
Accurate ecommerce tracking is essential when you’re running Meta Ads. A customer may view a product, add it to the cart, begin checkout, and eventually complete a purchase. Each of these actions can be captured as an ecommerce event and used for advertising, analytics, remarketing, and conversion measurement. A browser-only implementation, however, can lose some tracking signals because the browser environment is affected by privacy settings, ad blockers, cookies, JavaScript restrictions, and network conditions.
A more advanced setup combines:
Browser-side tracking with GTM
and
Server-side tracking with GTM
For Meta, this means using:
Meta Pixel + Meta Conversions API (CAPI)
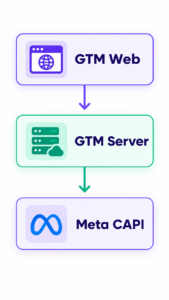
The architecture we’ll build in this tutorial is:

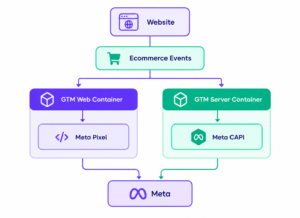
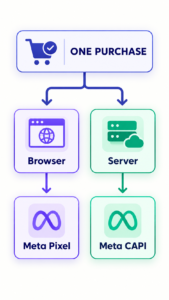
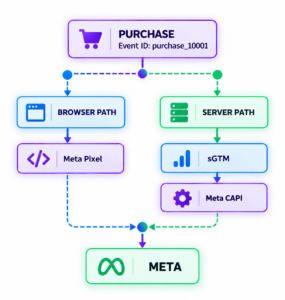
The most important part is that the browser and server versions of the same event use a matching event ID, allowing overlapping events to be deduplicated.
Google describes client-side and server-side Tag Manager as two complementary configurations: the web container runs in the browser, while the server container runs in a cloud environment and can process requests before sending them to third-party endpoints.
What You’ll Build
By the end of this guide, you’ll have a tracking architecture that can send ecommerce events through both browser and server-side tracking.
For example:
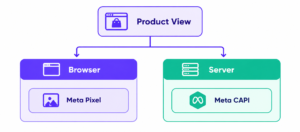
and
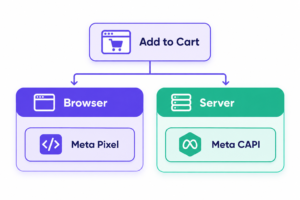
and:
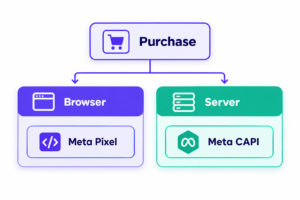
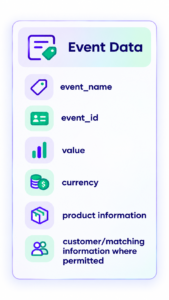
The final Purchase event should contain information such as:
What Is Browser-Side Tracking With GTM?
Browser-side tracking with GTM means your Google Tag Manager web container runs in the visitor’s browser and activates tracking tags when users perform actions.
The basic architecture is:
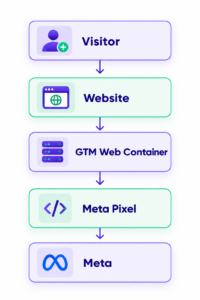
For example, a customer clicks Add to Cart.
GTM detects the ecommerce event and fires the Meta Pixel:
AddToCart
The browser then sends that event to Meta.
What Is Server-Side Tracking With GTM?
Server-side tracking with GTM moves part of the tracking process into a server container.
Instead of having every advertising tag execute directly in the browser, the architecture becomes:
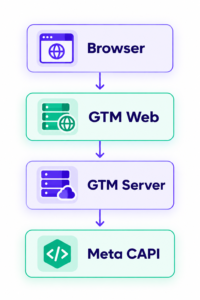
Google’s server-side GTM documentation describes the server container as an intermediary that can receive HTTP requests, process them, and route data to analytics and advertising endpoints.
This gives you greater control over what data is processed and sent to external platforms.
What Is the Difference Between Browser-Side and Server-Side Tracking?
| Feature | Browser-Side Tracking With GTM | Server-Side Tracking With GTM |
|---|---|---|
| Container | Web container | Server container |
| Runs in | Visitor’s browser | Cloud/server environment |
| Meta technology | Meta Pixel | Meta CAPI |
| JavaScript dependency | Higher | Lower |
| Data processing | Browser | Server |
| Can send ecommerce events | Yes | Yes |
| Can work together | Yes | Yes |
| Requires deduplication when same event is sent through both | Yes | Yes |
For this reason, we’re not replacing browser tracking.
We’re building a hybrid tracking architecture.
Before You Start
You’ll need:
1. Google Tag Manager
Create or access your GTM account here:
You need a Web container.
2. Meta Business Manager
You’ll need access to Meta Events Manager.
3. Meta Pixel/Dataset
You’ll need the Pixel/Dataset ID used by your website.
4. Server-Side GTM
You need a GTM Server container and a server environment.
Google currently supports automatic deployment of a server-side tagging server using Cloud Run.
5. Ecommerce Event Data
GTM needs a source of ecommerce event data.
For a normal website this can come from a properly implemented dataLayer.
For Shopify, use Shopify’s supported customer-event/Web Pixels architecture or an appropriate tracking integration to generate the ecommerce events. Shopify currently documents standard events such as product_viewed, product_added_to_cart, checkout_started, and checkout_completed.
The Complete Tracking Architecture
Before configuring anything, understand the data flow.
We’ll create this:
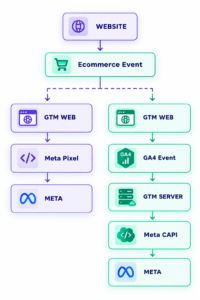
For an ecommerce Purchase:
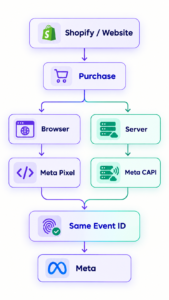
This is what allows you to combine browser-side tracking with server-side tracking.
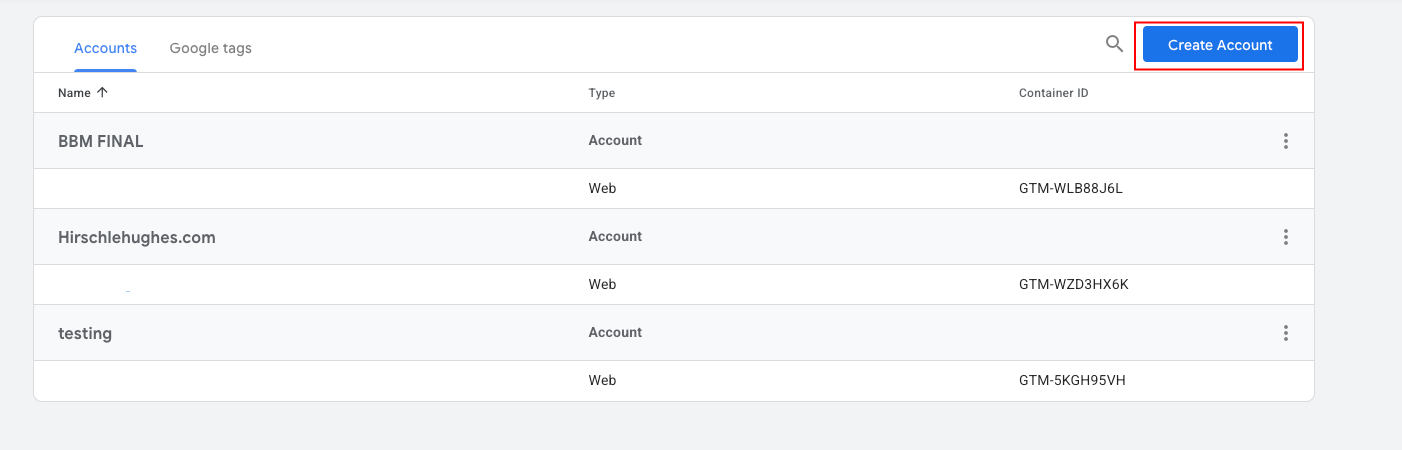
Step 1: Create Your GTM Web Container
Go to:
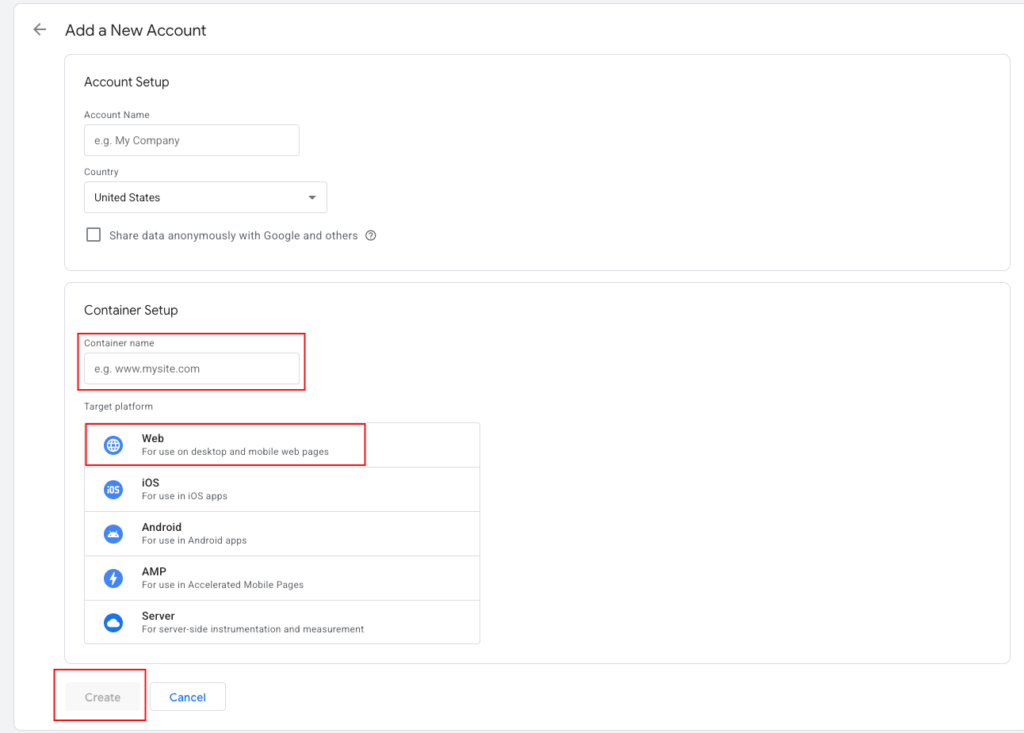
Then:
- Sign in.
- Select your account.
- Click Create Container if you don’t already have one.
- Enter your website name.
- Select Web as the target platform.
- Click Create.
Your container ID will look similar to
GTM-XXXXXXX
Step 2: Install the GTM Web Container
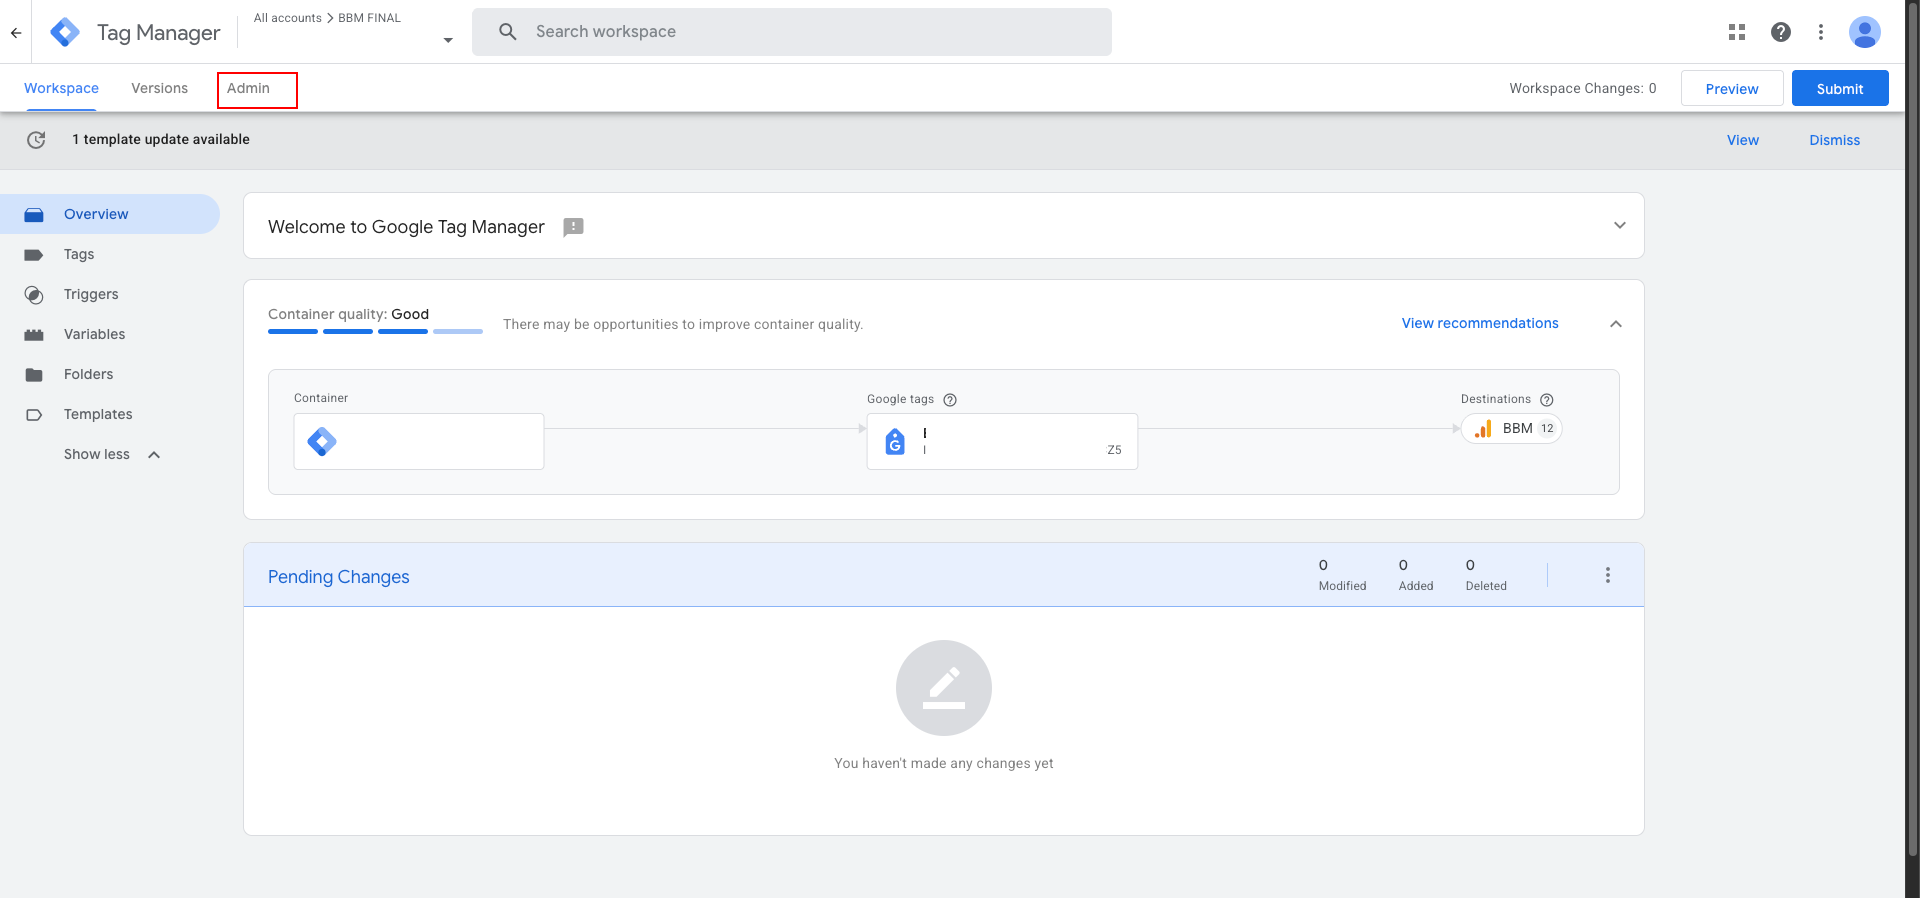
Open your GTM Web container.
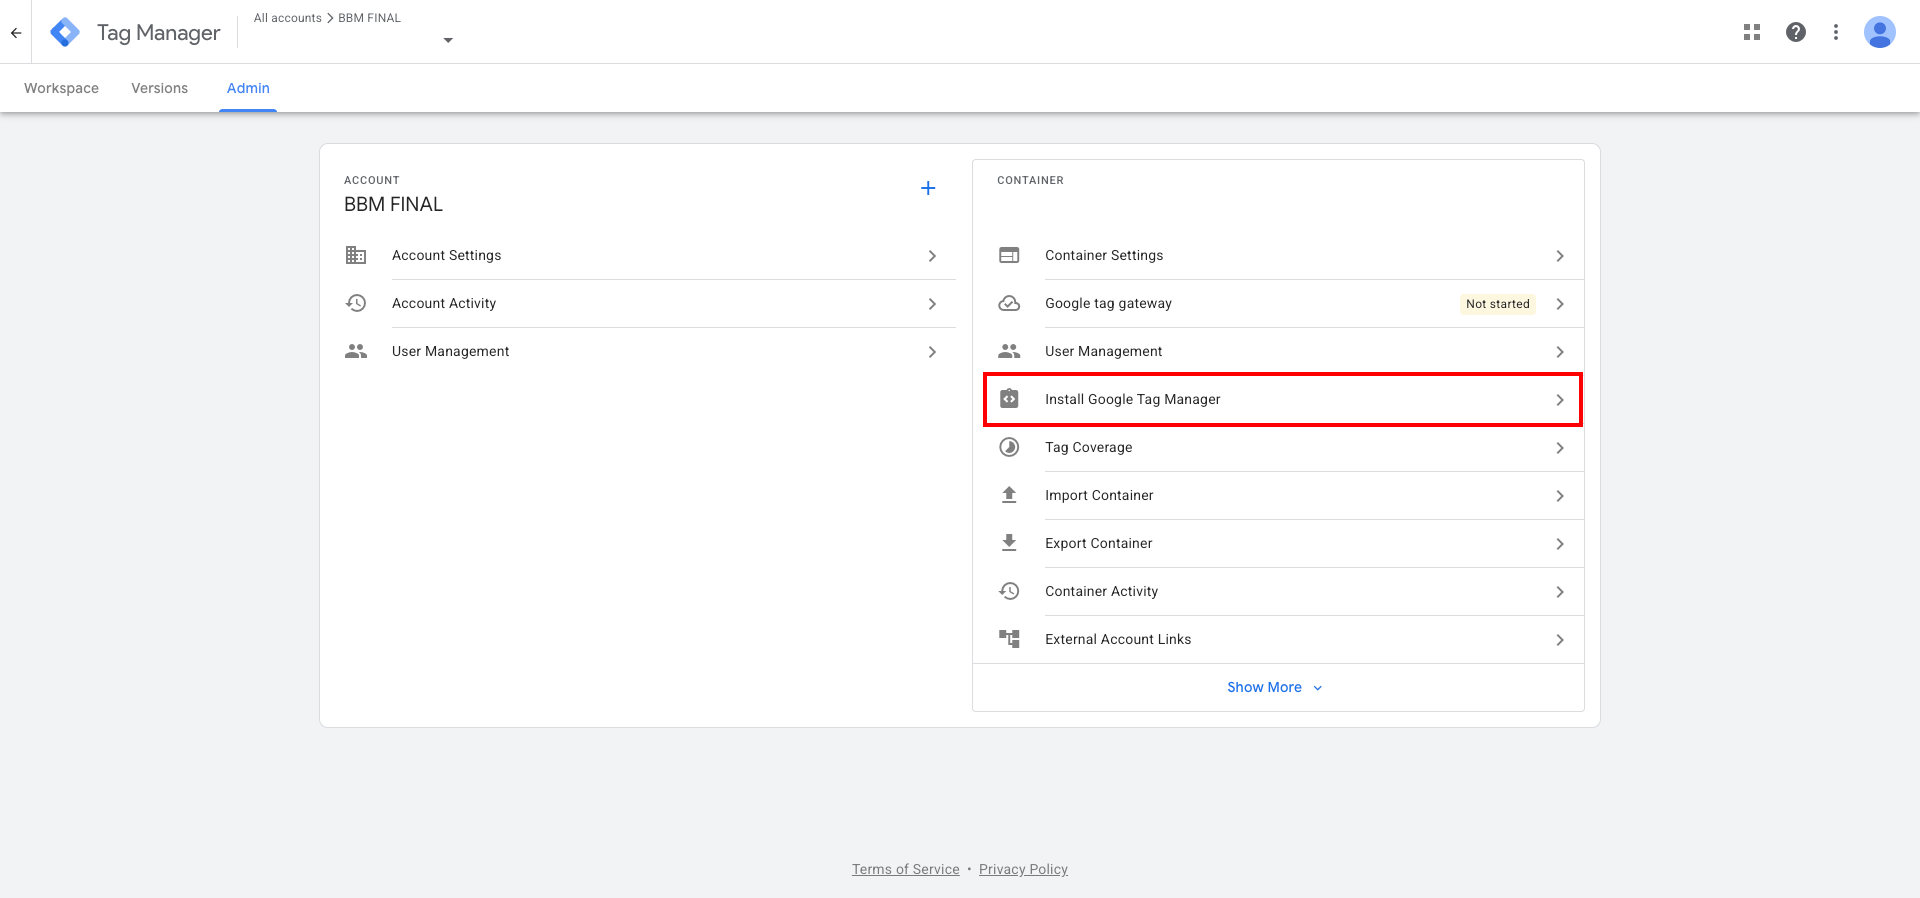
Click:
Admin → Install Google Tag Manager
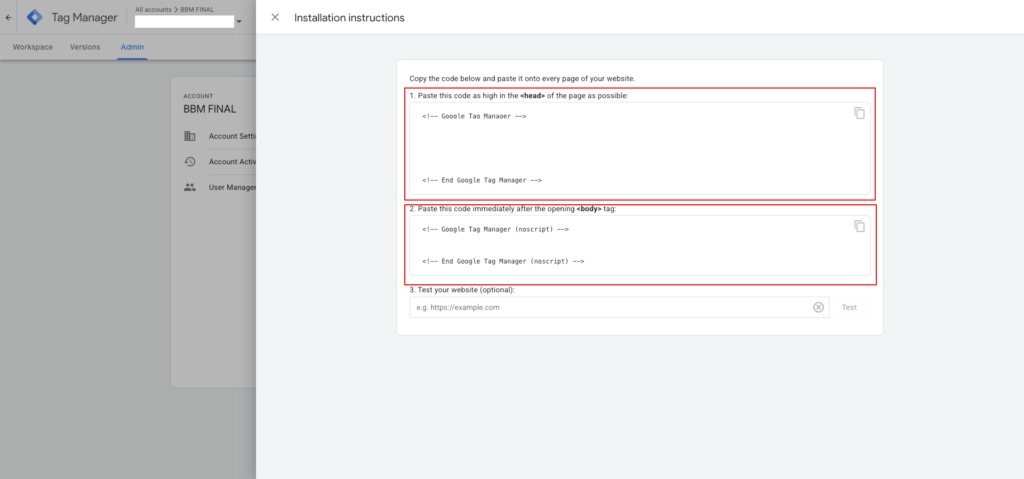
GTM will provide two pieces of code.
One belongs in the <head> section and another immediately after the opening <body> tag.
Google’s current installation documentation recommends installing the Web container code on your website before configuring tags.
For Shopify or another managed platform, use the platform’s supported method for installing the GTM/Web Pixel integration rather than blindly inserting JavaScript into restricted checkout surfaces.
Step 3: Verify That GTM Is Installed
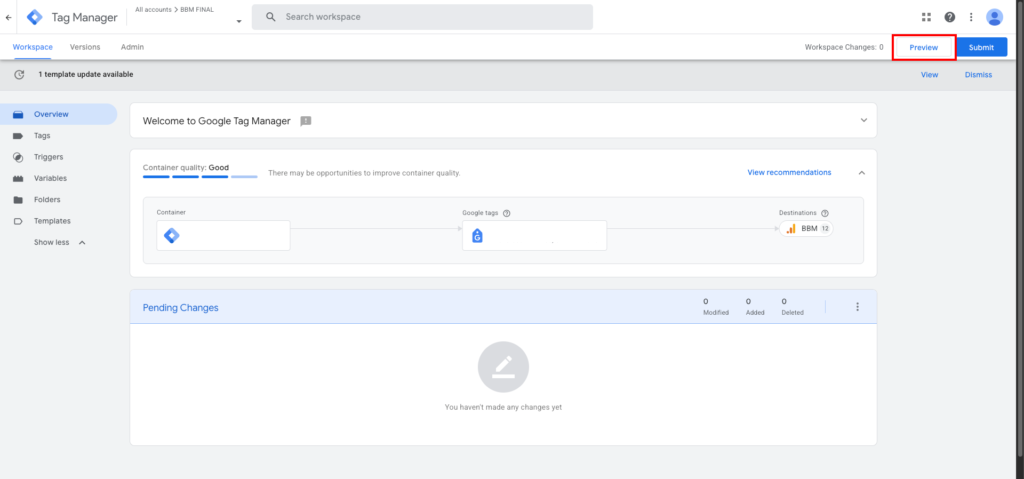
Go back to your GTM Web container.
Click:
Preview
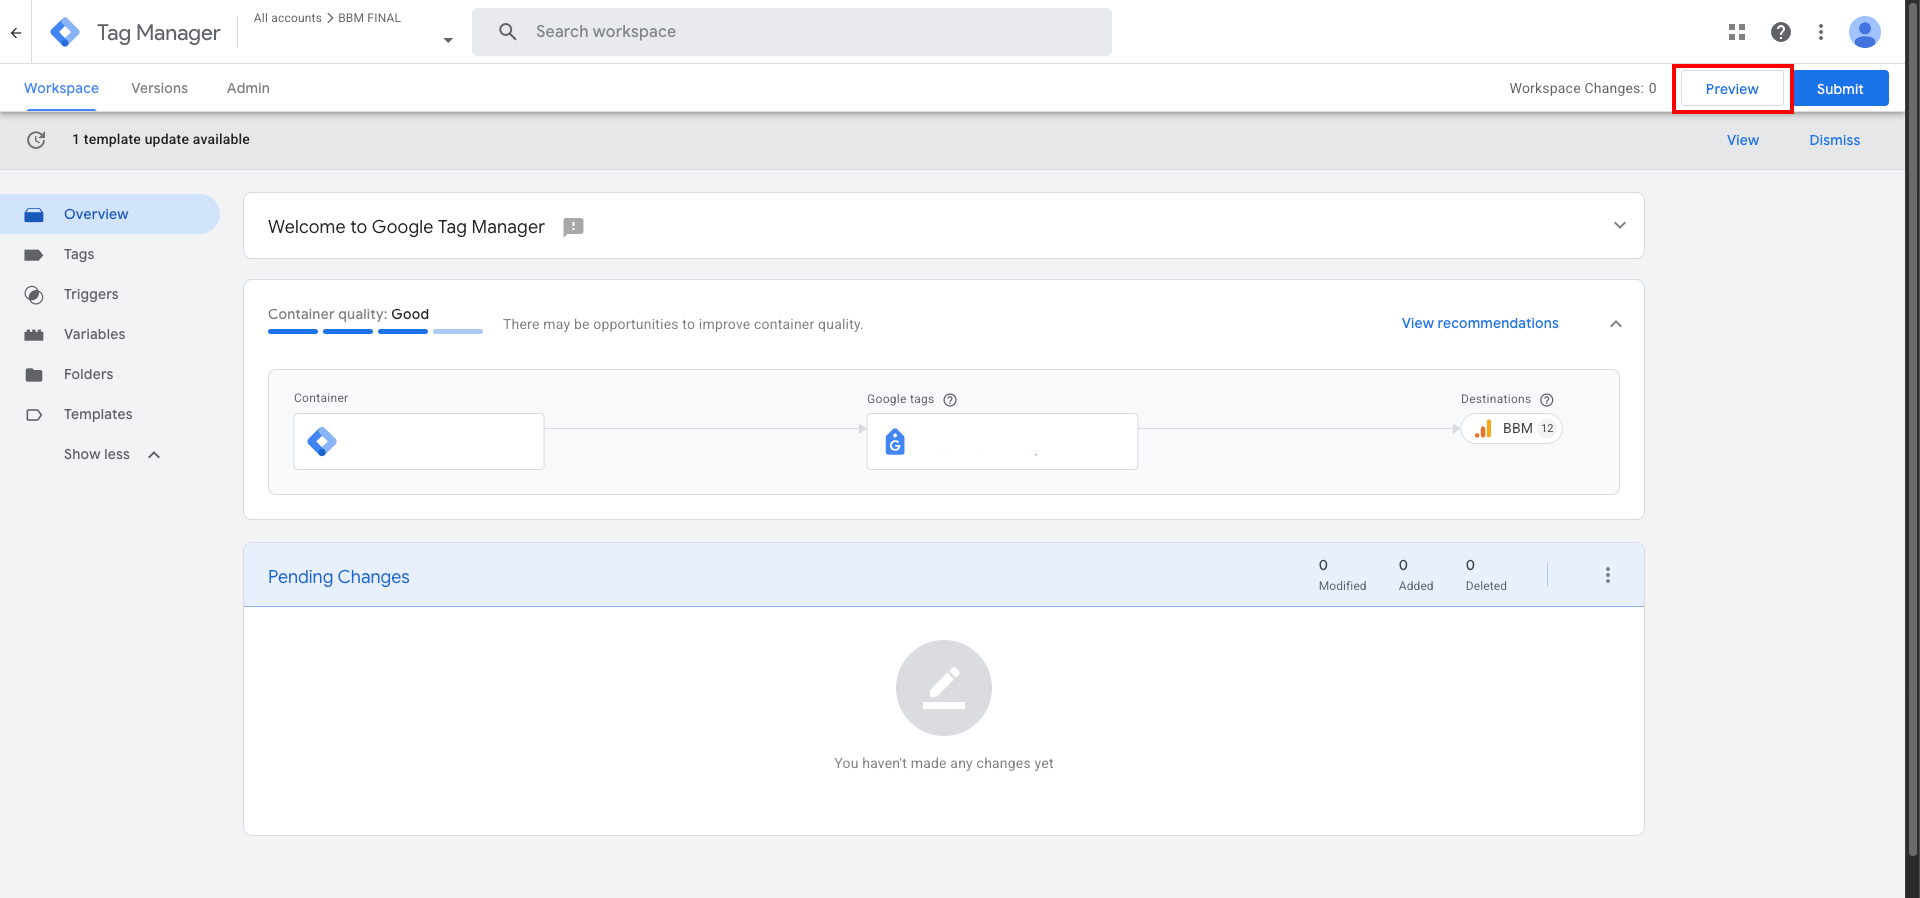
Google Tag Assistant will open.
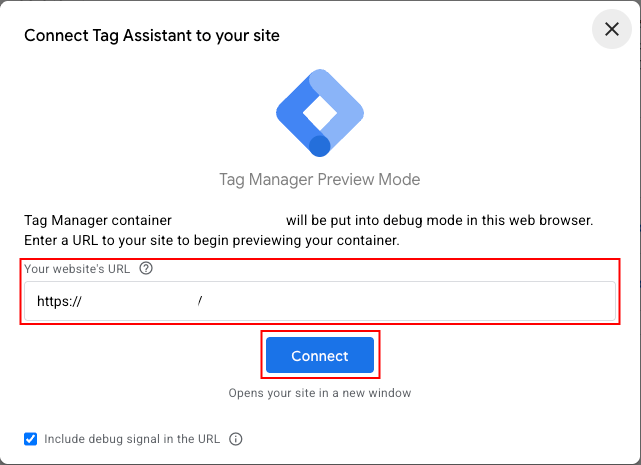
Enter your website URL.
Click:
Connect
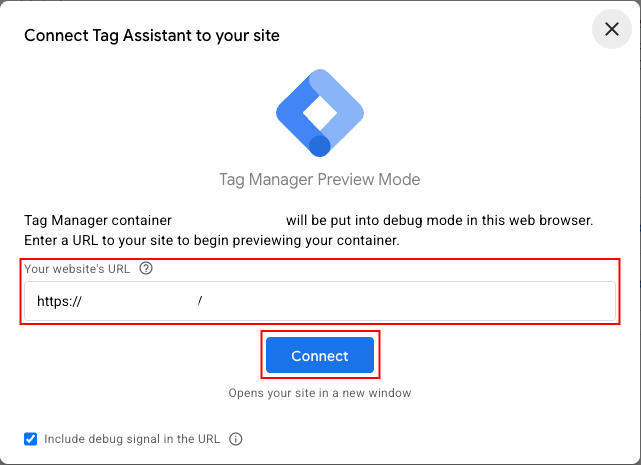
Your website should open with Tag Assistant connected.
Google’s current preview workflow is Workspace → Preview → enter website URL → Connect.
If your GTM container does not appear, stop here and fix the GTM installation before creating Meta tags.
Step 4: Create Your Meta Pixel
Open:
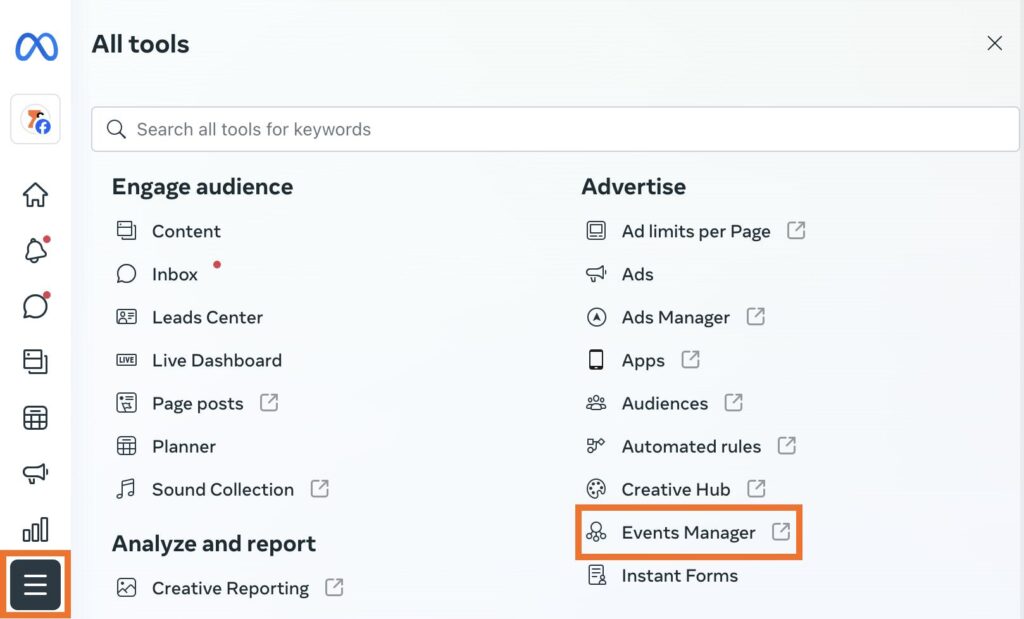
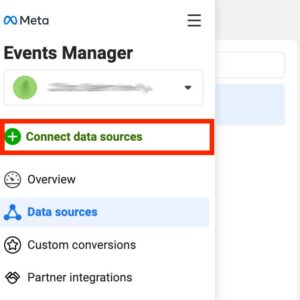
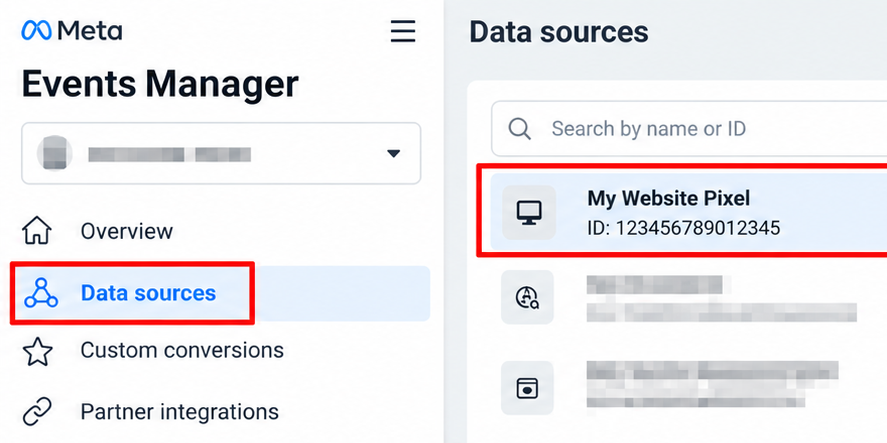
Then go to your data sources.
Depending on Meta’s current interface, look for:
Connect Data Sources
or the equivalent option for creating a web data source.
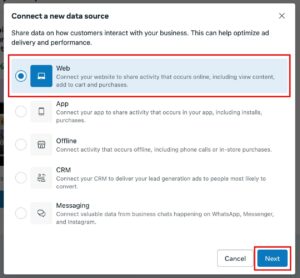
Select:
Web
Create or select your dataset/Pixel.
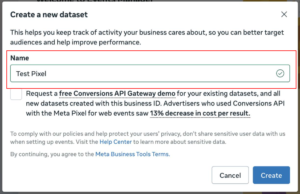
Copy the Pixel/Dataset ID.
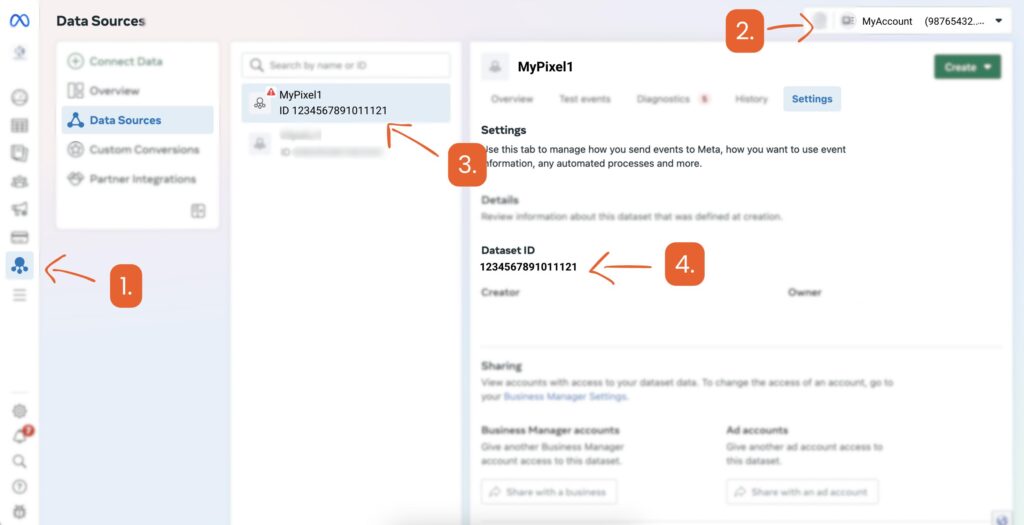
It will look similar to:
123456789012345
Keep this ID available.
Step 5: Create the Meta Pixel Base Tag in GTM
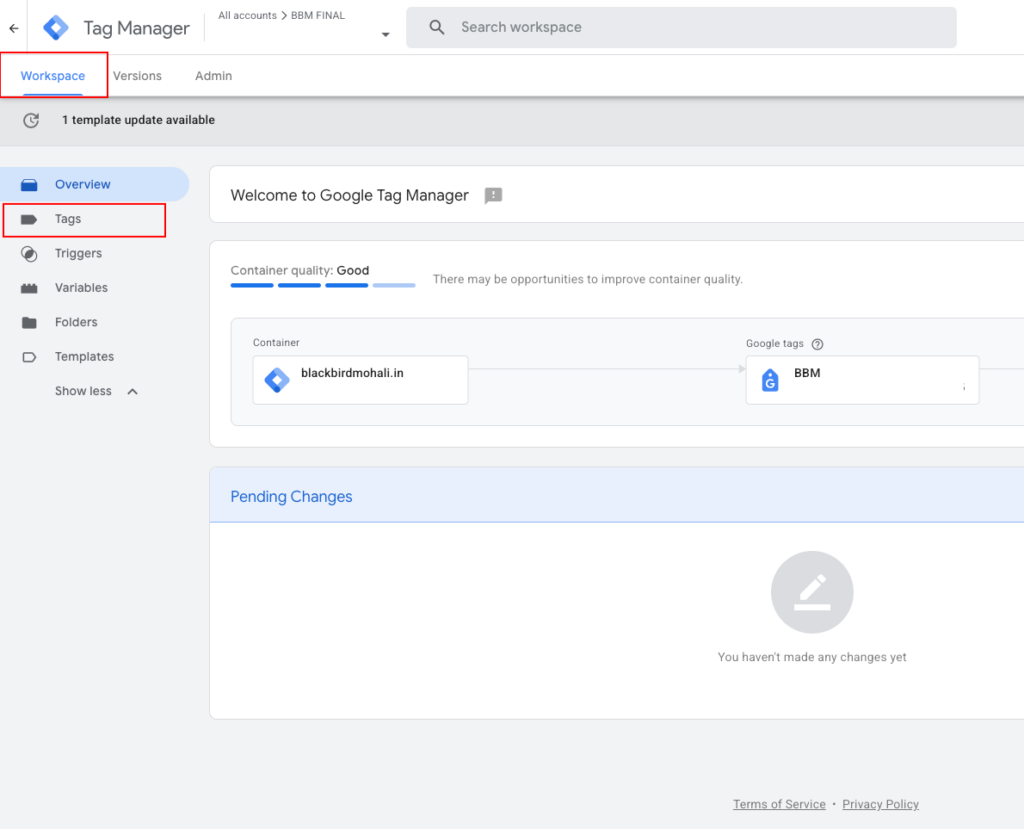
Go back to:
Google Tag Manager → Web Container → Workspace → Tags
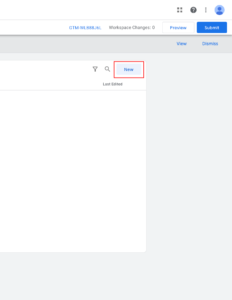
Click:
New
Name the tag:
Meta Pixel - Base Code
Click:
Tag Configuration
Choose:
Custom HTML
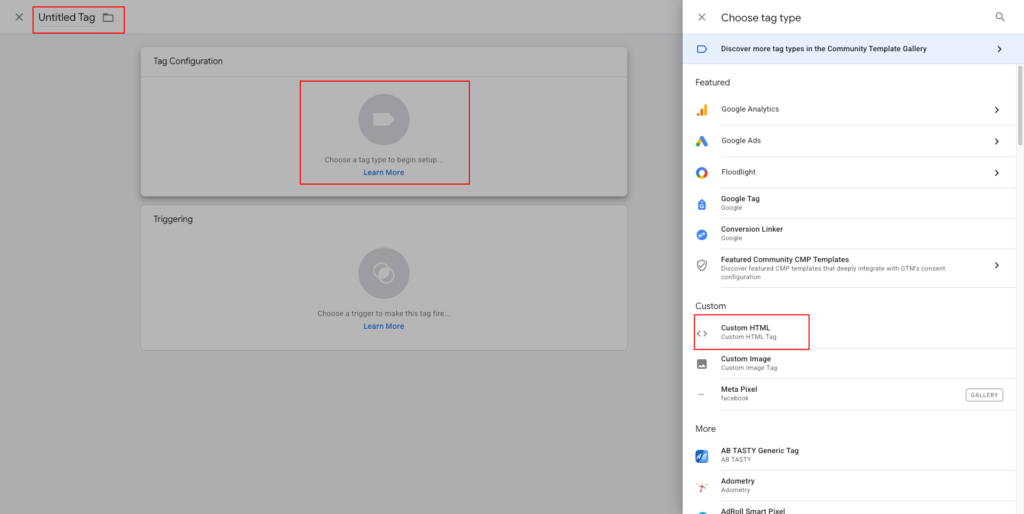
Paste your Meta Pixel base code supplied by Meta.
A typical base implementation follows the Meta Pixel pattern:
!function(f,b,e,v,n,t,s)
{if(f.fbq)return;n=f.fbq=function(){n.callMethod?
n.callMethod.apply(n,arguments):n.queue.push(arguments)};
if(!f._fbq)f._fbq=n;n.push=n;n.loaded=!0;n.version='2.0';
n.queue=[];t=b.createElement(e);t.async=!0;
t.src=v;s=b.getElementsByTagName(e)[0];
s.parentNode.insertBefore(t,s)}(window, document,'script',
'https://connect.facebook.net/en_US/fbevents.js');

fbq('init', 'YOUR_PIXEL_ID');

fbq('track', 'PageView');
Replace:
YOUR_PIXEL_ID
with your actual Meta Pixel ID.
For production, use the current implementation provided through your Meta Events Manager setup rather than copying an outdated snippet from another website.
Step 6: Create the All Pages Trigger
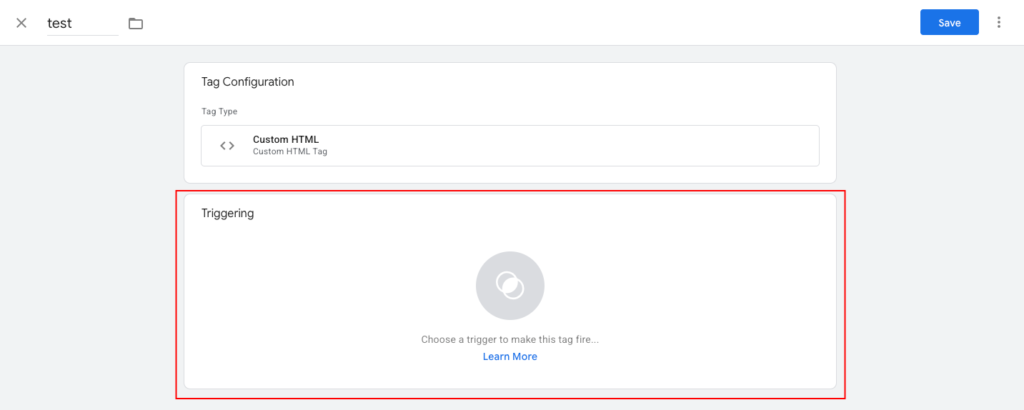
Inside the Meta Pixel Base tag:
Go to:
Triggering → All Pages
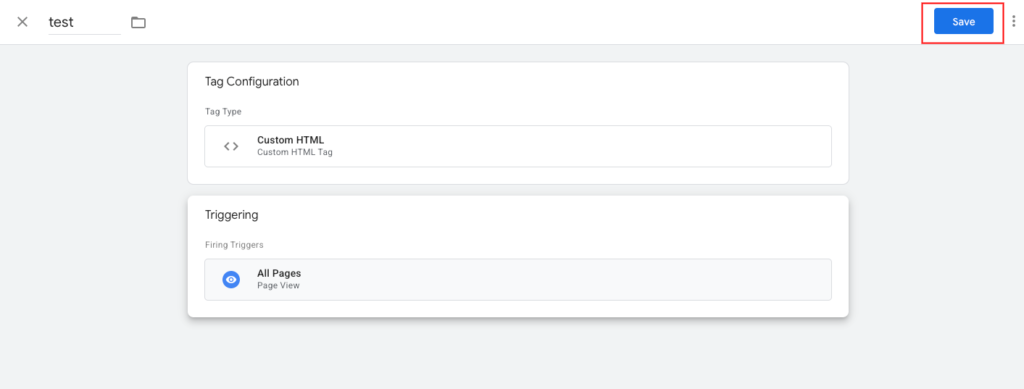
Click:

Save
Your configuration should now be:
Tag:
Meta Pixel - Base Code

Trigger:
All Pages
Click:
Submit → Publish
But before publishing a production implementation, use Preview mode to test it.
Google recommends verifying tags in Preview before publishing them.
Step 7: Create Your Ecommerce Data Layer
This is one of the most important parts of the entire implementation.
GTM doesn’t magically know when someone adds a product to a cart or completes a purchase.
You need an event/data source.
A common ecommerce data layer event looks like:
dataLayer.push({
  event: 'add_to_cart',
  ecommerce: {
    currency: 'USD',
    value: 99.00,
    items: [
      {
        item_id: 'SKU-1001',
        item_name: 'Product Name',
        price: 99.00,
        quantity: 1
      }
    ]
  }
});
A Purchase event can look like:
dataLayer.push({
  event: 'purchase',
  ecommerce: {
    transaction_id: '10001',
    currency: 'USD',
    value: 199.00,
    items: [
      {
        item_id: 'SKU-1001',
        item_name: 'Product Name',
        price: 199.00,
        quantity: 1
      }
    ]
  }
});
The exact data layer implementation depends on your ecommerce platform.
For Shopify, Shopify’s Web Pixels API currently provides standard customer events including product views, cart additions, checkout starts, and checkout completion.
Step 8: Turn On GTM Data Layer Variables
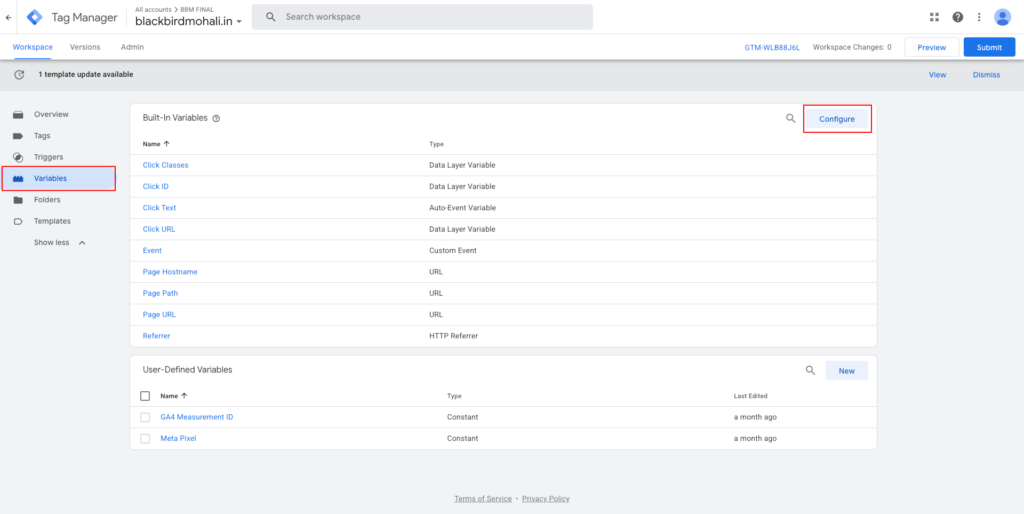
Go to:
Variables → Configure
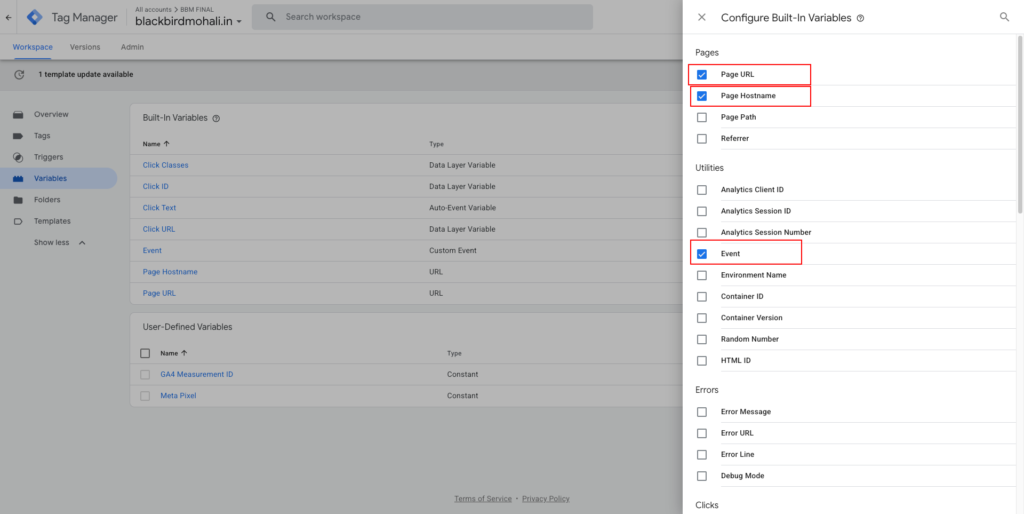
Enable useful built-in variables such as:
Event
Page URL
Page Hostname
Then create your ecommerce variables.
Click:
Variables → New
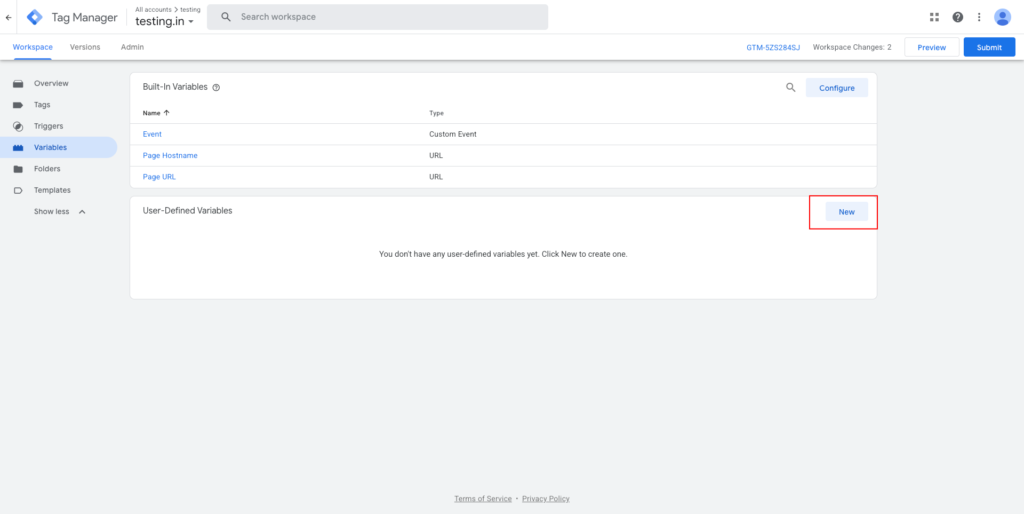
Choose:
Data Layer Variable
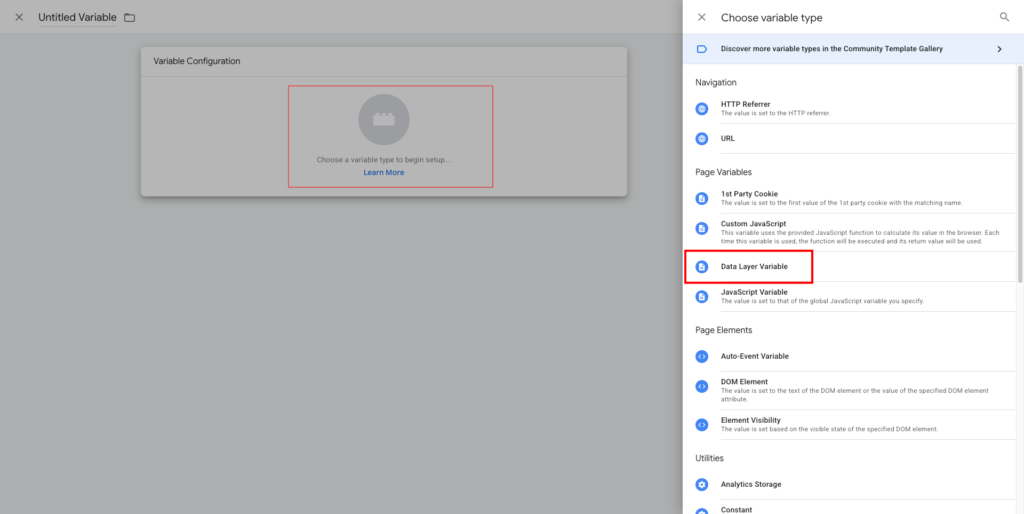
Create:
DLV - ecommerce.value
Set:
Data Layer Variable Name:
ecommerce.value
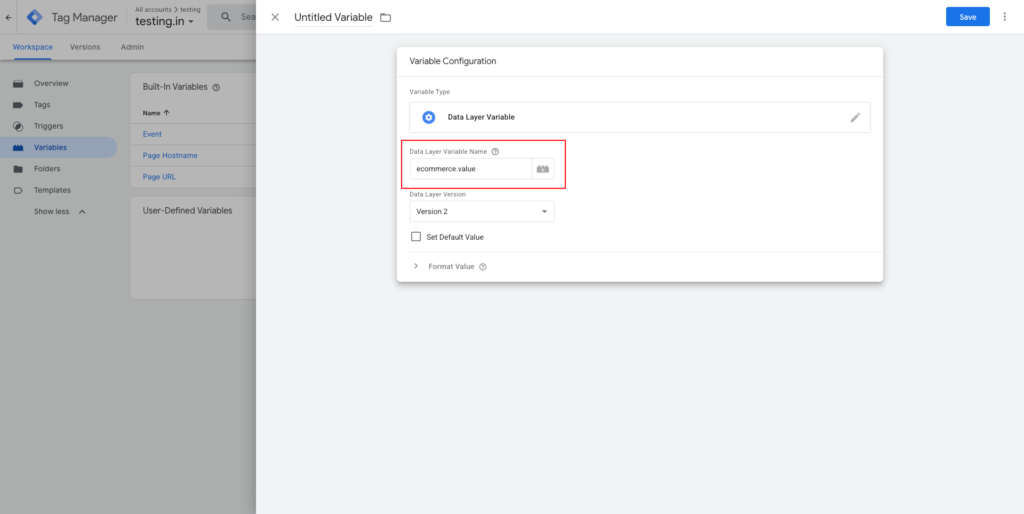
Create additional variables:
DLV - ecommerce.currency
DLV - ecommerce.transaction_id
DLV - ecommerce.items
These variables will later be used by your Meta browser events and your server-side events.
Step 9: Create an Event ID
This is critical.
When the same ecommerce event is sent through Meta Pixel and Meta CAPI, both versions need a reliable way to refer to the same underlying event.
For example:
Browser:
Purchase
eventID = purchase_10001

Server:
Purchase
event_id = purchase_10001
Don’t generate one random value for the browser and another random value for the server.
Instead, create one event identifier at the point where the ecommerce event is generated and carry it through the tracking architecture.
For purchases, an order/transaction identifier can often be a useful foundation, but don’t blindly reuse an identifier where multiple events from the same transaction require unique IDs.
Step 10: Add Event ID to Your Ecommerce Data
Your data layer can contain:
dataLayer.push({
  event: 'purchase',

  event_id: 'purchase_10001',

  ecommerce: {
    transaction_id: '10001',
    currency: 'USD',
    value: 199.00,

    items: [
      {
        item_id: 'SKU-1001',
        quantity: 1,
        price: 199.00
      }
    ]
  }
});
Create another GTM variable:
Variables → New → Data Layer Variable
Use:
Data Layer Variable Name:
event_id
Name it:
DLV - event_id
Step 11: Create the Meta Browser AddToCart Event
Go to:
Tags → New
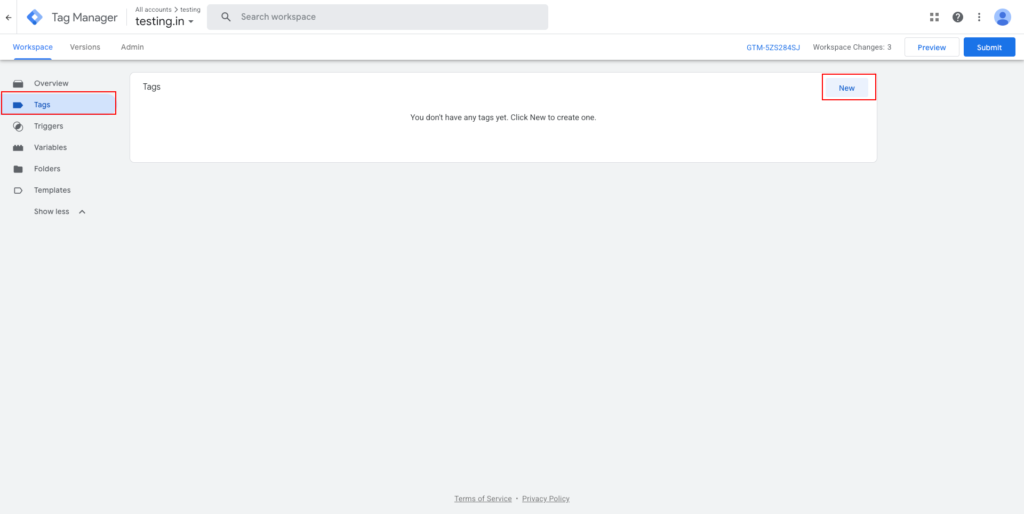
Name:
Meta Pixel - AddToCart
Choose:
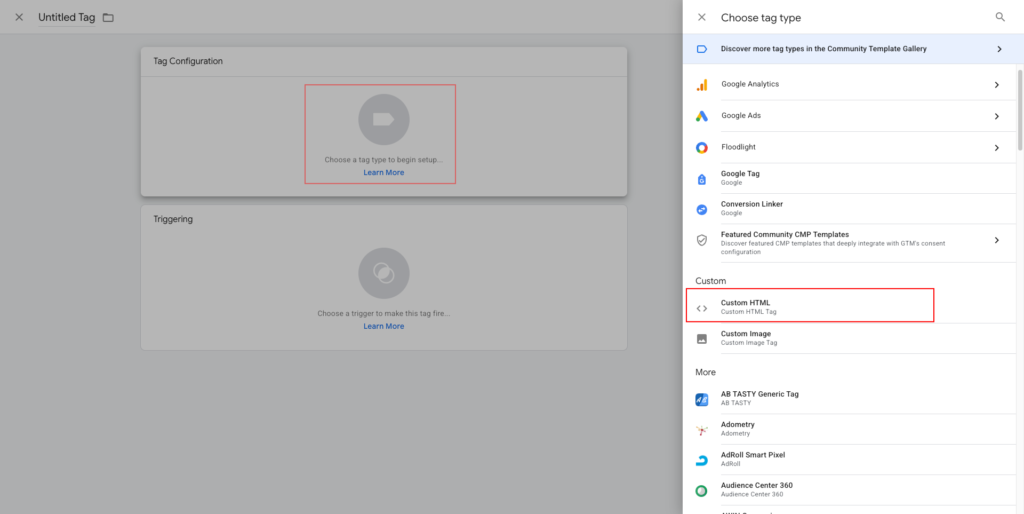
Custom HTML
Use:
<script>
fbq('track', 'AddToCart', {
  value: {{DLV - ecommerce.value}},
  currency: '{{DLV - ecommerce.currency}}'
}, {
  eventID: '{{DLV - event_id}}'
});
</script>
Replace the variables with the exact GTM variables you created.
Step 12: Create the AddToCart Trigger
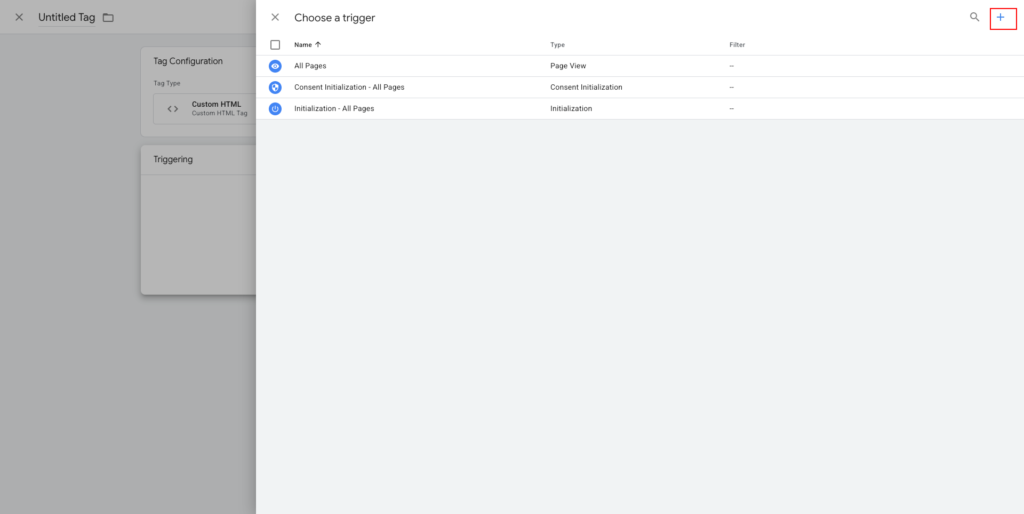
Go to:
Triggering → New
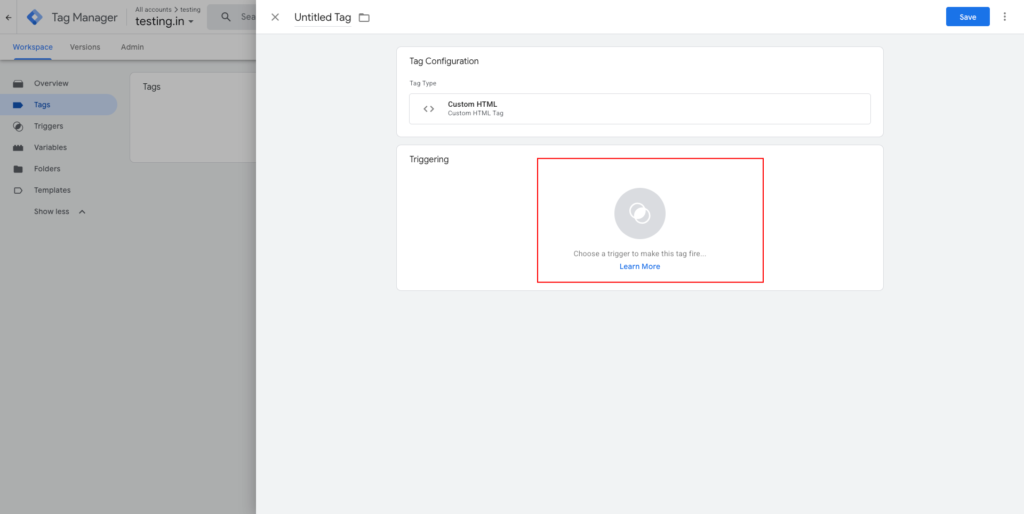
Select:
Custom Event
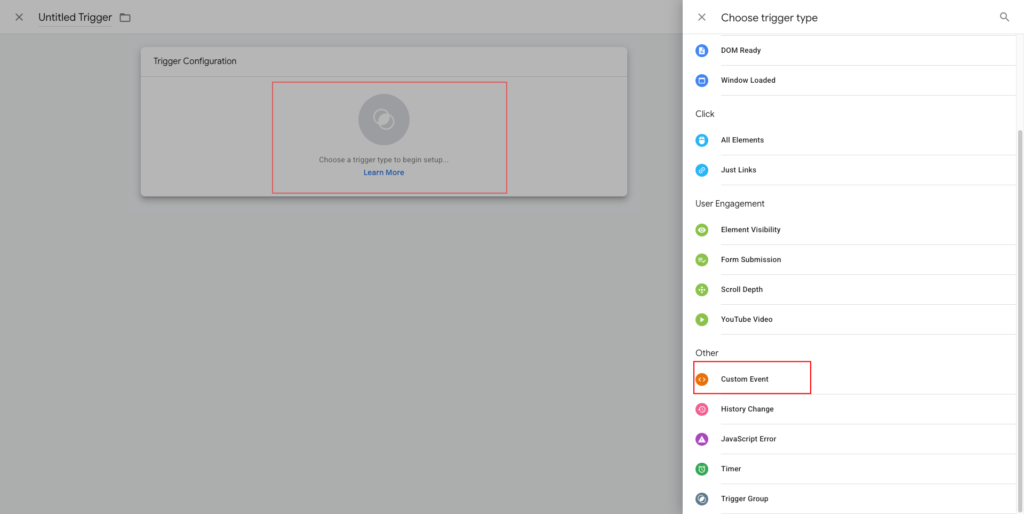
Configure:
Event name:
add_to_cart
Name the trigger:
CE - add_to_cart
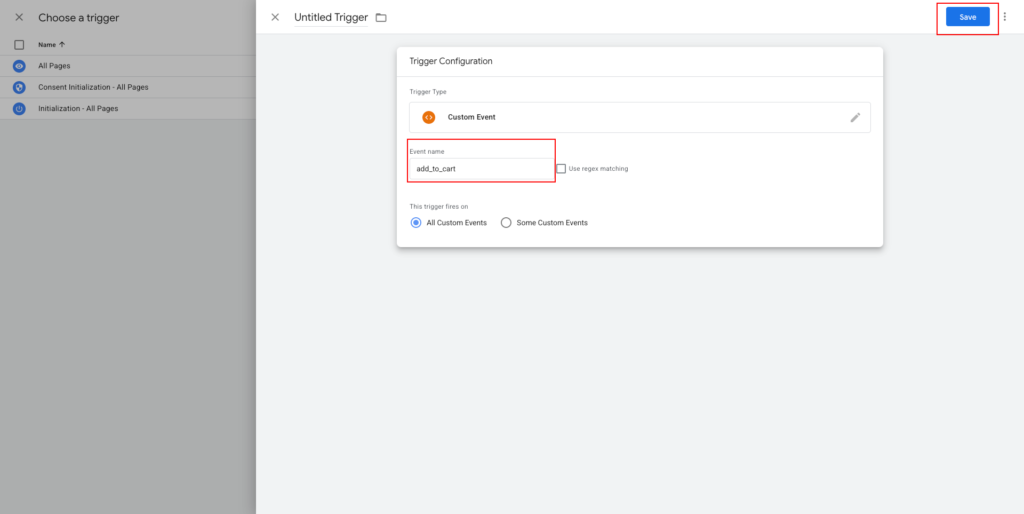
Click:
Save
Your browser tag is now:
Meta Pixel - AddToCart

Trigger:
CE - add_to_cart
Step 13: Create the Meta Browser Purchase Event
Create another tag:
Tags → New
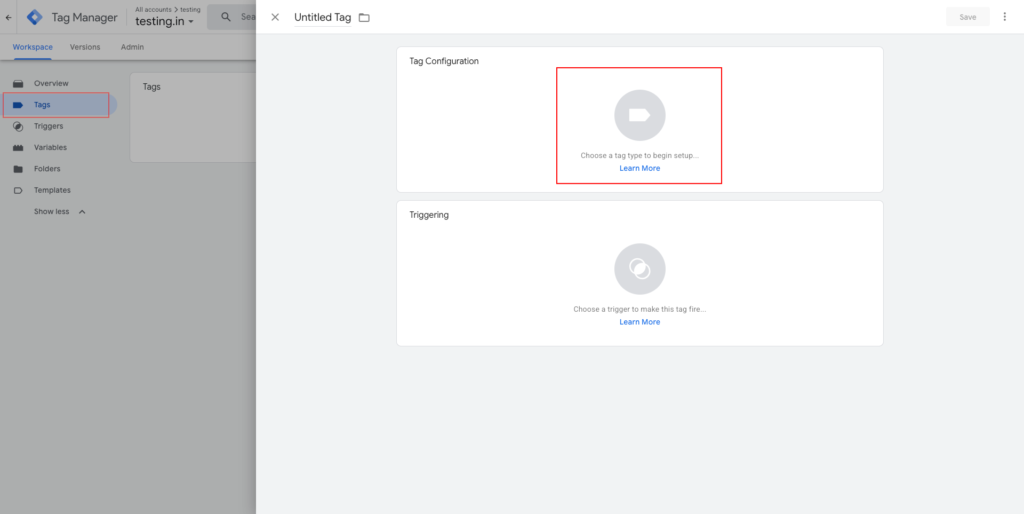
Name:
Meta Pixel - Purchase
Choose:
Custom HTML
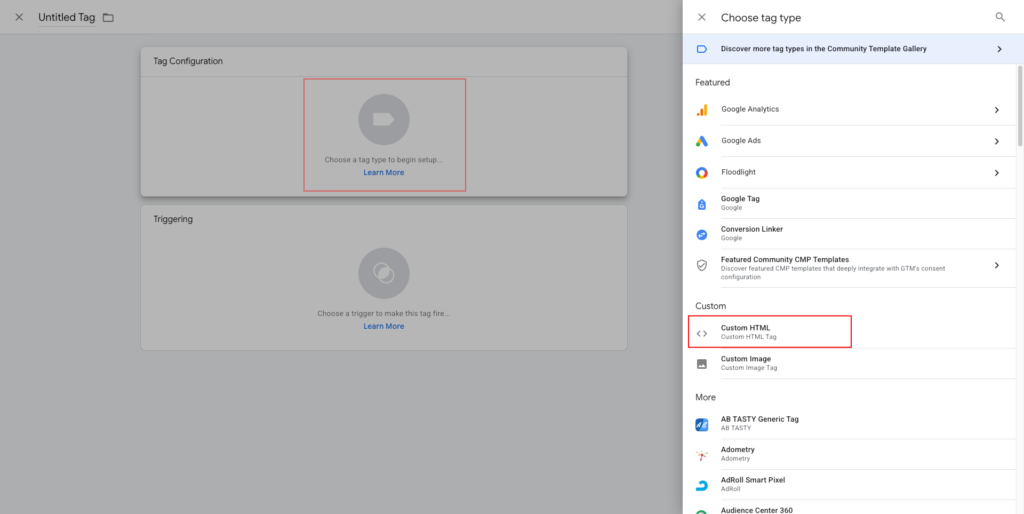
Use:
<script>
fbq('track', 'Purchase', {
  value: {{DLV - ecommerce.value}},
  currency: '{{DLV - ecommerce.currency}}'
}, {
  eventID: '{{DLV - event_id}}'
});
</script>
Then create:
Trigger → Custom Event
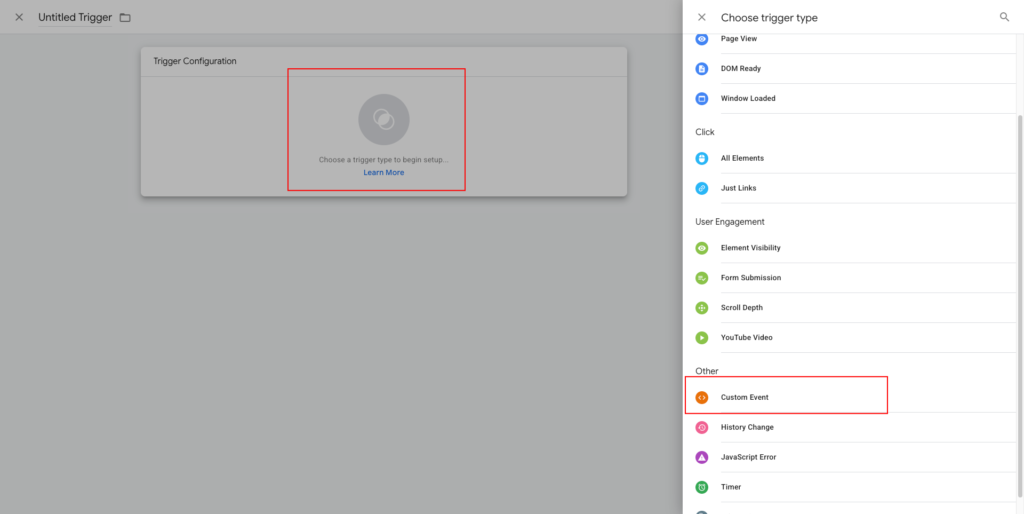
Set:
Event name:
purchase
Name:
CE - purchase
Your browser Purchase tag is now connected to the ecommerce purchase event.
Step 14: Create ViewContent and InitiateCheckout
Repeat the same process for other ecommerce events.
ViewContent
Browser event:
fbq('track', 'ViewContent', {
  value: {{DLV - ecommerce.value}},
  currency: '{{DLV - ecommerce.currency}}'
}, {
  eventID: '{{DLV - event_id}}'
});
Trigger:
Custom Event
product_viewed
The event name depends on your ecommerce data source. Shopify currently uses product_viewed as its standard customer event.
InitiateCheckout
Browser event:
fbq('track', 'InitiateCheckout', {
  value: {{DLV - ecommerce.value}},
  currency: '{{DLV - ecommerce.currency}}'
}, {
  eventID: '{{DLV - event_id}}'
});
Trigger:
Custom Event
begin_checkout
or your site’s actual checkout event.
Step 15: Test Browser-Side Tracking
In GTM:
Workspace → Preview
Connect your website.
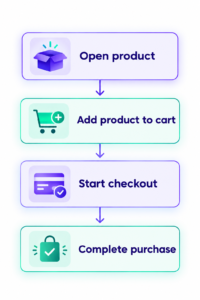
Then perform these actions:
In Tag Assistant, click each event.
Check:
Meta Pixel - AddToCart
Meta Pixel - ViewContent
Meta Pixel - Purchase
Each should show:
Fired
Also verify that your variables contain the expected values.
For Purchase, you should see something like:
event_id = purchase_10001
value = 199
currency = USD
Now Build Server-Side Tracking With GTM
The browser-side portion is working.
Now we’ll create:
Step 16: Create a GTM Server Container
Go to:
Open your GTM account.
Create a new container.
Depending on the current interface:
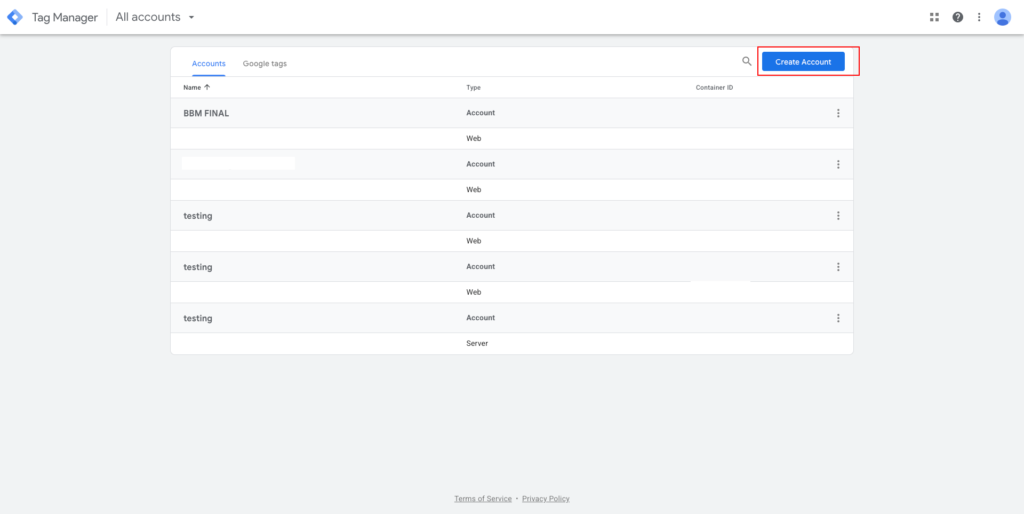
Account → Create Container
Enter a name such as:
My Website - Server
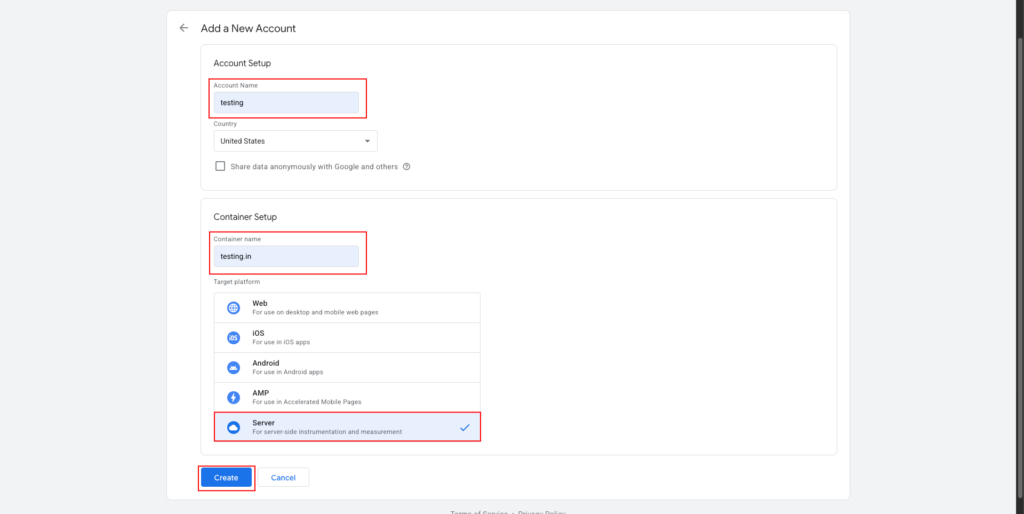
For target platform choose:
Server
Click:
Create
Google’s current server-side setup uses a separate Server container from your Web container.
Step 17: Deploy the Server Container
Google currently provides automatic Cloud Run provisioning.
On the server-container setup screen, select:
Automatically provision tagging server
Then select or create the required Google Cloud billing configuration.
Click:
Create Server
Google’s current Cloud Run setup guide documents this automatic provisioning flow and states that the resulting server is deployed on Cloud Run.
Important: Testing vs Production
The automatically provisioned server is initially intended for testing.
Google notes that the default deployment is configured for limited traffic and that live traffic may require additional capacity and production configuration.
Don’t treat the first Cloud Run deployment as the final production architecture for a high-traffic store.
Step 18: Get Your Server Container URL
Open your Server container.
Go to:
Admin → Container Settings
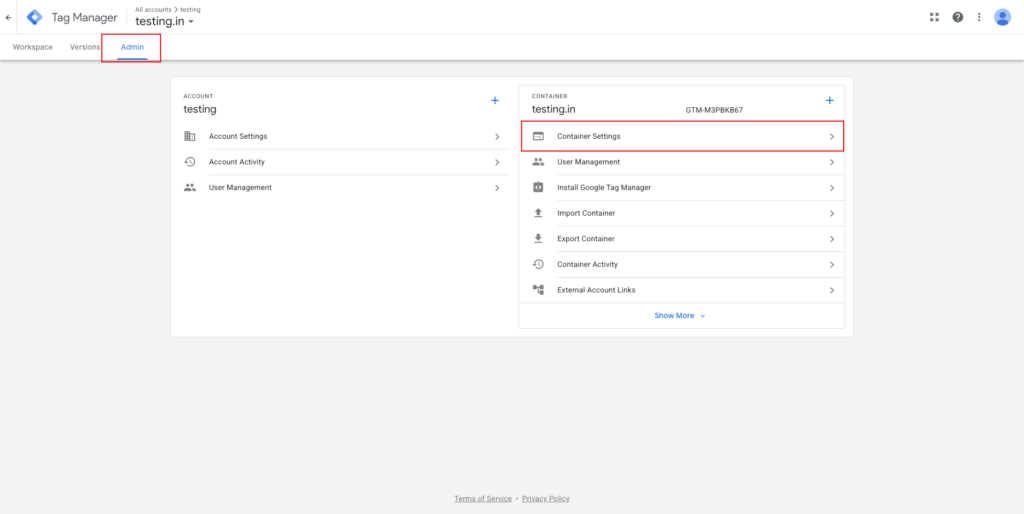
You should see your server container URL.
For example:
https://your-project-region.a.run.app
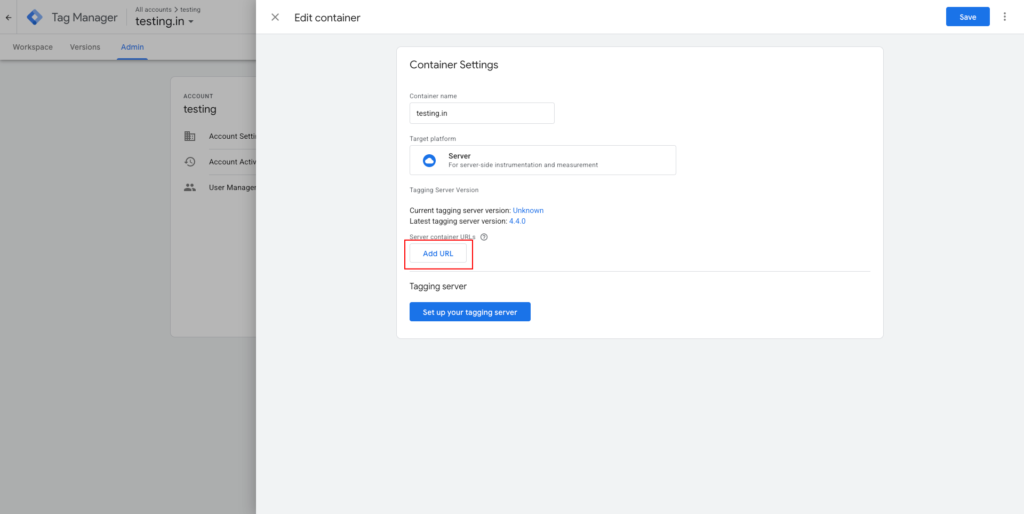
Google documents adding the tagging server URL under:
Admin → Container Settings → Add URL.
Step 19: Use a First-Party Tracking Domain
For production, consider using a subdomain such as:
https://analytics.example.com
or:
https://track.example.com
instead of relying only on the default Cloud Run run.app URL.
Google’s server-side tagging documentation recommends configuring a custom domain for the tagging server; it can also enable more controlled first-party cookie behavior.
Your exact DNS configuration depends on your hosting/provider setup.
Step 20: Connect Your Web Container to the Server Container
There are multiple ways to send data from GTM Web to GTM Server.
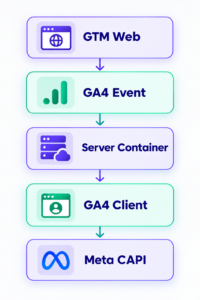
One common method is to use GA4 as the transport layer.
The architecture is:
Google supports sending data to a Tag Manager server container by configuring the server container URL in the Google tag.
Step 21: Configure the Google Tag
Open your Web container.
Go to:
Tags → New
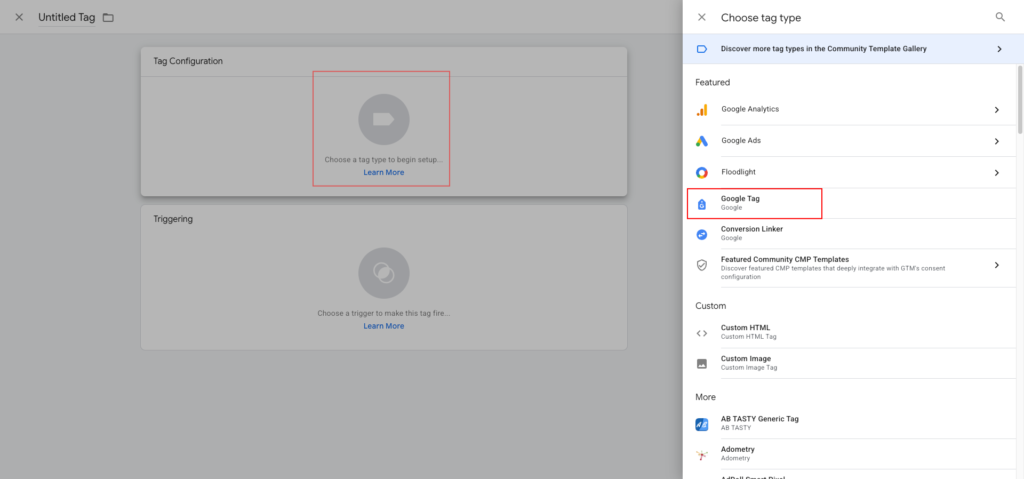
Select:
Google tag
Set your appropriate Google tag ID.
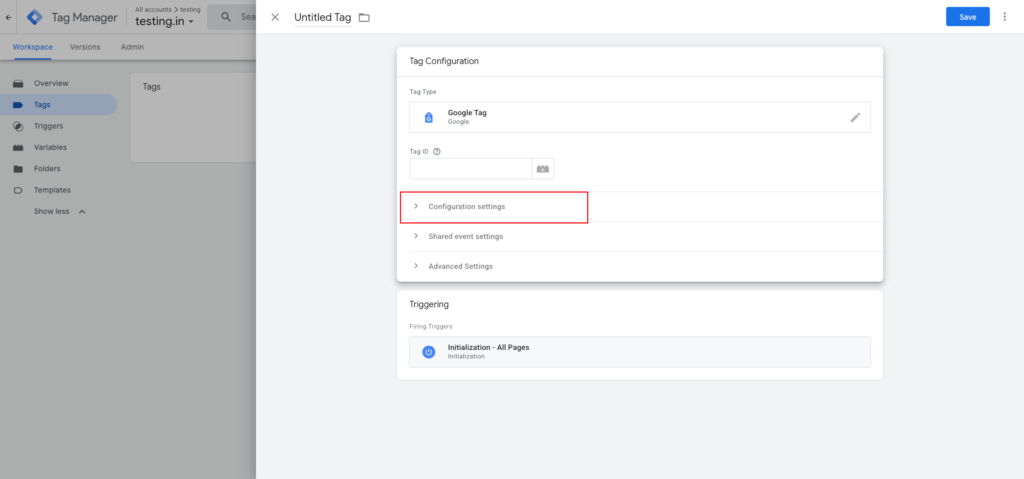
Then open:
Configuration settings
Add:
Parameter name:
server_container_url
Set the value to:
https://analytics.example.com
Replace this with your actual server-side GTM URL.
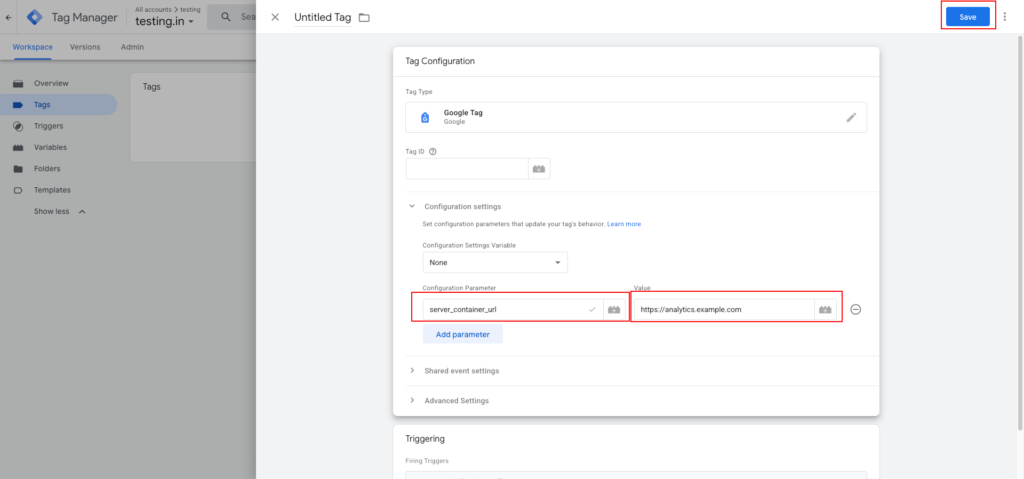
Google documents server_container_url as the configuration parameter used to send Google measurement traffic to the server container.
Step 22: Create Ecommerce GA4 Events
Now create the corresponding ecommerce events in your Web container.
For example:
Tags → New
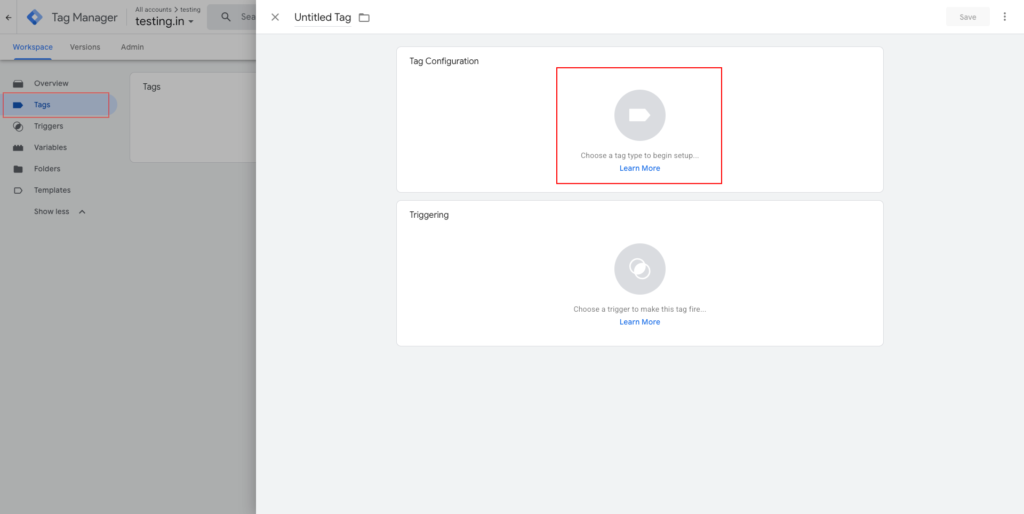
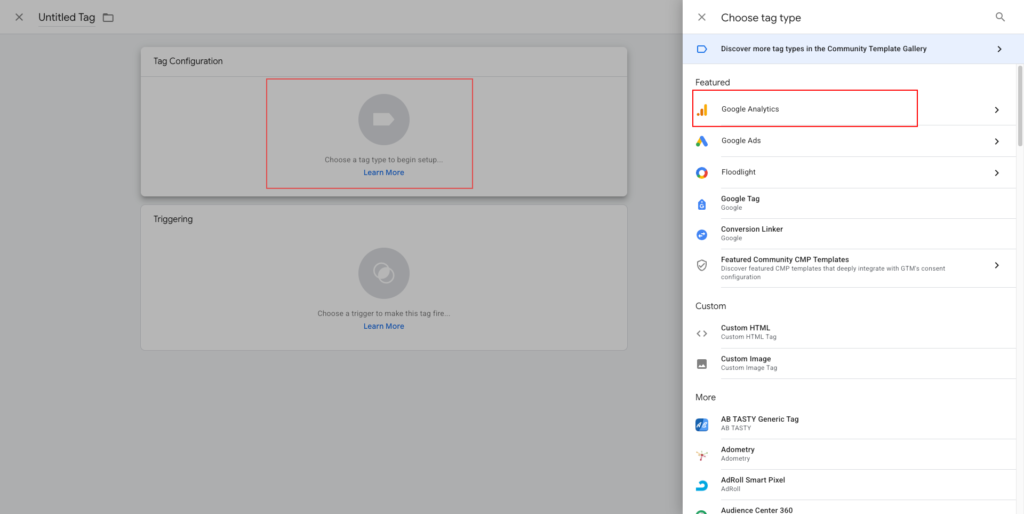
Choose:
Google Analytics: GA4 Event
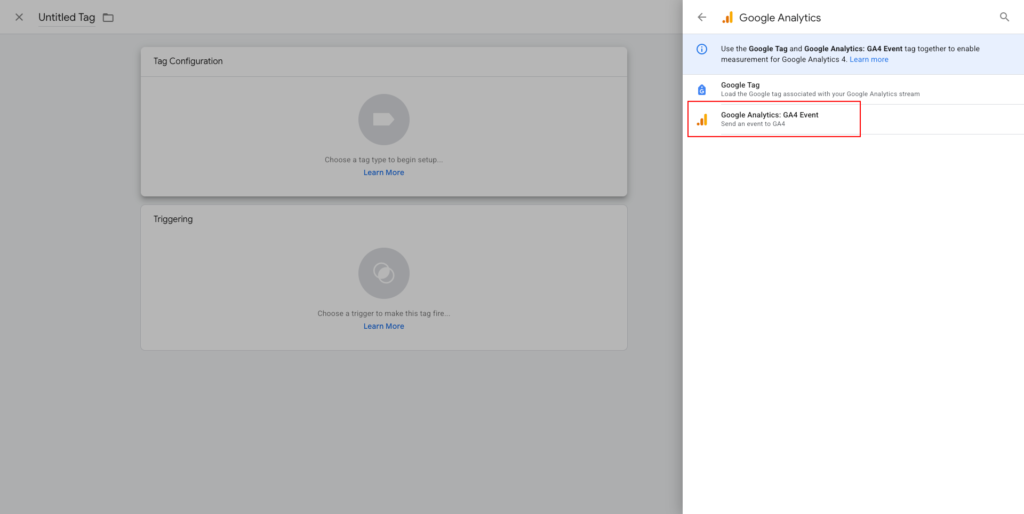
Set the event name:
add_to_cart
Add parameters such as:
value
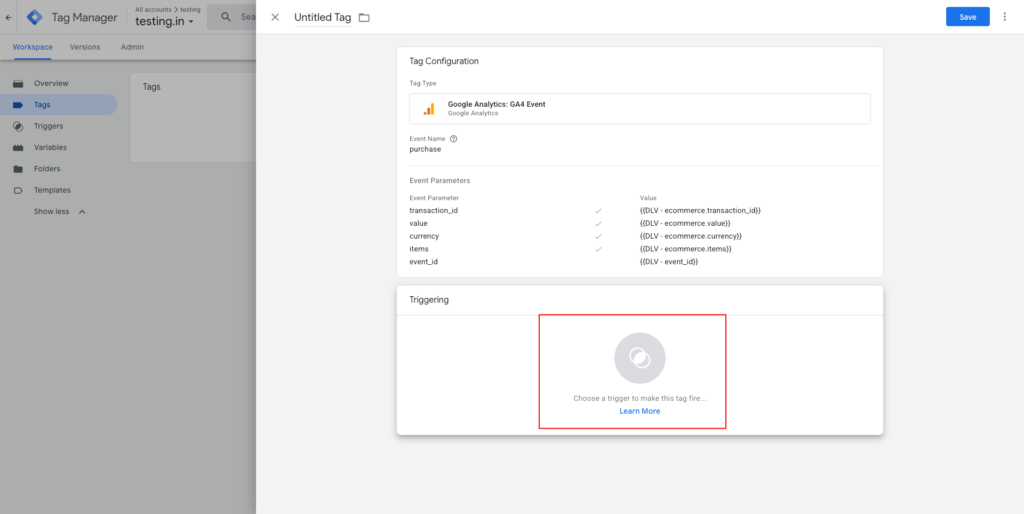
{{DLV - ecommerce.value}}

currency
{{DLV - ecommerce.currency}}

event_id
{{DLV - event_id}}
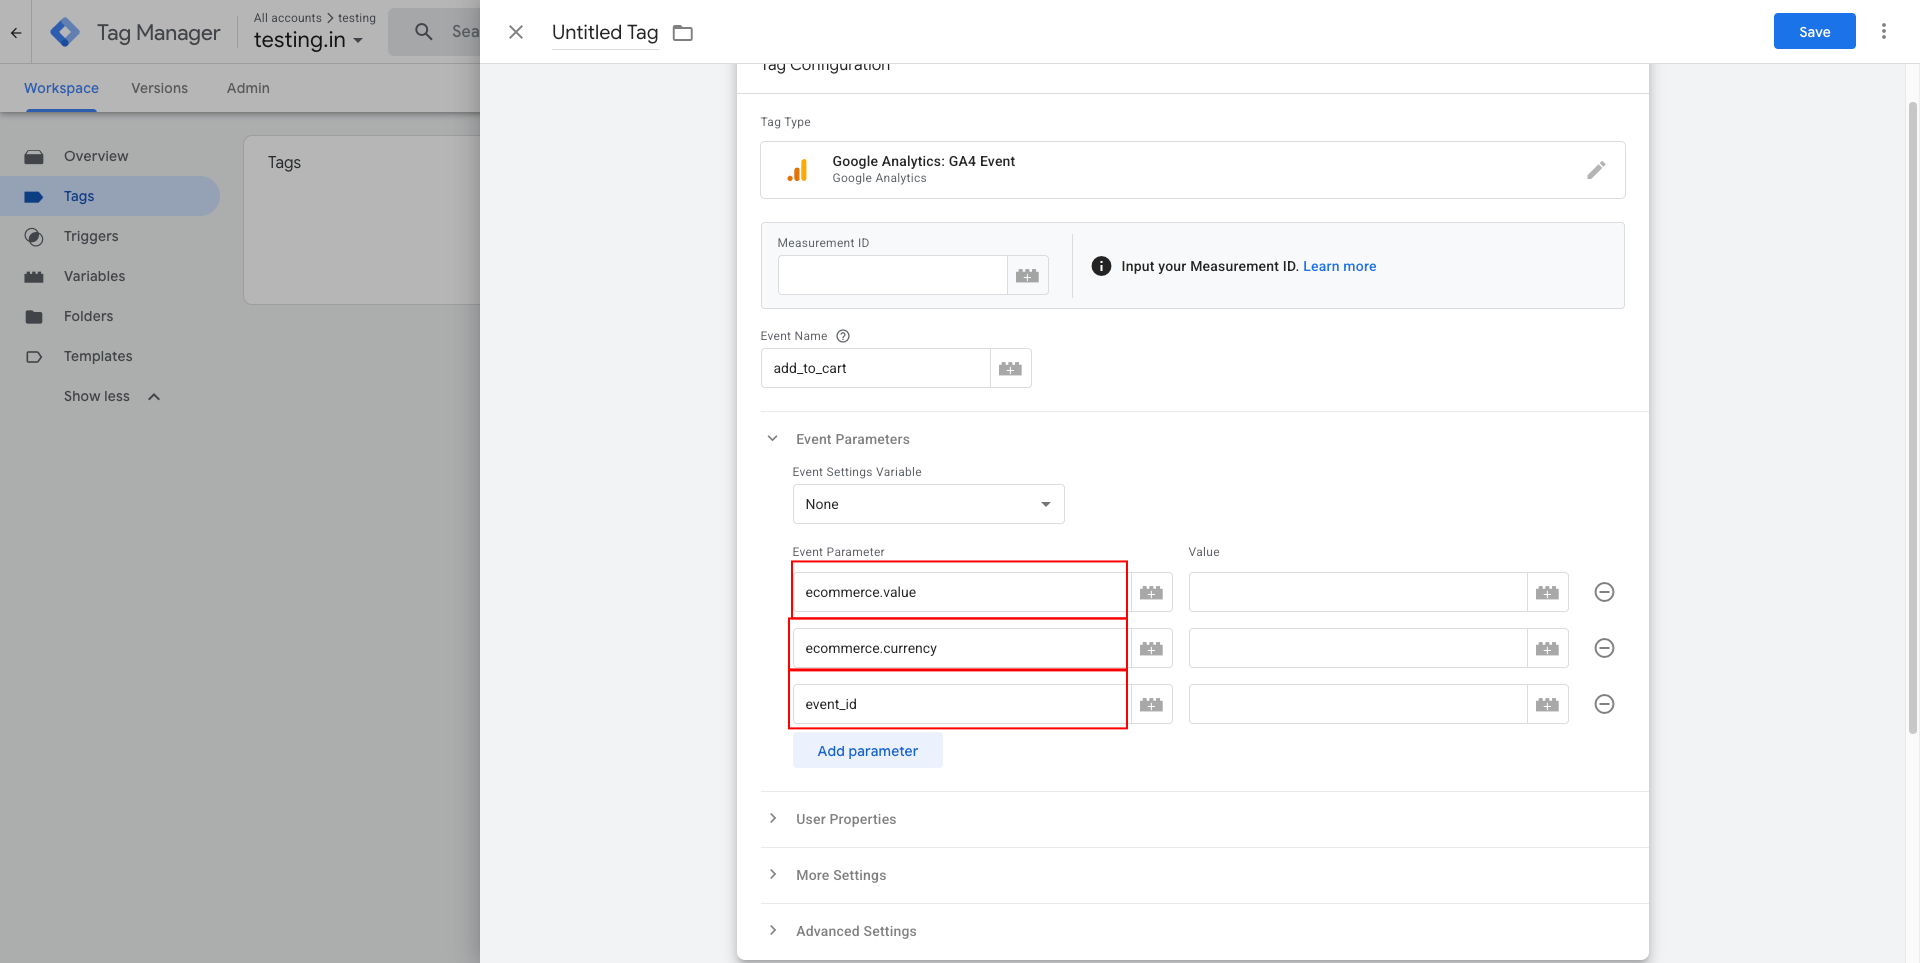
Add:
items
{{DLV - ecommerce.items}}
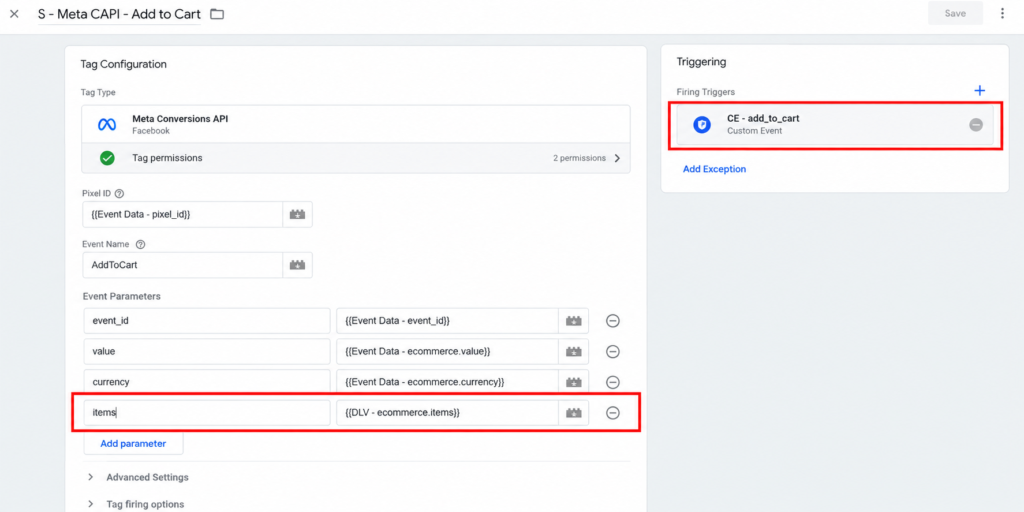
Then configure the:
CE - add_to_cart
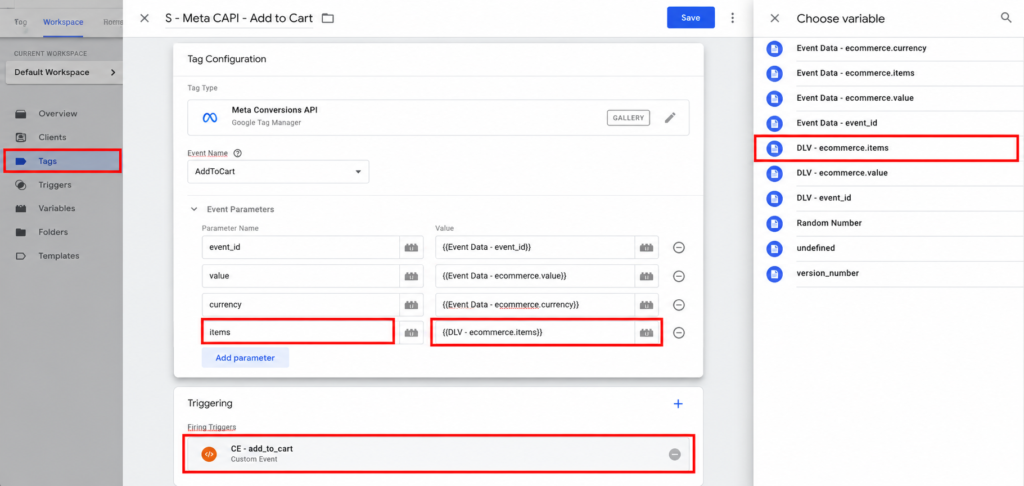
trigger.
Repeat this for:
view_item
add_to_cart
begin_checkout
purchase
The names depend on your ecommerce data source.
Step 23: Send Purchase Data to the Server Container
For the Purchase event, create:
Tags → New → Google Analytics: GA4 Event
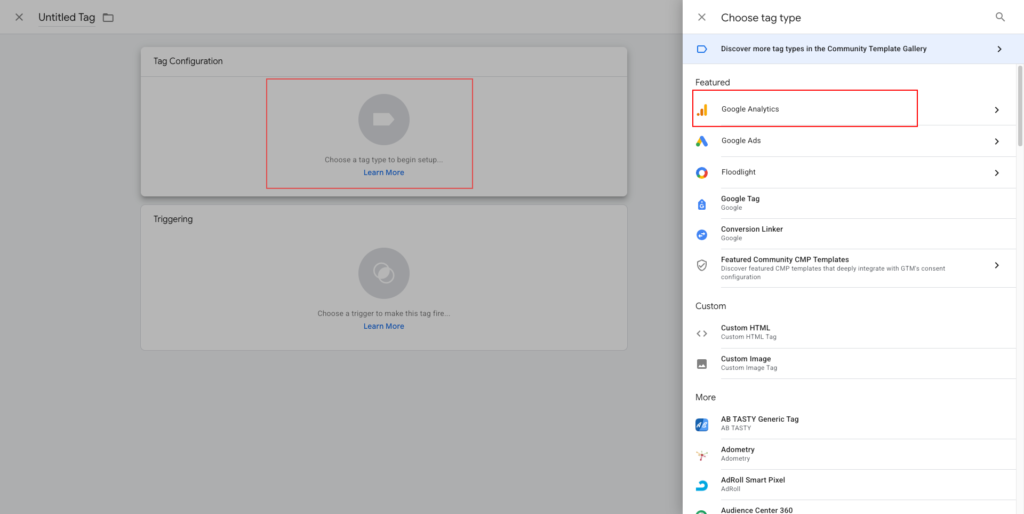
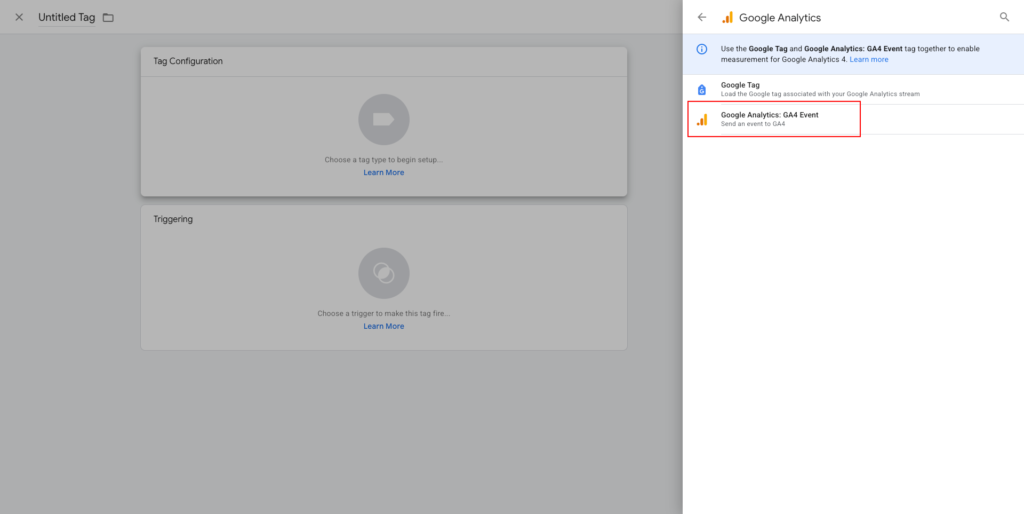
Set:
Event Name:
purchase
Parameters:
transaction_id
{{DLV - ecommerce.transaction_id}}

value
{{DLV - ecommerce.value}}

currency
{{DLV - ecommerce.currency}}

items
{{DLV - ecommerce.items}}

event_id
{{DLV - event_id}}
Trigger:
CE - purchase
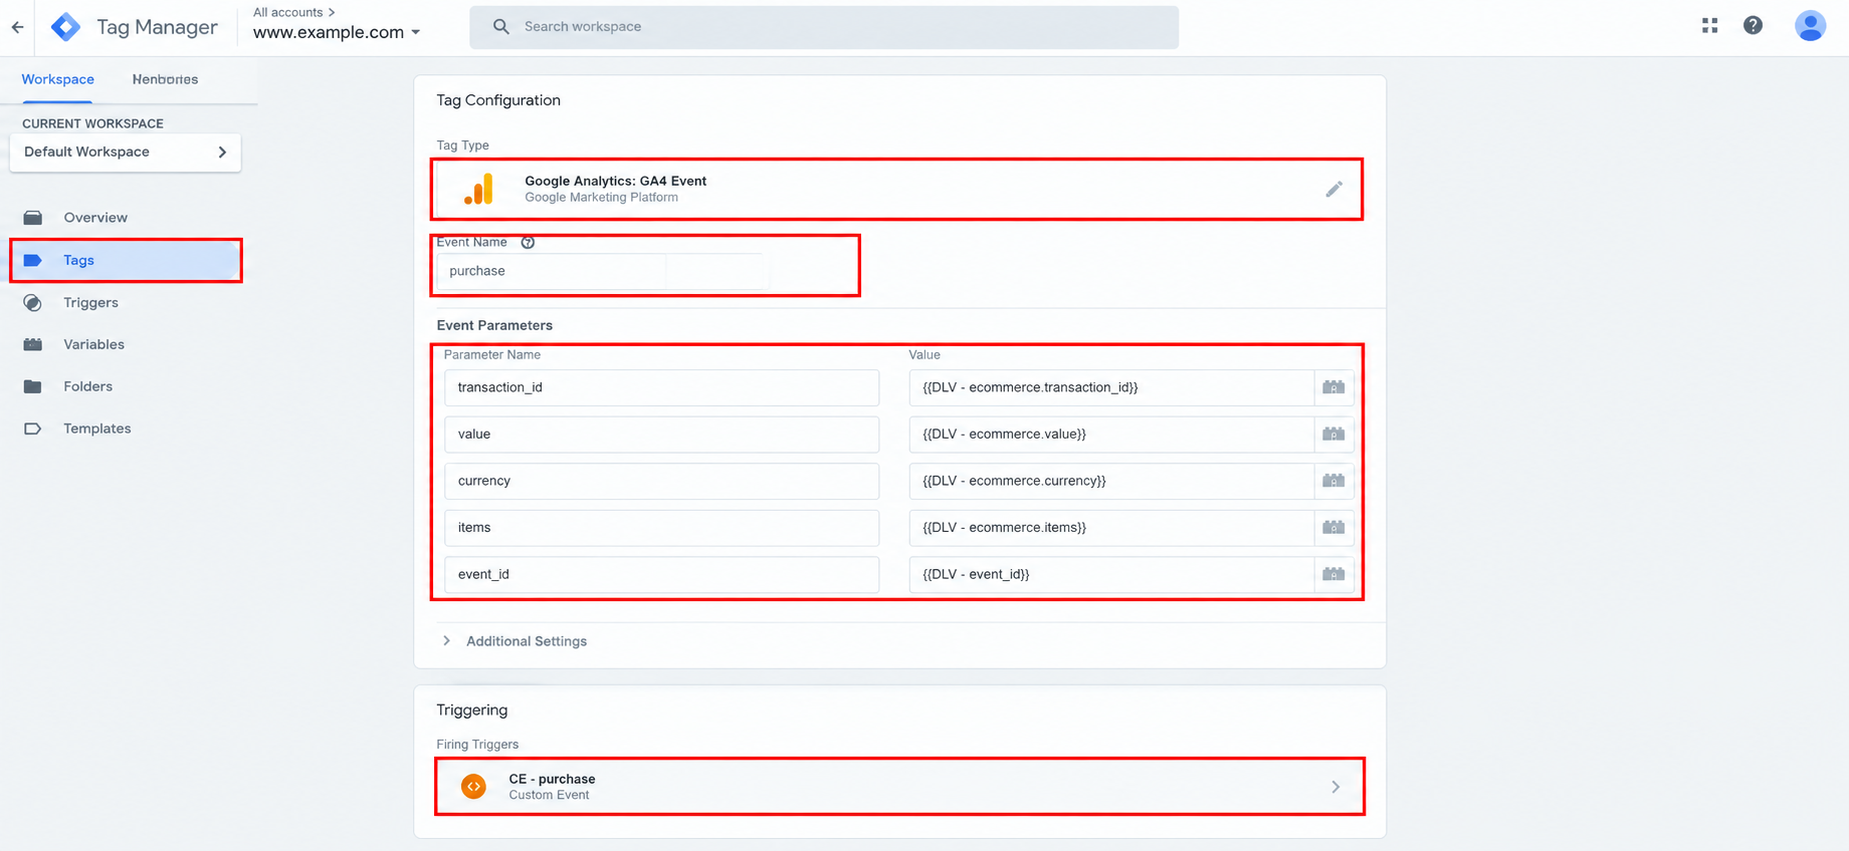
Now the browser sends this event to your server container through the configured server URL.
Step 24: Check the Server Container
Open:
GTM → Server Container
Click:
Preview
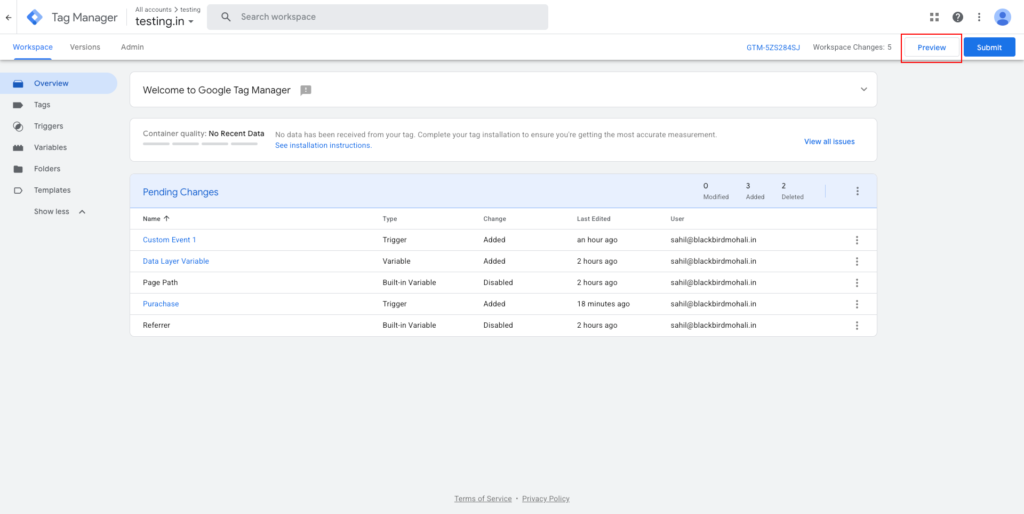
Then return to your website.
Perform a test ecommerce action.
Your server-side preview should start receiving requests.
Google’s server-side documentation explains that clients receive incoming requests and make the event data available to server-side tags.
Step 25: Understand the GA4 Client
Your server container needs a client to interpret incoming requests.
For GA4 requests, the GA4 Client handles the incoming GA4 measurement request.
Then server-side tags can use that event data.
The flow is:
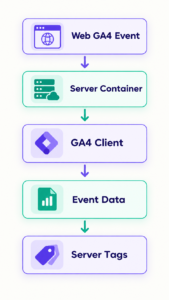
This is one of the major differences between Web GTM and Server GTM.
Step 26: Install a Meta CAPI Tag Template
A server container does not automatically contain every advertising platform’s tag.
Google documents that additional server-side destination tags can be added through the Community Template Gallery or custom templates.
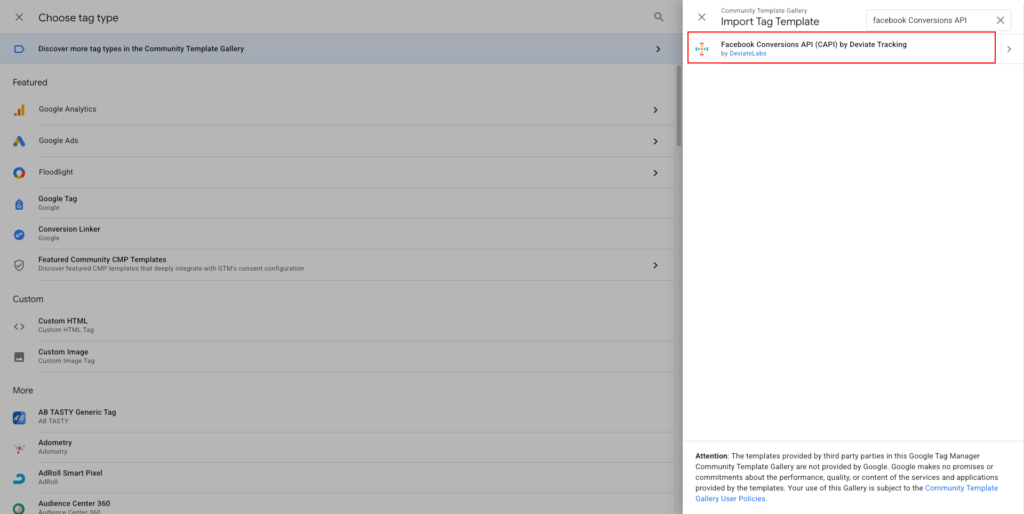
For this tutorial, you can use a server-side Meta/Facebook Conversions API tag template.
One currently maintained implementation guide from Stape walks through adding the Facebook Conversions API template to a GTM Server container via:
Server Container → Templates → Search Template Gallery → Facebook Conversions API → Add to workspace.
Stape’s Meta CAPI + server-side GTM guide
Use the template provider and version that you have reviewed and trust. Community templates are third-party software, so review their permissions and maintenance before deploying them.
Step 27: Create the Meta CAPI Tag
Inside the GTM Server container:
Go to:
Tags → New
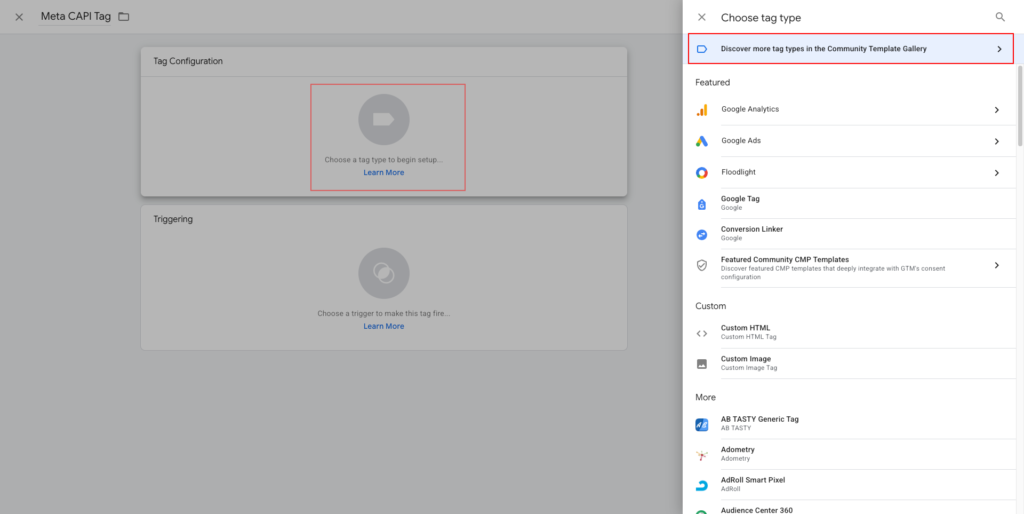
Choose the installed:
Facebook/Meta Conversions API tag template.
Name it:
Meta CAPI - Purchase
Configure the fields required by the template.
Typically you’ll provide:
Pixel/Dataset ID
API Access Token
Event Name
Event ID
Event Data
User Data
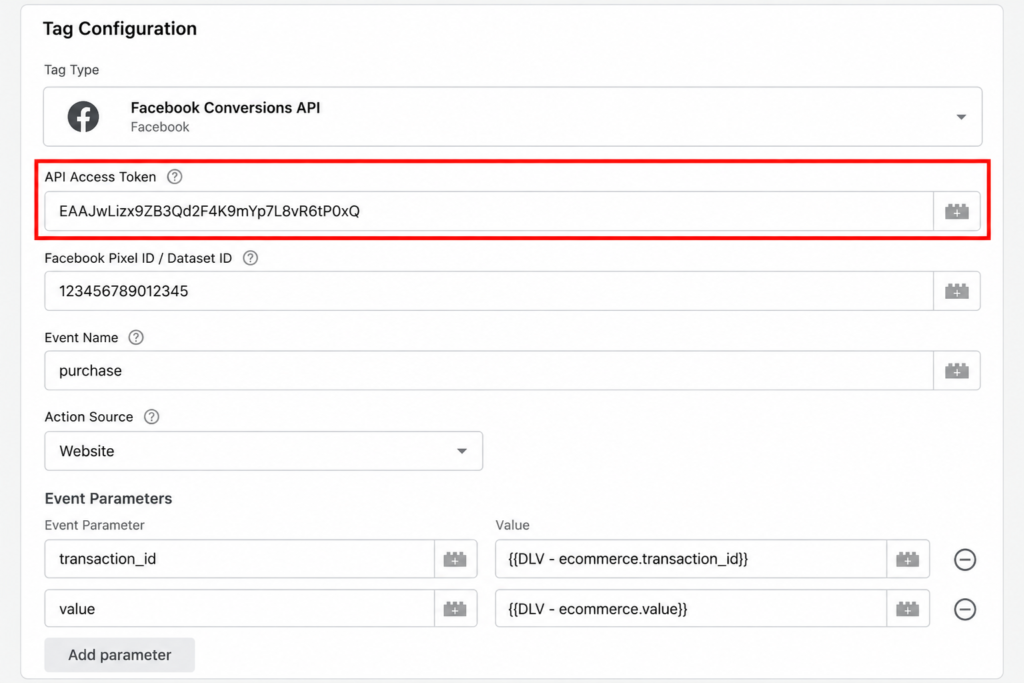
The exact field names depend on the template version you’re using.
Stape’s current CAPI guide describes configuring the Pixel ID and API Access Token and then passing event data and event IDs from the incoming server-side event.
Step 28: Add Your Meta Pixel/Dataset ID
In your Meta CAPI tag, enter your Meta Pixel/Dataset ID.
For example:
123456789012345
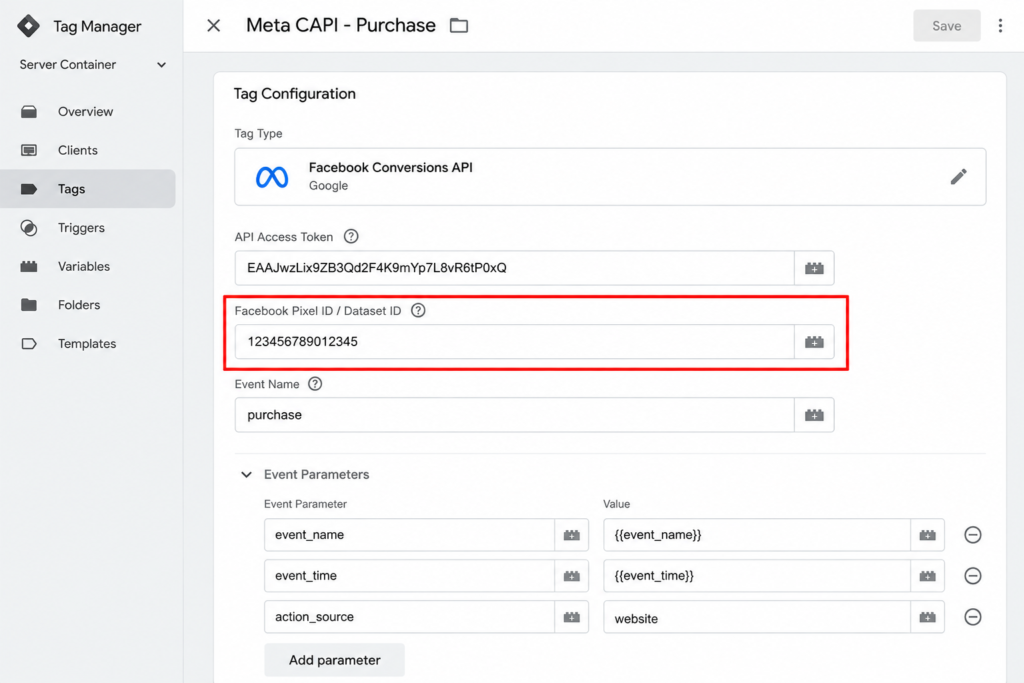
Use your actual ID.
Don’t hard-code a different Pixel ID for every tag.
For larger implementations, create a GTM variable so the ID can be reused.
Step 29: Add Your Meta API Access Token
Paste the Meta CAPI access token into the server-side Meta tag.
Important:
Do not put this token in the Web container.
The access token belongs on the server side.
Your architecture should be:
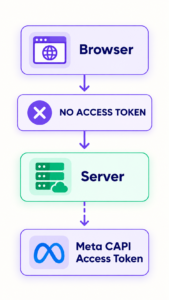
This prevents your secret token from being embedded in publicly accessible frontend code.
Step 30: Configure the Meta Server Purchase Event
Set:
Meta Event Name:
Purchase
Then map:
event_id
to the event ID received from your incoming ecommerce event.
You can also map:
value
currency
contents
content_ids
from the incoming server-side event.
Your final server-side event should conceptually become:
Event Name:
Purchase

Event ID:
purchase_10001

Value:
199.00

Currency:
USD
Step 31: Create Server-Side Variables
Inside your Server container, you can create variables using incoming event data.
Go to:
Variables → New
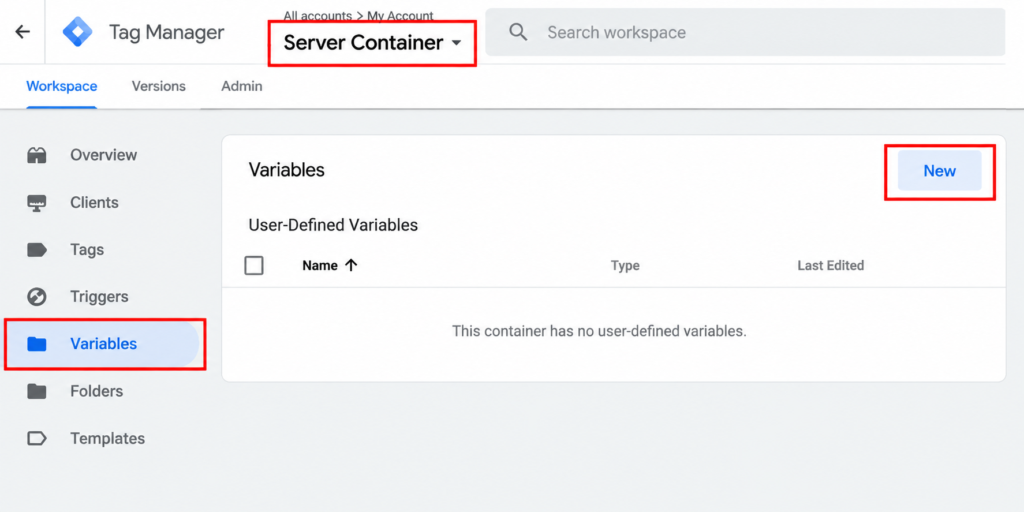
Choose the appropriate server-side event-data variable type provided by your container/template.
Create variables for:
event_id
value
currency
transaction_id
items
For example:
Event Data:
event_id
could become:
{{Event Data - event_id}}
and:
Event Data:
ecommerce.value
could become:
{{Event Data - ecommerce.value}}
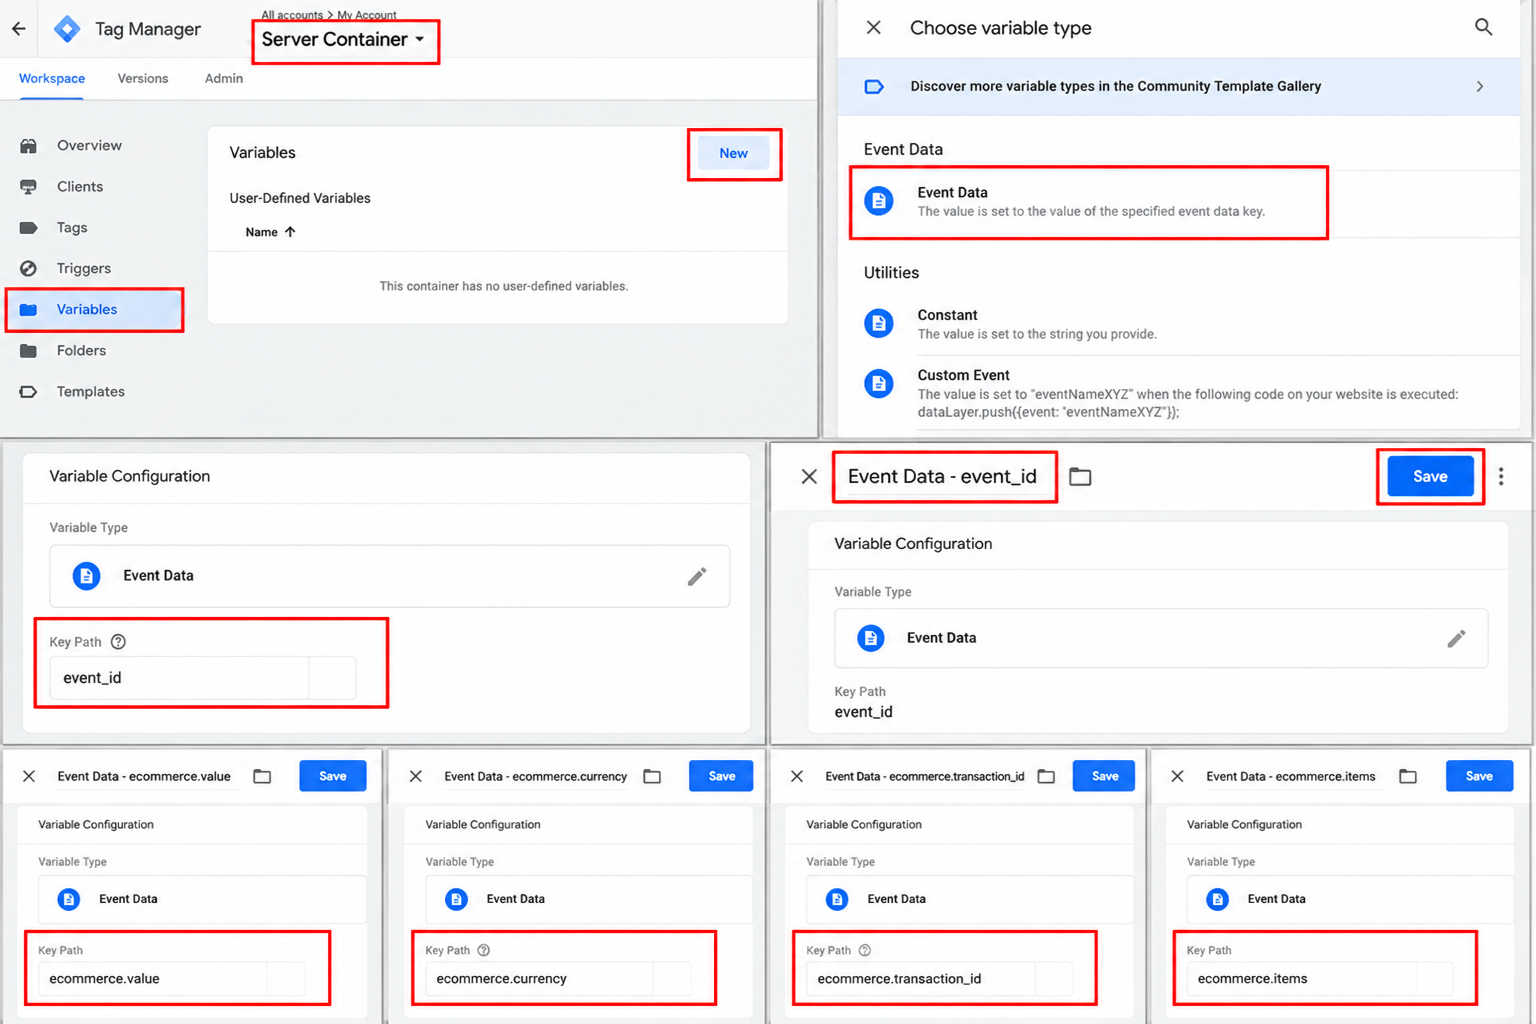
The exact path depends on the event structure your client exposes.
Step 32: Create the Server Purchase Trigger
Inside the Server container:
Go to:
Triggers → New
Use a server-side event/client condition.
For a GA4 Client setup, your condition can be based on:
Client Name = GA4
and:
Event Name = purchase
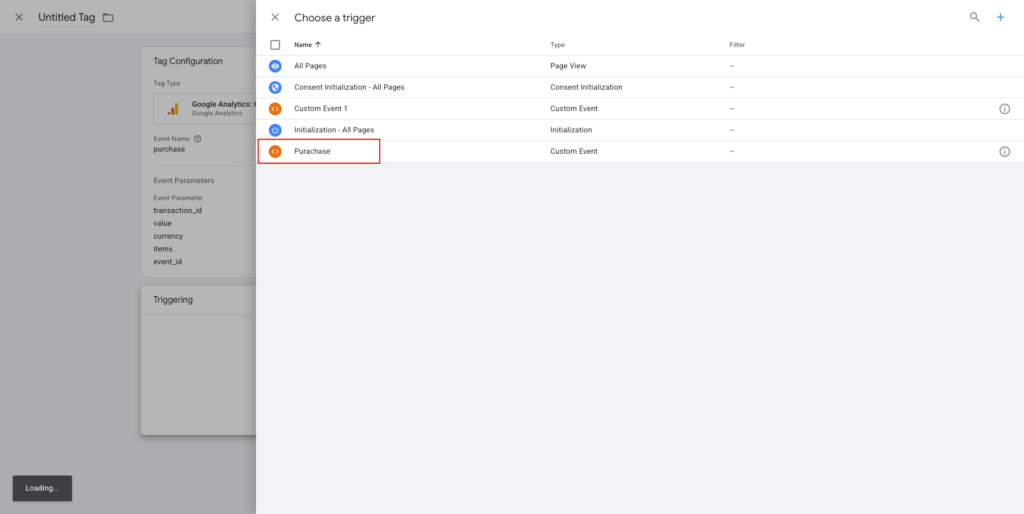
For example:
Trigger Name:
S - purchase

Conditions:
Client Name equals GA4
AND
Event Name equals purchase
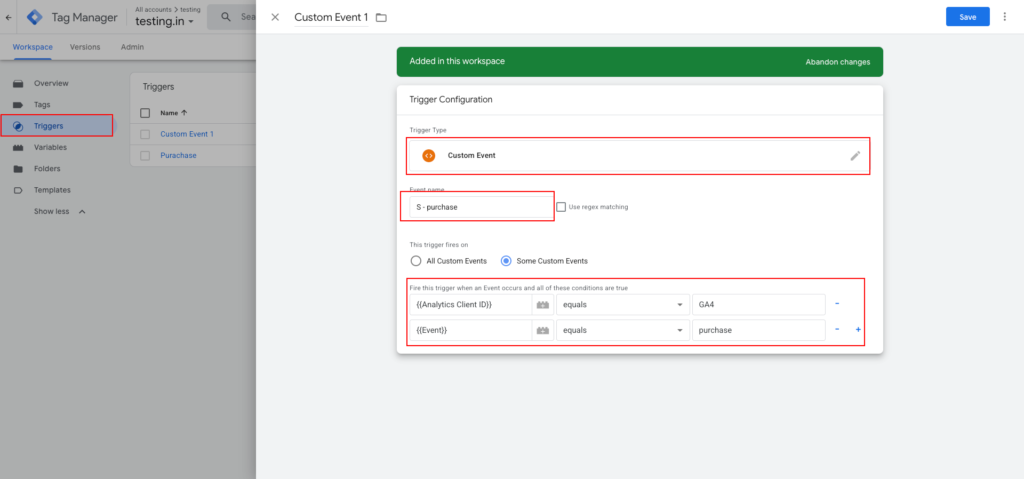
The server Meta CAPI Purchase tag should use this trigger.
A current server-side CAPI implementation guide uses this same basic pattern: receive the event through the server client, use the incoming event data, and fire the Meta CAPI tag on the matching event.
Step 33: Map GA4 Ecommerce Data to Meta
You now have:
GA4:
purchase

Data:
value
currency
items
event_id
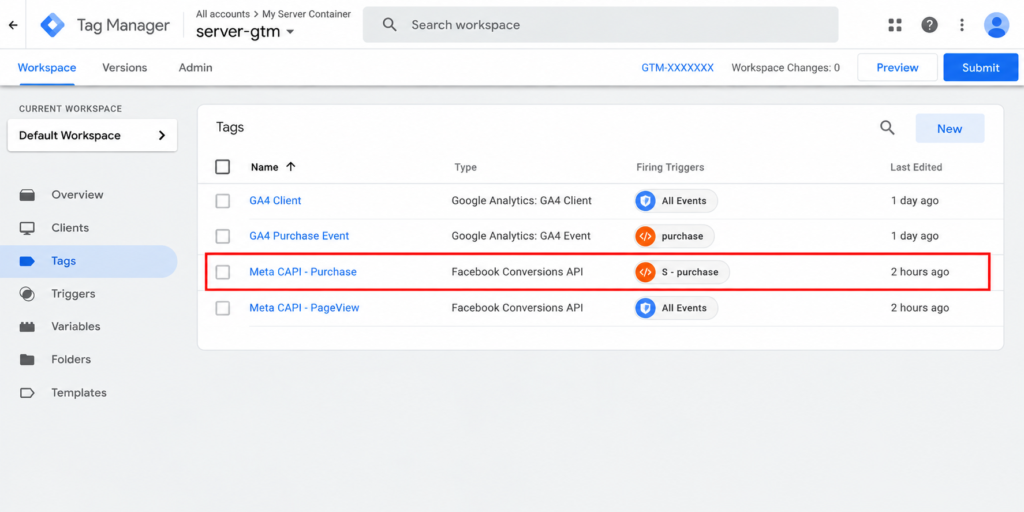
You need to convert that into:
Meta:
Purchase

Data:
value
currency
contents
event_id
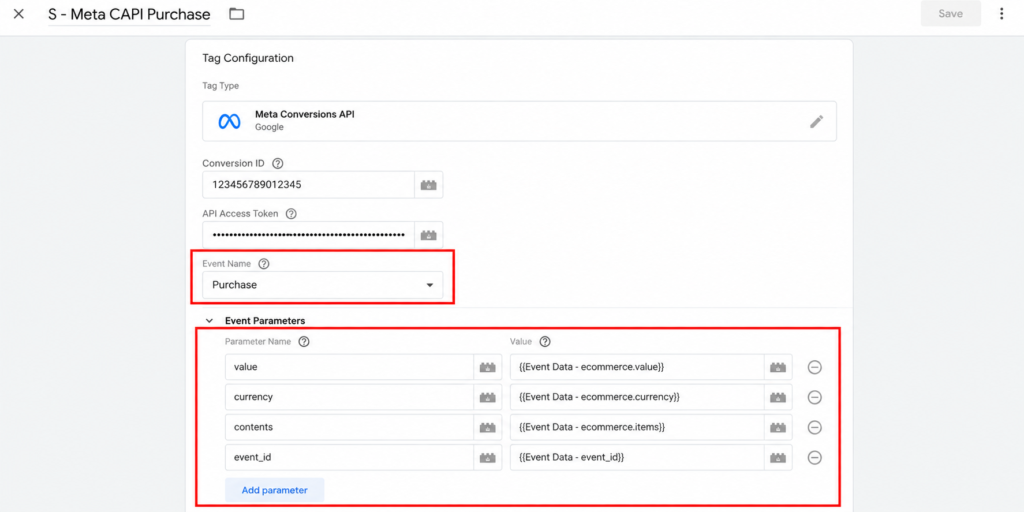
For example:
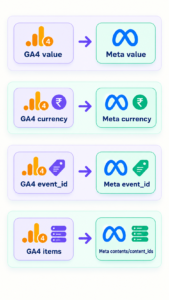
The exact mapping depends on your server-side Meta tag template.
Step 34: Configure Meta User Data
For improved event matching, your server event may use available customer identifiers that are appropriate and permitted.
Depending on the implementation, this can include:
email
phone
external_id
fbp
fbc
IP
user agent
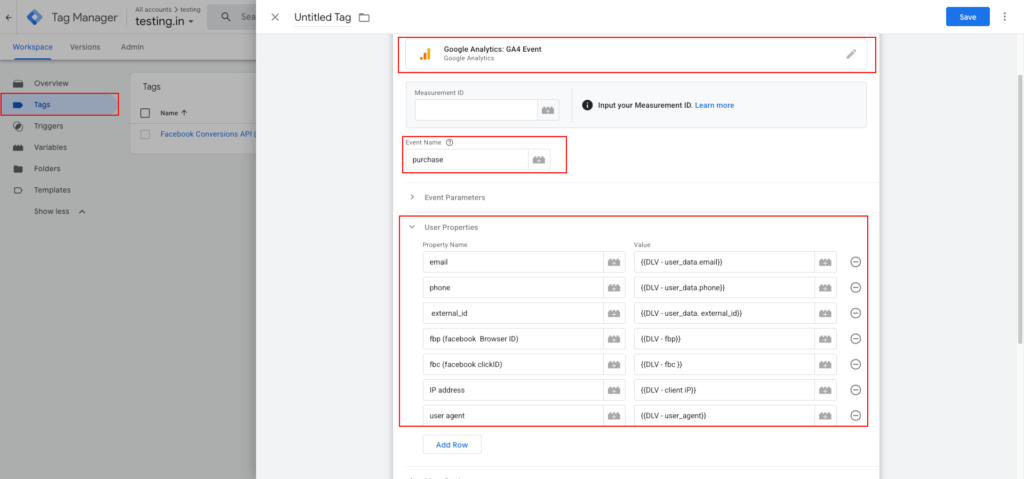
Where Meta requires hashed customer information, it needs to be normalized and hashed according to Meta’s requirements.
Some server-side Meta templates can perform required hashing automatically. Stape’s current CAPI documentation describes automatic hashing for relevant user information in its template.
Only transmit customer data that you actually need and are allowed to collect and use.
Step 35: Configure Browser and Server Event Deduplication
This is the most important part.
Suppose a customer purchases:
$199
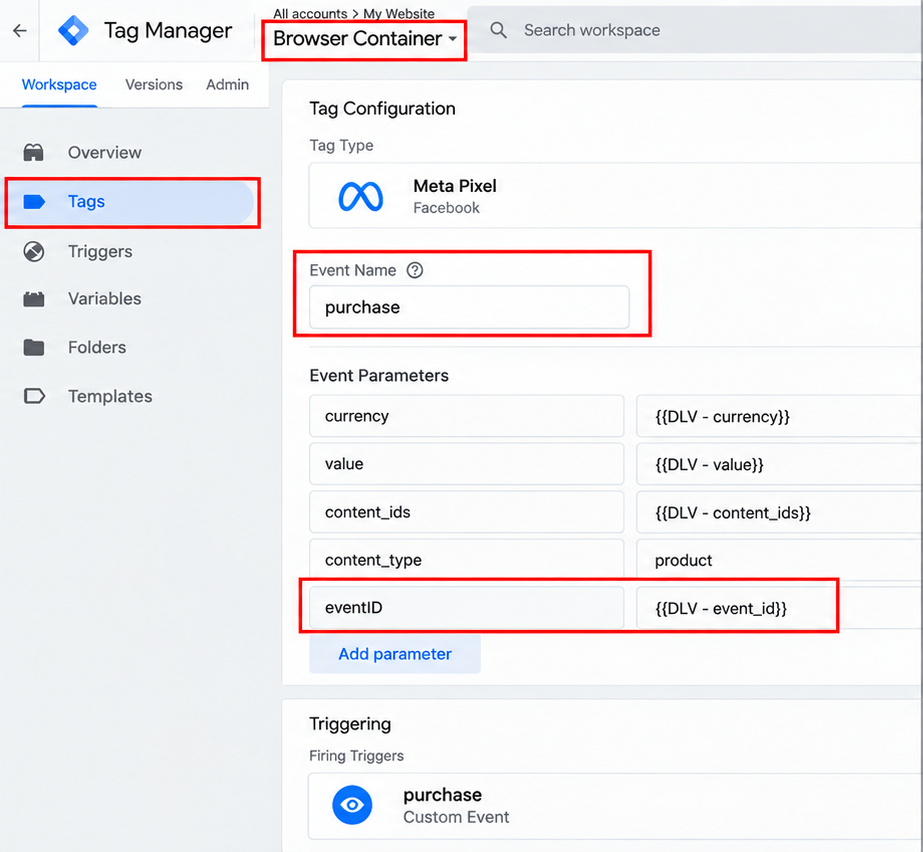
Browser:
Purchase
eventID = purchase_10001
Server:
Purchase
event_id = purchase_10001
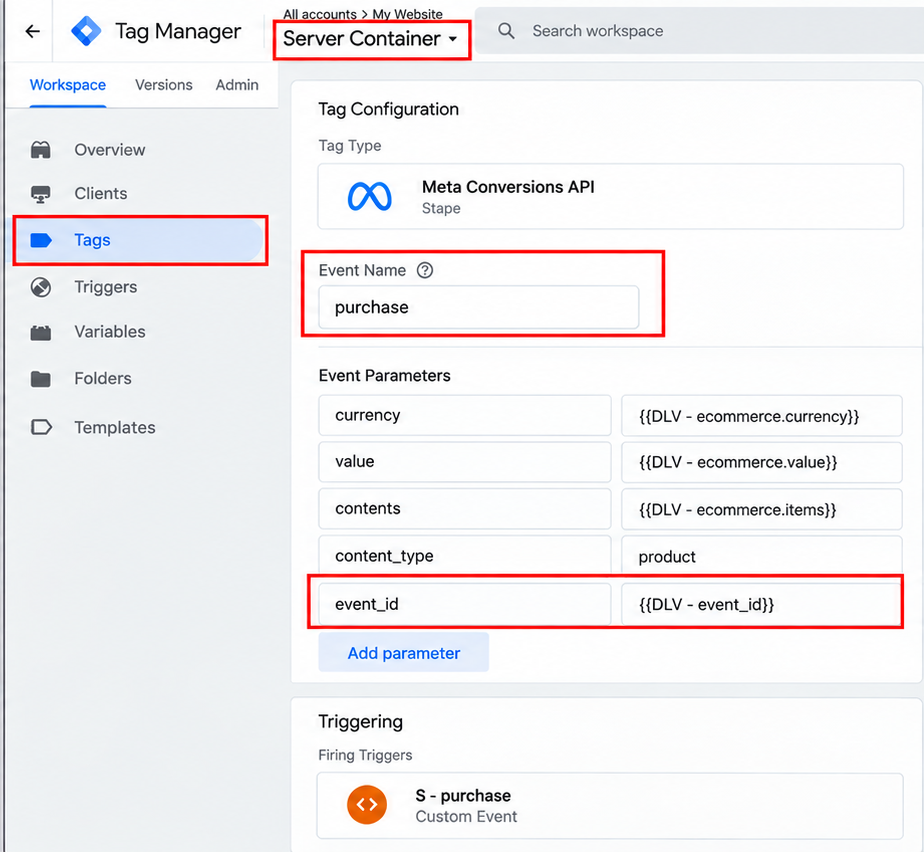
The browser and server events now identify the same underlying event.
Meta’s deduplication mechanism uses event information such as the event name and event ID to identify duplicate browser/server events. A current implementation guide describes matching event_id and event name as the key deduplication mechanism.
Step 36: Do Not Create Separate Event IDs
Avoid this:
Browser:
Purchase
eventID = 123456

Server:
Purchase
event_id = 987654
Instead:
Browser:
Purchase
eventID = purchase_123456

Server:
Purchase
event_id = purchase_123456
One ecommerce action should have one stable event identity.
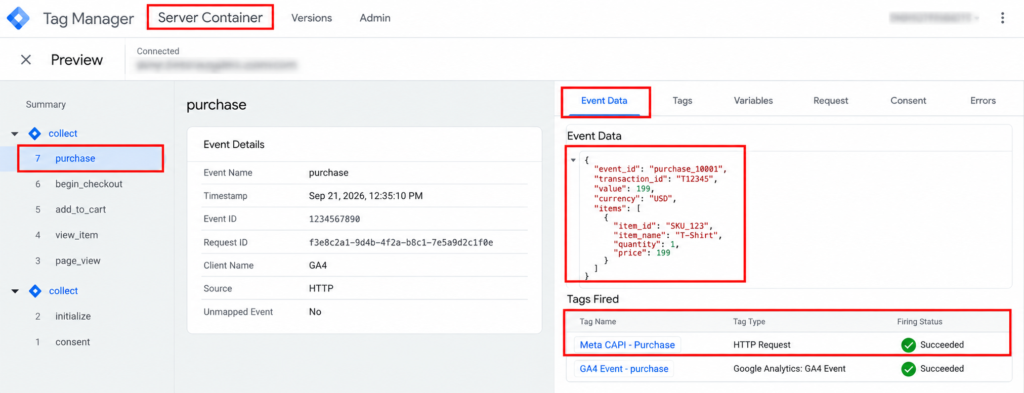
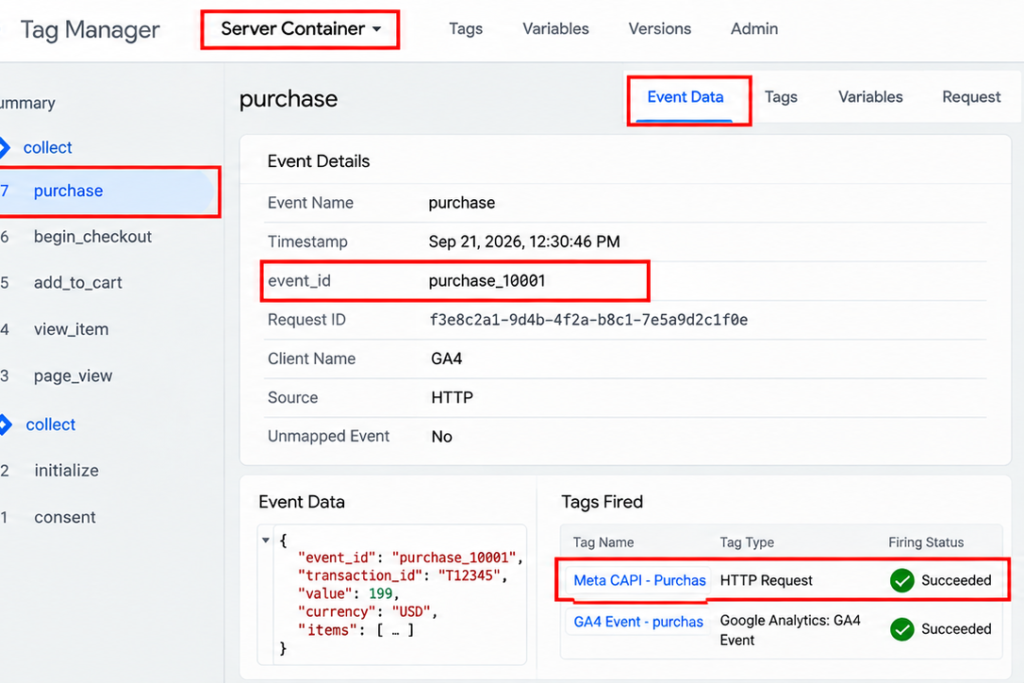
Step 37: Test the Server Purchase
Open:
GTM Server Container → Preview
Now complete a test purchase.
You should see:
purchase
inside the server-side preview.
Click the event.
Inspect the event data.
Look for:
event_id
value
currency
transaction_id
items
Then check whether the:
Meta CAPI - Purchase
tag fired.
Step 38: Test Meta Events Manager
Open:
Select the correct dataset.
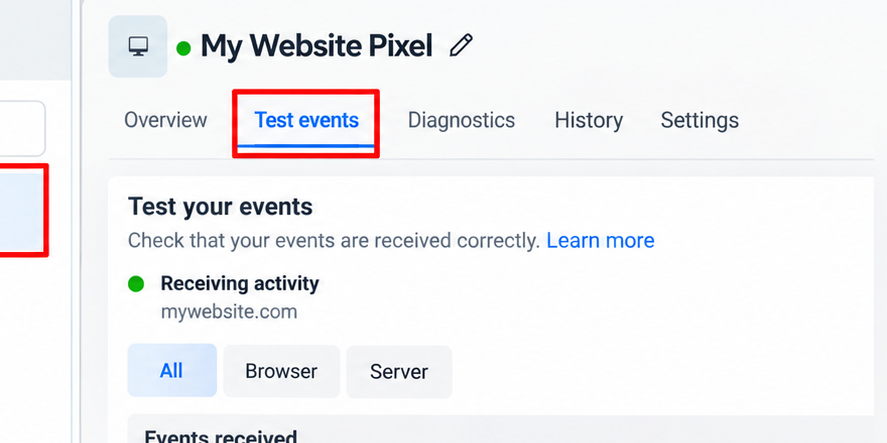
Open the testing/diagnostics area available for your data source.
Then perform a test ecommerce event.
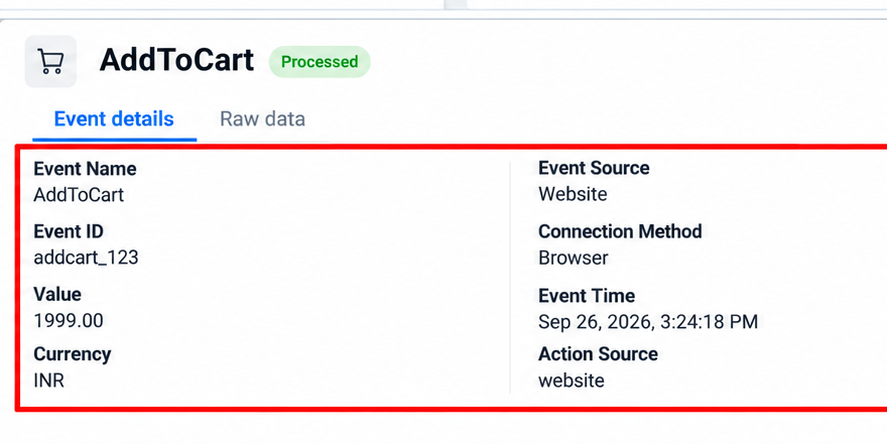
You should see an incoming event such as:
Purchase
Inspect:
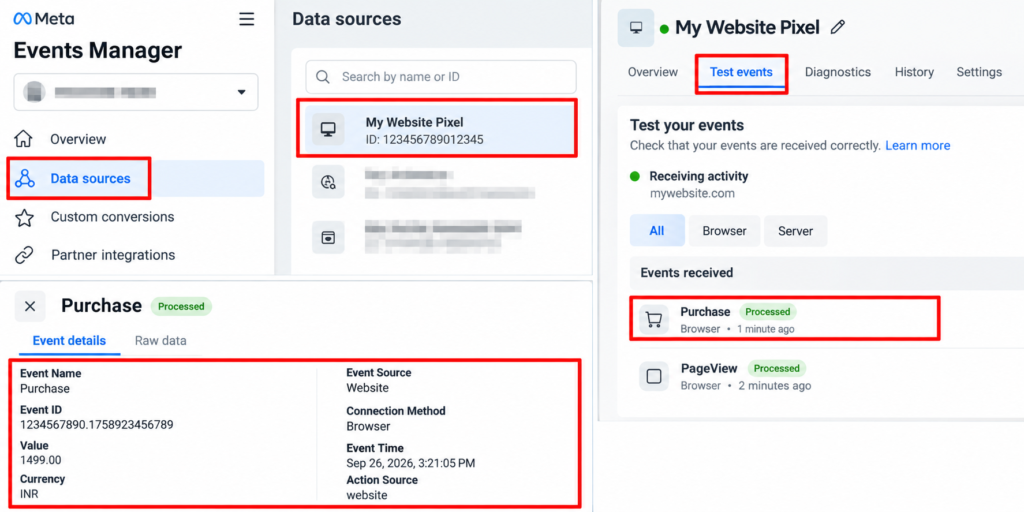
Event Name
Event ID
Value
Currency
Event Source
Connection Method
Step 39: Verify Browser + Server Together
This is the test that matters most.
Perform one test Purchase.
You may see:
Browser:
Purchase
eventID = purchase_10001
and:
Server:
Purchase
event_id = purchase_10001
The two events should represent the same underlying purchase.
Your target architecture is:
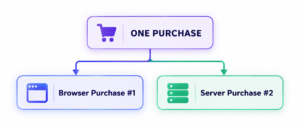
Not:
Step 40: Test AddToCart
Repeat the same process for AddToCart.
Customer action:
Add to Cart
Browser:
Meta Pixel
AddToCart
eventID = addcart_123
Server:
Meta CAPI
AddToCart
event_id = addcart_123
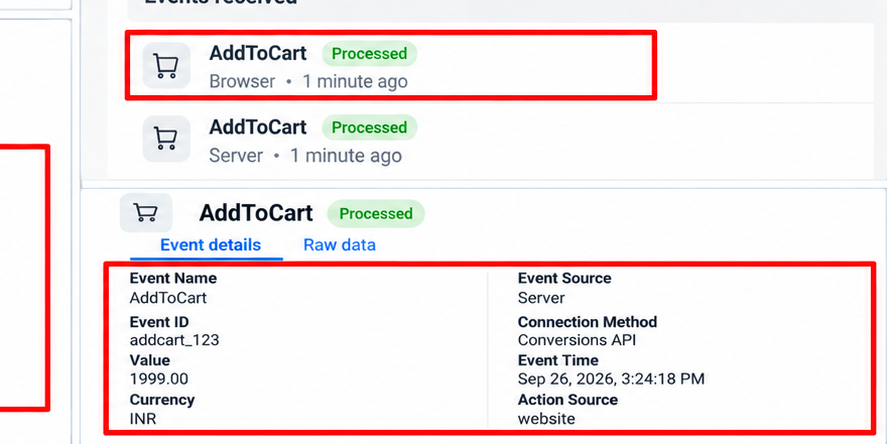
The event ID must correspond to the same event.
Shopify’s standard product_added_to_cart event records when a customer adds a product to the cart.
Step 41: Test ViewContent
For a product view:
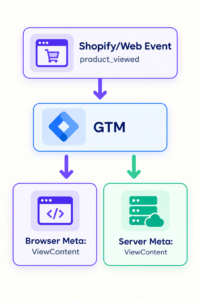
Shopify currently documents product_viewed as the standard customer event for a customer visiting a product details page.
Step 42: Test Checkout Events
For checkout:
checkout_started
can be mapped to:
InitiateCheckout
Then:
checkout_completed
can be mapped to:
Purchase
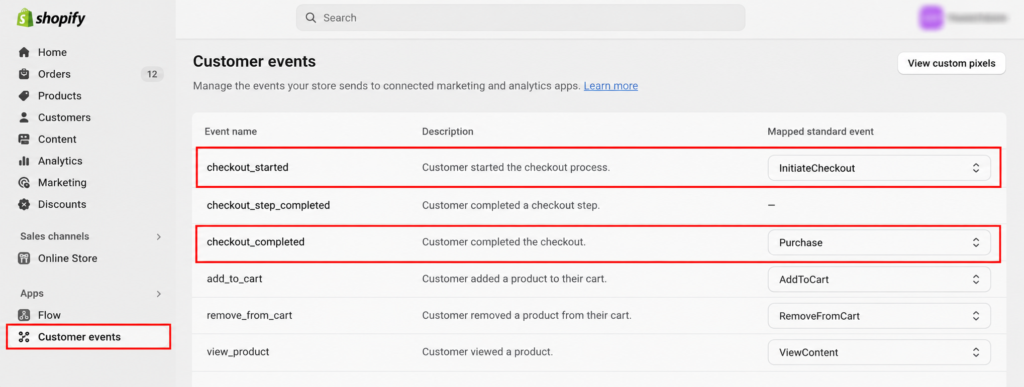
Shopify currently documents checkout_started and checkout_completed as standard customer events.
Step 43: Test Every Ecommerce Event
Your final QA flow should be:
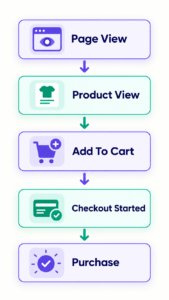
For each event, check both:
Browser
and:
Server
You should also verify that the appropriate event parameters are populated.
Common Problem #1: Browser Event Fires Twice
You may have multiple Meta Pixel implementations.
For example:
Shopify Meta integration
+
GTM Meta Pixel
or:
GTM Meta Pixel
+
Custom theme Pixel
Before troubleshooting CAPI, audit all existing Meta implementations.
Search for:
fbq(
facebook pixel
Meta Pixel
Purchase
AddToCart
inside your existing integrations.
Common Problem #2: Server Purchase Isn’t Showing
Check the chain:
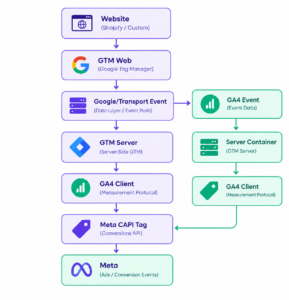
Find the exact point where the data stops.
Don’t immediately modify the Meta tag.
First verify whether the event actually reached the server container.
Common Problem #3: Meta Receives the Event but Value Is Wrong
Example:
Shopify:
₹9,999

Meta:
₹999
Check your:
value
currency
quantity
price
discount
tax
shipping
mapping.
Don’t automatically assume the problem is Meta.
Trace the transaction from the original ecommerce data source through every container.
Common Problem #4: Currency Is Wrong
Example:
Shopify:
INR

Meta:
USD
Check:
{{DLV - ecommerce.currency}}
Don’t hard-code currency if your store can transact in multiple currencies.
Common Problem #5: Events Are Not Deduplicating
Check:
Browser event_name
Server event_name
Browser eventID
Server event_id
For the same event, make sure the identifier and event naming strategy are consistent.
Example:
Browser:
Purchase
purchase_10001

Server:
Purchase
purchase_10001
Common Problem #6: GTM Server Preview Is Empty
Check:
Server Container → Admin → Container Settings
Make sure your server container URL is configured correctly.
Then verify the web-side transport is actually sending requests to that URL.
Google’s documentation recommends using the server container URL in the server container configuration and testing the server with Preview.
Common Problem #7: Meta CAPI Tag Doesn’t Fire
Inside your Server container:
Go to:
Triggers
Check your condition.
For example:
Client Name = GA4

Event Name = purchase
Then go to:
Preview → purchase event
and check whether the trigger conditions are actually true.
Common Problem #8: Access Token Error
Check:
Pixel/Dataset ID
API Access Token
Meta business permissions
CAPI configuration
Generate a new token through the appropriate Meta Events Manager workflow when necessary.
Do not expose the token in browser-side tracking code.
Common Problem #9: Multiple Server Events
If you have multiple server-side Meta CAPI tags or multiple tracking apps, the same event may be transmitted more than once.
Audit:
GTM Server tags
Shopify apps
Meta integrations
Custom API integrations
Third-party tracking platforms
Common Problem #10: GTM Shows “Fired” but Meta Doesn’t Receive the Event
A tag firing inside GTM only proves that the tag execution condition was met.
It doesn’t automatically prove that the final advertising platform accepted the event.
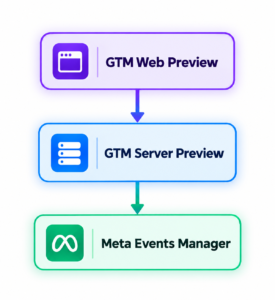
Always check:
Recommended Ecommerce Event Structure
For most Shopify/ecommerce implementations, start with:
| Customer action | Website event | Meta browser event | Meta server event |
|---|---|---|---|
| Product view | product_viewed / view_item |
ViewContent | ViewContent |
| Add to cart | add_to_cart |
AddToCart | AddToCart |
| Checkout | checkout_started / begin_checkout |
InitiateCheckout | InitiateCheckout |
| Purchase | purchase / checkout_completed |
Purchase | Purchase |
Shopify’s current Web Pixels documentation provides standard customer-event definitions that can be mapped into this type of analytics architecture.
Recommended GTM Naming Convention
As your container grows, naming becomes important.
Use:
Web Tags
META - Browser - Base
META - Browser - ViewContent
META - Browser - AddToCart
META - Browser - InitiateCheckout
META - Browser - Purchase
Web Triggers
CE - product_viewed
CE - add_to_cart
CE - begin_checkout
CE - purchase
Server Tags
META - CAPI - ViewContent
META - CAPI - AddToCart
META - CAPI - InitiateCheckout
META - CAPI - Purchase
Variables
DLV - event_id
DLV - ecommerce.value
DLV - ecommerce.currency
DLV - ecommerce.transaction_id
DLV - ecommerce.items
This makes troubleshooting much easier.
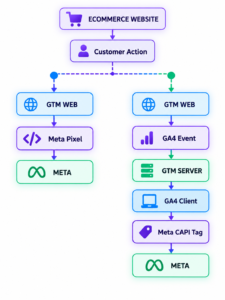
Recommended Final Architecture
Once everything is configured, the system should look like:
For a Purchase:
Browser-Side Tracking With GTM: What It Handles
Your browser-side tracking layer should handle:
- Page views
- Product views
- Add to cart
- Checkout actions
- Purchase events
- Browser-side Meta Pixel
- Event IDs
- Ecommerce parameters
The Web container is the part of GTM that runs on the website visitor’s browser. Google describes client-side tagging as the configuration where the web container contains the tags, triggers, variables, and measurement code used to respond to user interactions.
Server-Side Tracking With GTM: What It Handles
Your server-side tracking layer should handle:
- Incoming tracking requests
- Data processing
- Event transformations
- Meta CAPI
- Server-side user-data handling
- Conversion routing
- Filtering and validation
Google describes server-side tagging as an environment where requests are received by a server container and can be processed before being sent to analytics and advertising endpoints.
Browser + Server Tracking Checklist
Before going live, verify:
GTM Web
☐ GTM Web installed
☐ Preview works
☐ Meta Pixel base tag works
☐ ViewContent works
☐ AddToCart works
☐ InitiateCheckout works
☐ Purchase works
Ecommerce Data
☐ event_id
☐ transaction_id
☐ value
☐ currency
☐ items
☐ product IDs
☐ quantity
GTM Server
☐ Server container created
☐ Server deployed
☐ Server URL configured
☐ Custom domain configured for production
☐ GA4 Client receiving requests
☐ Meta CAPI tag installed
☐ Server triggers configured
Meta
☐ Correct Pixel/Dataset ID
☐ Correct CAPI access token
☐ Browser events received
☐ Server events received
☐ Event IDs are consistent
☐ Events are deduplicated
☐ Purchase values are correct
☐ Currency is correct
Final Testing Process
Don’t test everything at once.
Use this sequence.
Test 1: GTM Web
Open:
GTM → Web → Preview
Test:
Product View
Add to Cart
Checkout
Purchase
Test 2: GTM Server
Open:
GTM → Server → Preview
Repeat the same customer actions.
Confirm that server-side events arrive.
Test 3: Meta Events Manager
Open:
Check whether Meta is receiving the browser and server events.
Test 4: Deduplication
For the same test Purchase:
Browser:
Purchase
eventID = purchase_10001

Server:
Purchase
event_id = purchase_10001
Verify the setup doesn’t create two independent conversions.
Test 5: Production
After successful testing:
GTM Web → Submit → Publish
and:
GTM Server → Submit → Publish
Google’s current workflow requires publishing the container for workspace changes to become active.
Frequently Asked Questions
What is browser-side tracking with GTM?
Browser-side tracking with GTM means the GTM Web container runs in the visitor’s browser and fires tracking tags based on user interactions and ecommerce events.
What is server-side tracking with GTM?
Server-side tracking with GTM uses a separate GTM Server container hosted in a cloud environment to receive and process tracking requests before forwarding them to destinations such as Meta CAPI.
Do I need both Meta Pixel and Meta CAPI?
They can be used together. The browser Pixel and server CAPI provide different event paths. When you send the same event through both, implement the appropriate deduplication strategy.
What is the most important ecommerce event?
For an ecommerce store, Purchase is generally one of the most important conversion events because it represents a completed transaction. Other useful events include ViewContent, AddToCart, and InitiateCheckout.
Why do I need an event ID?
When the same conversion is sent through browser and server paths, an event ID provides a way to associate those events with the same underlying action for deduplication.
Can GTM Server replace Meta Pixel?
Not necessarily. A server-side implementation is a different tracking layer. Many implementations use browser-side Meta Pixel and server-side Meta CAPI together.
Does server-side tracking eliminate browser tracking issues?
No. Server-side tracking provides another event-delivery path and more control over processing, but it does not make privacy, consent, or data-quality requirements disappear.
Conclusion
Setting up Meta tracking with Google Tag Manager is much more than adding a Meta Pixel to your website.
A robust ecommerce tracking architecture combines:
Browser-side tracking with GTM
Server-side tracking with GTM
Meta Pixel
Meta Conversions API
Ecommerce events tracking
Event deduplication
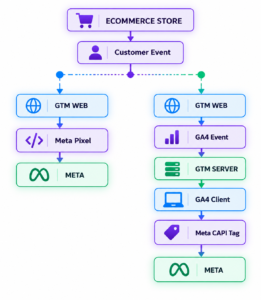
The final architecture is:
The key principle is simple:
Track the customer action once, create a reliable event identity, and allow both the browser and server tracking paths to reference that same event.
When this is implemented correctly, your Shopify or ecommerce store gets a more structured foundation for Meta conversion tracking, server-side tracking, browser-side tracking, and ecommerce event measurement.
The technical setup should still be tested regularly after changes to your Shopify theme, checkout, tracking apps, consent configuration, GTM containers, or Meta integrations.