
How to Set Up GA4 Browser Events and Server-Side Ecommerce Events Using GTM
Setting up Google Analytics 4 (GA4) on Shopify is not just about adding a Measurement ID. For reliable ecommerce measurement, you need to make sure that Shopify customer events are correctly captured, passed into Google Tag Manager (GTM), and sent to GA4 with the correct event names and parameters.
In this tutorial, we’ll show you how to set up GA4 browser events and server-side ecommerce events using Google Tag Manager for Shopify.
You’ll learn how to:
- Set up GA4
- Create a Google Tag Manager web container
- Add GTM to Shopify using a custom pixel
- Send Shopify customer events to the GTM dataLayer
- Configure GA4 browser-side tracking
- Configure ecommerce events such as
view_item,add_to_cart,begin_checkout, andpurchase - Set up a GTM server container
- Send GA4 events through server-side GTM
- Configure the GA4 client and server-side GA4 tag
- Test browser and server events
- Prevent duplicate ecommerce events
This guide is written as a step-by-step implementation tutorial, so you can follow each step in order.
What You’ll Build
At the end of this tutorial, your tracking architecture will look like this:
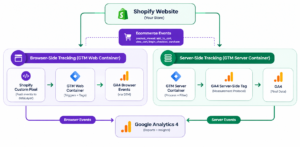
Google Tag Manager supports both client-side and server-side tagging. In a server-side setup, the web container sends requests to a server container, where the data can be processed before being forwarded to GA4 or another destination.
1. Browser-Side Tracking With GTM vs Server-Side Tracking With GTM
Before starting the setup, understand what each part does.
Browser-Side Tracking With GTM
Browser-side tracking runs in the customer’s browser.
The flow is:
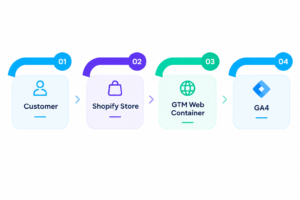
The GTM web container receives events from the Shopify custom pixel and sends them to GA4.
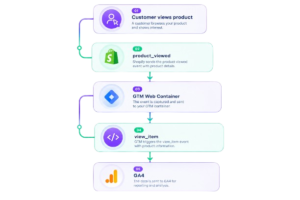
For example:
Server-Side Tracking With GTM
Server-side tracking adds a server container between the website and GA4.
The flow becomes:
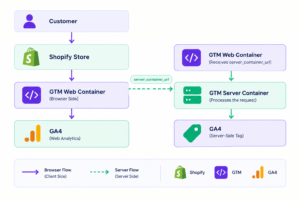
Google describes the server container as an intermediary endpoint that can process, validate, modify, or filter incoming requests before sending them to third-party endpoints.
2. What You Need Before Starting
Make sure you have access to:
- Shopify Admin
- Google Analytics 4
- Google Tag Manager
- Google Cloud Platform, if you are hosting your own GTM server
- Permission to create/edit GTM containers
- Permission to edit the GA4 property
- A Shopify store with products and checkout enabled
You will also need:
- GA4 Measurement ID
- GTM Web Container ID
- GTM Server Container URL
- Server-side GTM container
- GA4 Measurement Protocol/API configuration where required
3. Create Your GA4 Property
If you already have a GA4 property, skip this section.
Step 1: Open Google Analytics
Open Google Analytics and sign in with your Google account.
Step 2: Create a Property
Go to:
Admin → Create Property
Enter:
- Property name
- Reporting time zone
- Currency
Then click Next/Create and complete the setup.
4. Create the GA4 Web Data Stream
After creating the property:
- Open Admin.
- Go to Data collection and modification.
- Click Data Streams.
- Click Add stream.
- Select Web.
- Enter your Shopify store URL.
- Enter a stream name.
- Click Create stream.
Open the newly created web stream and copy the Google tag ID/Measurement ID.
It will normally look similar to:
G-XXXXXXXXXX
Shopify’s GA4 documentation also requires a web data stream and says to make note of the Tag ID for the tagging setup.
5. Create a Google Tag Manager Web Container
Now we’ll create the browser-side GTM container.
Open:
Step 1
Sign in to your Google account.
Step 2
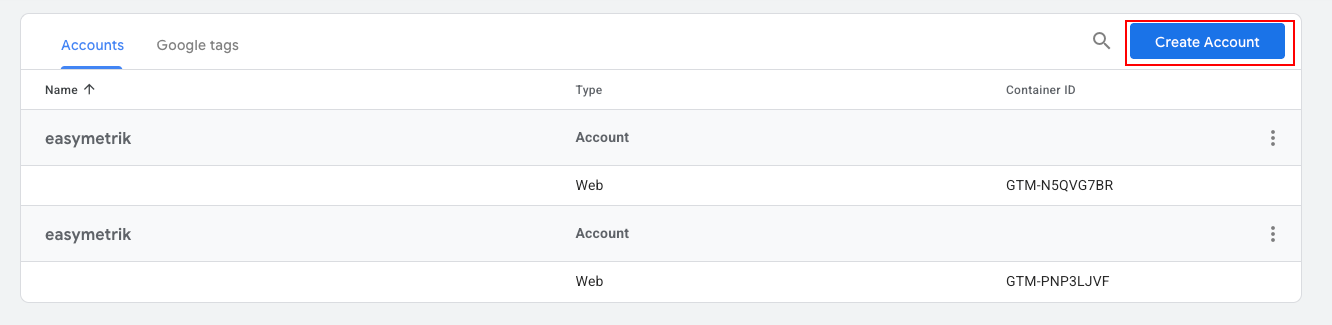
Click Create Account if you don’t already have a GTM account.
Step 3
Enter your account name.
For example:
My Shopify Store
Step 4
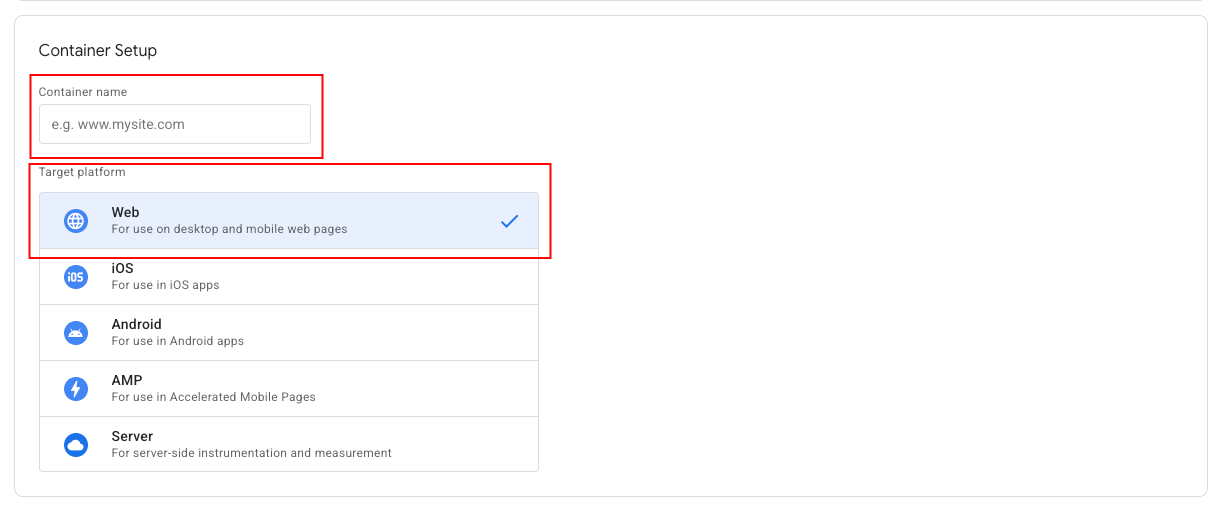
Enter your Shopify store URL.
Step 5
For Target Platform, select:
Web
Step 6
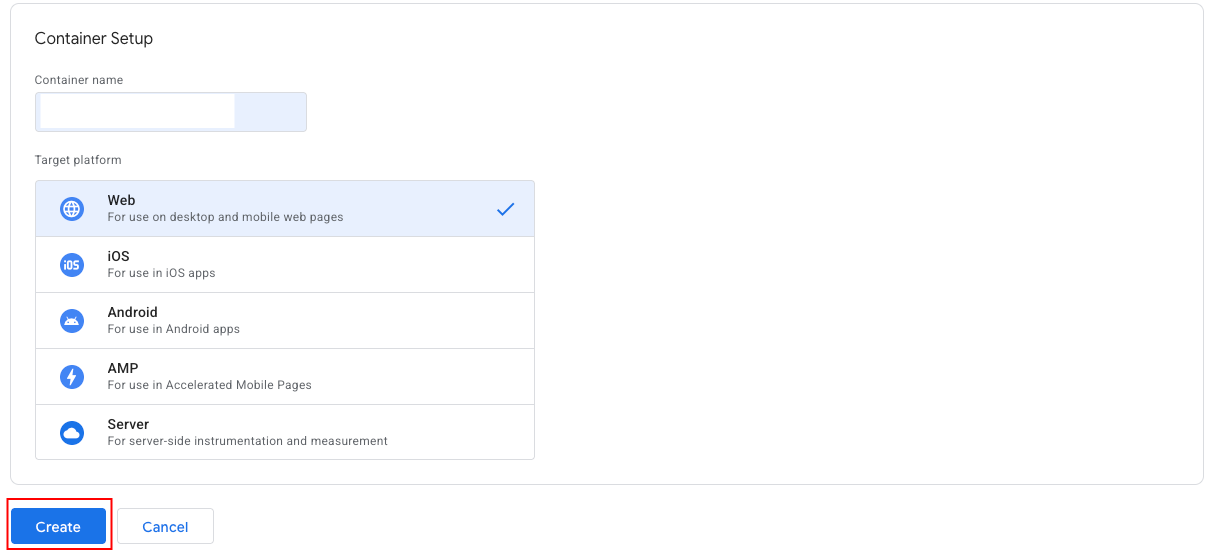
Click Create.
You now have a GTM Web Container.
Copy the container ID.
It will look like:
GTM-XXXXXXX
6. Add GTM to Shopify Using a Custom Pixel
This is an important Shopify-specific step.
Do not simply paste an old GTM installation into theme.liquid and assume it will cover Shopify’s modern customer-event architecture.
Shopify’s current GTM tutorial uses a custom pixel to load GTM and subscribe to Shopify customer events. Shopify also identifies custom pixels as an advanced feature.
Step 1: Open Shopify Admin
Go to:
Shopify Admin → Settings
Step 2: Open Customer Events
Find:
Customer events
Step 3: Create a Custom Pixel
Click:
Add custom pixel
Give it a name such as:
GTM Custom Pixel
Step 4: Paste Your GTM Pixel Code
Shopify provides a GTM custom-pixel tutorial and example code.
The basic GTM initialization looks like:
window.dataLayer = window.dataLayer || [];

(function(w,d,s,l,i){
  w[l]=w[l]||[];
  w[l].push({
    'gtm.start': new Date().getTime(),
    event:'gtm.js'
  });

  var f=d.getElementsByTagName(s)[0],
      j=d.createElement(s),
      dl=l!='dataLayer'?'&l='+l:'';

  j.async=true;
  j.src='https://www.googletagmanager.com/gtm.js?id='+i+dl;

  f.parentNode.insertBefore(j,f);
})(window,document,'script','dataLayer','GTM-XXXXXXX');
Replace:
GTM-XXXXXXX
with your actual GTM Web Container ID.
Shopify’s official tutorial explains that the GTM installation code should be adapted for the custom pixel environment rather than pasted as a normal HTML page installation.
7. Send Shopify Customer Events to the GTM dataLayer
Now we need to tell Shopify’s custom pixel which customer events should be pushed into GTM.
Shopify provides standard customer events that can be subscribed to from a custom pixel.
For example, to track product views:
analytics.subscribe("product_viewed", (event) => {
  window.dataLayer.push({
    event: "product_viewed",
    client_id: event.clientId,
    product_id: event.data?.productVariant?.product?.id,
    product_title: event.data?.productVariant?.title,
    product_sku: event.data?.productVariant?.sku,
    url: event.context.document.location.href
  });
});
When a visitor views a product:
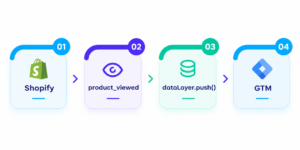
Shopify’s documentation uses this same event-subscription/dataLayer approach for GTM custom pixels.
8. Add the Main Shopify Ecommerce Events
For ecommerce tracking, you can map Shopify customer events to recommended GA4 ecommerce events.
The important mappings are:
| Shopify Customer Event | GA4 Event |
|---|---|
product_viewed |
view_item |
product_added_to_cart |
add_to_cart |
product_removed_from_cart |
remove_from_cart |
cart_viewed |
view_cart |
checkout_started |
begin_checkout |
checkout_address_info_submitted |
add_shipping_info |
payment_info_submitted |
add_payment_info |
checkout_completed |
purchase |
collection_viewed |
view_item_list |
Shopify’s current GTM custom-pixel documentation provides these event mappings.
9. Add the Product View Event
Inside your Shopify custom pixel, add:
analytics.subscribe("product_viewed", (event) => {
  window.dataLayer.push({
    event: "product_viewed",
    client_id: event.clientId,
    product_id: event.data?.productVariant?.product?.id,
    product_title: event.data?.productVariant?.title,
    product_sku: event.data?.productVariant?.sku,
    url: event.context.document.location.href
  });
});
Save the custom pixel.
10. Add the Add-to-Cart Event
Add:
analytics.subscribe("product_added_to_cart", (event) => {
  window.dataLayer.push({
    event: "product_added_to_cart",
    client_id: event.clientId,
    product_title: event.data?.cartLine?.merchandise?.product?.title,
    quantity: event.data?.cartLine?.quantity,
    price: event.data?.cartLine?.merchandise?.price?.amount,
    total_cost: event.data?.cartLine?.cost?.totalAmount?.amount
  });
});
Now Shopify sends an event into the GTM dataLayer when a product is added to the cart.
11. Add the Cart View Event
Add:
analytics.subscribe("cart_viewed", (event) => {
  window.dataLayer.push({
    event: "cart_viewed",
    client_id: event.clientId,
    cart_id: event.data?.cart?.id,
    quantity: event.data?.cart?.totalQuantity,
    total_cost: event.data?.cart?.cost?.totalAmount?.amount
  });
});
12. Add the Checkout Started Event
Add:
analytics.subscribe("checkout_started", (event) => {
  window.dataLayer.push({
    event: "checkout_started",
    client_id: event.clientId,
    checkout_token: event.data?.checkout?.token,
    value: event.data?.checkout?.totalPrice?.amount,
    currency: event.data?.checkout?.currencyCode
  });
});
13. Add the Purchase Event
The purchase event is the most important ecommerce event in this tutorial.
Use Shopify’s checkout_completed event and map it to the GA4 purchase event inside GTM.
Example:
analytics.subscribe("checkout_completed", (event) => {
  window.dataLayer.push({
    event: "checkout_completed",
    client_id: event.clientId,
    event_id: event.id,
    order_id: event.data?.checkout?.order?.id,
    currency: event.data?.checkout?.currencyCode,
    value: event.data?.checkout?.totalPrice?.amount,
    tax: event.data?.checkout?.totalTax?.amount,
    shipping: event.data?.checkout?.shippingLine?.price?.amount
  });
});
Shopify’s documentation specifically maps checkout_completed to the GA4 purchase event and identifies the order ID, currency, value, shipping, tax, and line items as useful GA4 parameters.
14. Save and Connect the Custom Pixel
After adding the required subscriptions:
- Click Save.
- Click Connect.
- Review the customer-event permissions.
- Confirm the pixel connection.
Shopify’s custom pixel environment is sandboxed, so testing is important before relying on the data in production. Shopify recommends its Pixel Helper for testing custom pixels.
15. Configure the Google Tag in GTM
Now open your GTM Web Container.
Go to:
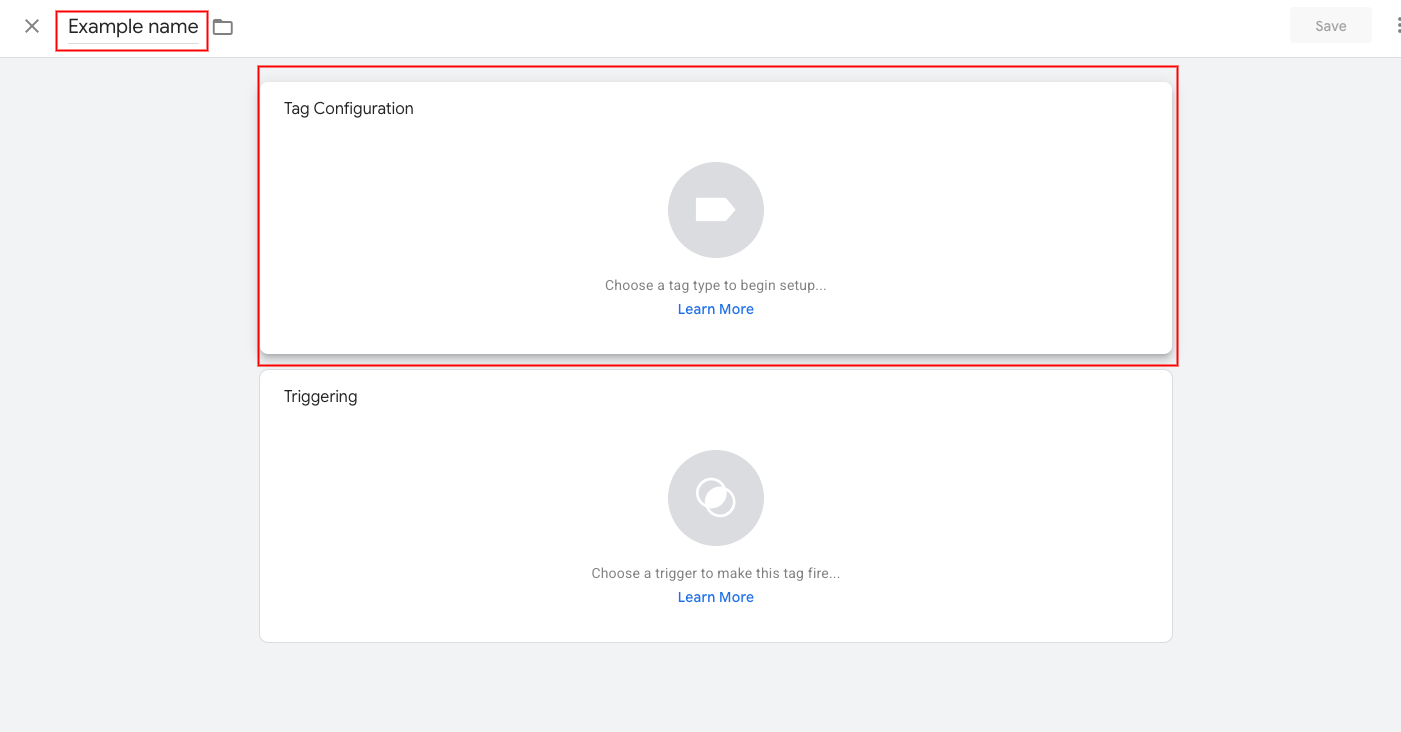
Tags → New
Click:

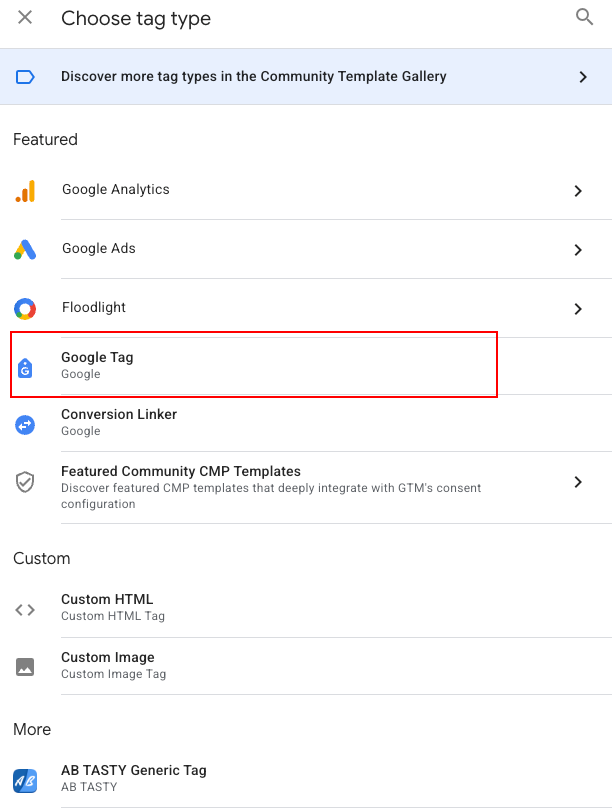
Tag Configuration → Google Tag
Enter your GA4 Google tag ID.
 Example:
G-XXXXXXXXXX
Set the trigger to:
Initialization – All Pages
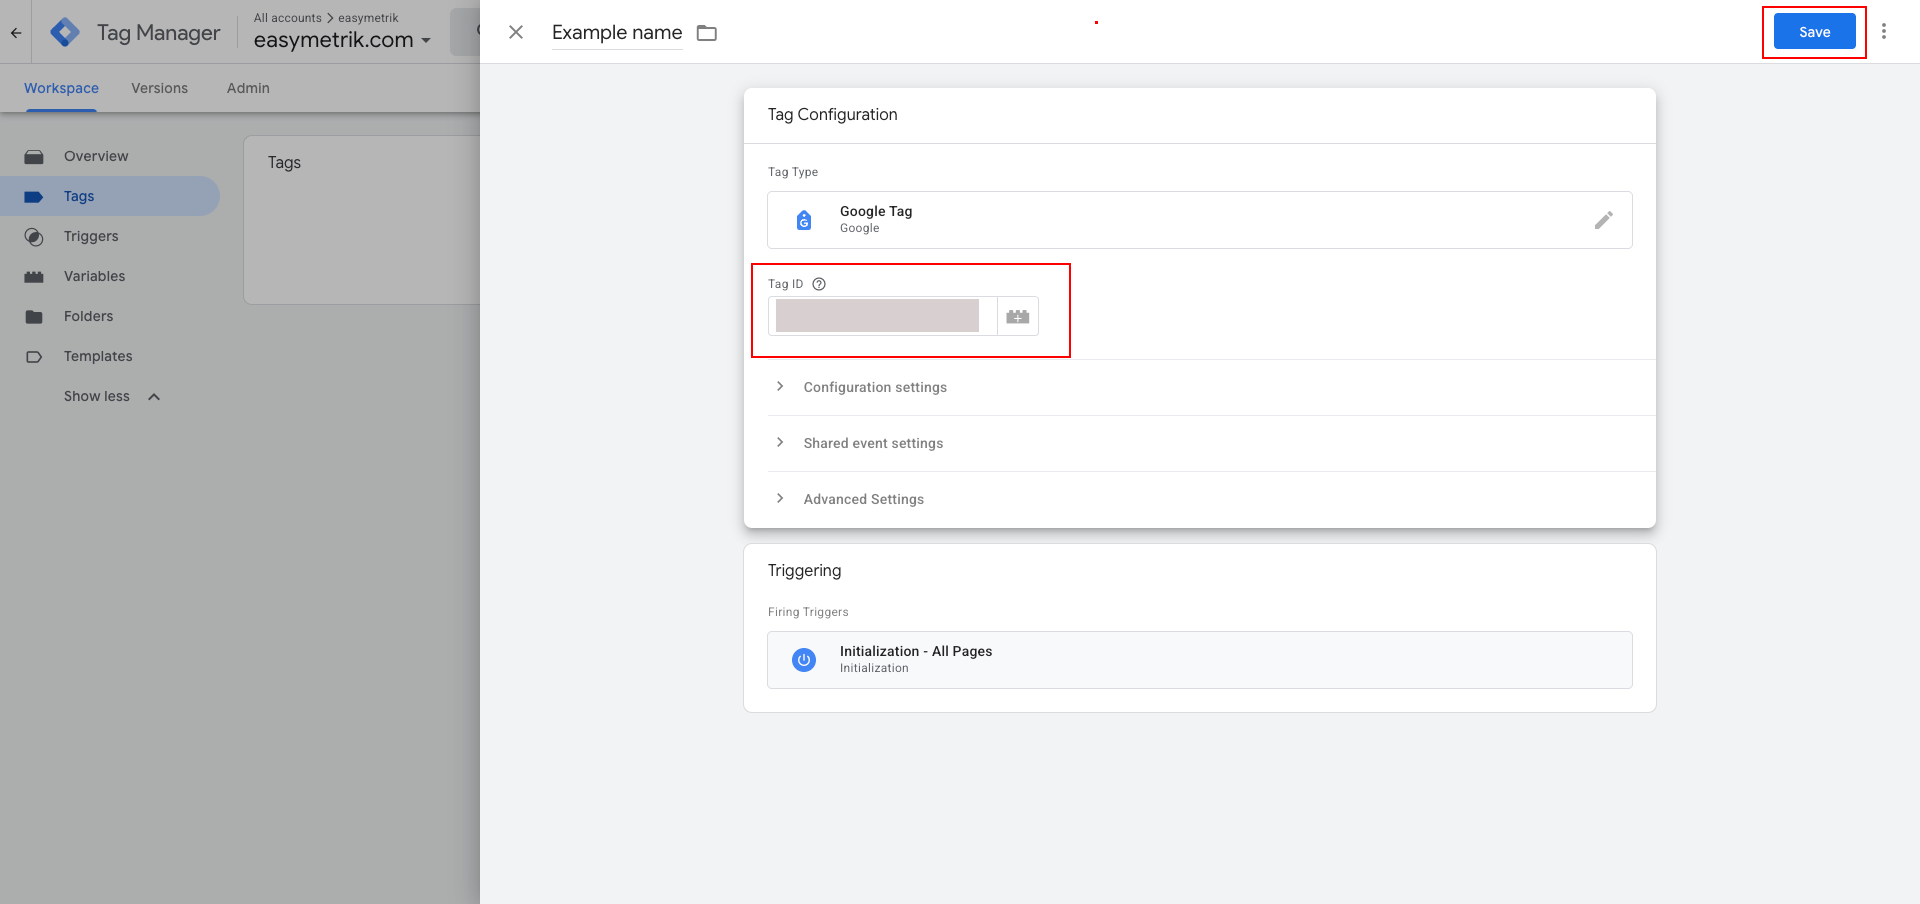
or the appropriate page-load trigger for your implementation.
Google’s current GTM documentation uses the Google tag as the base tag for sending data to GA4.
16. Create the Product View Trigger
Go to:
Triggers → New
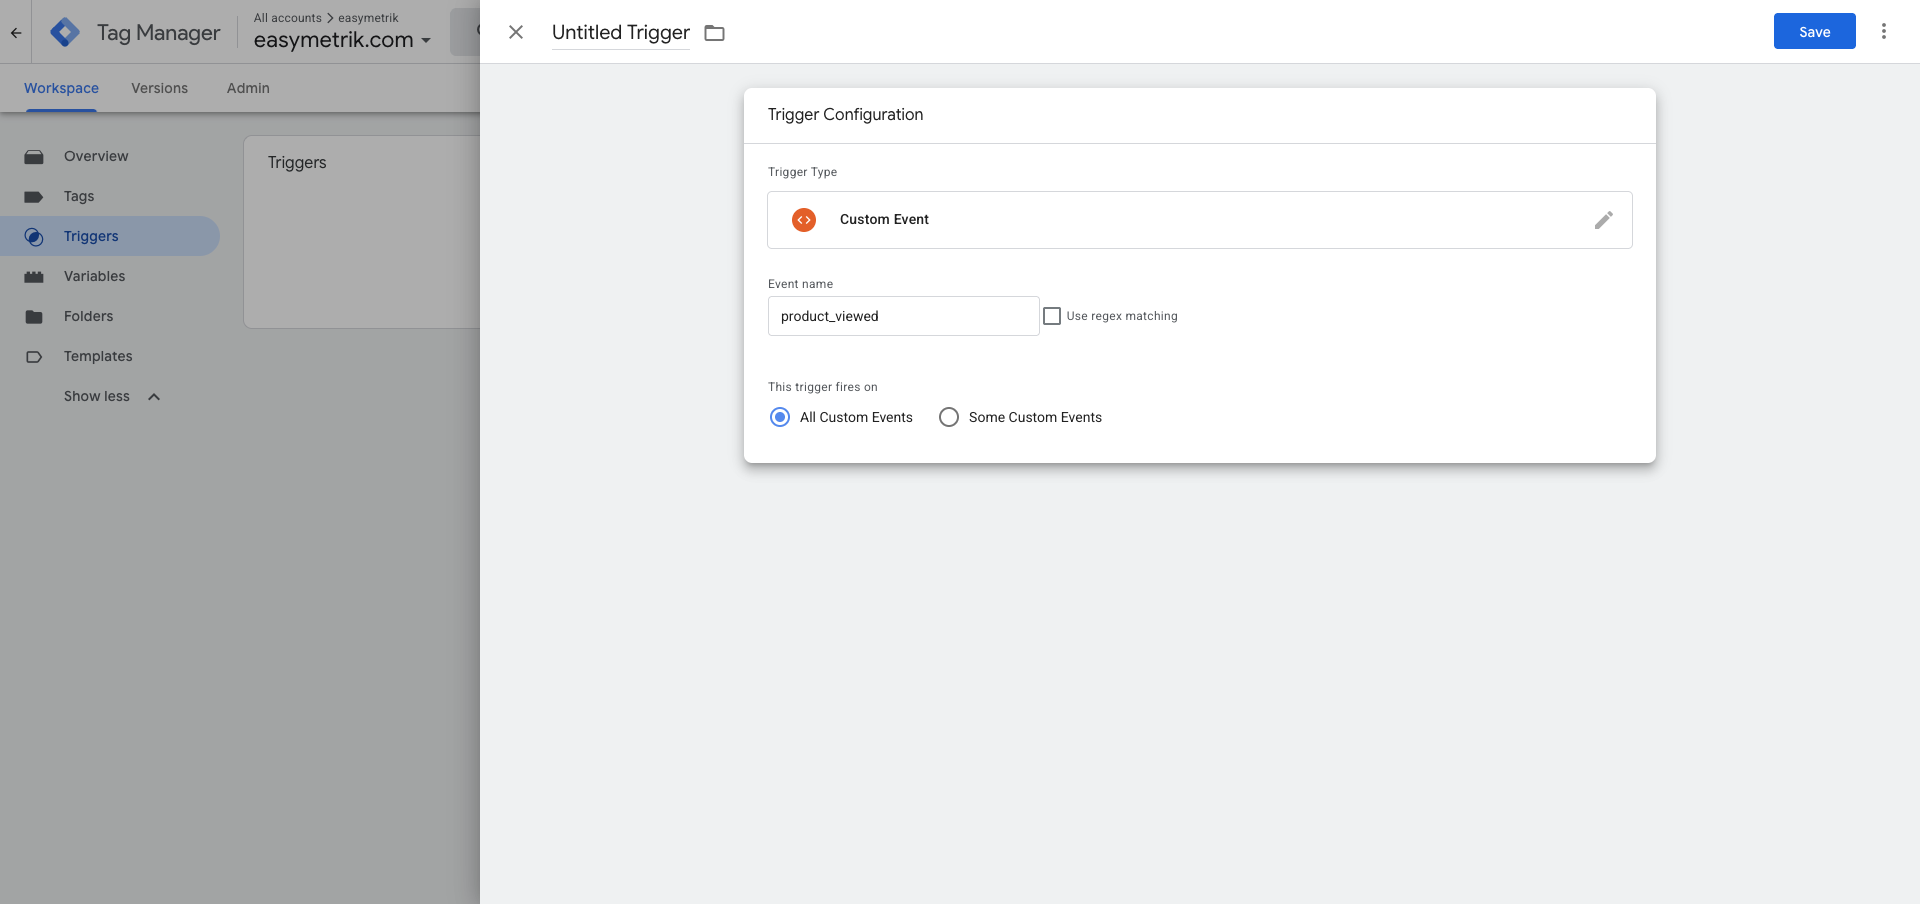
Select:

Custom Event
Enter:
product_viewed
Set:
This trigger fires on → All Custom Events
Click Save.
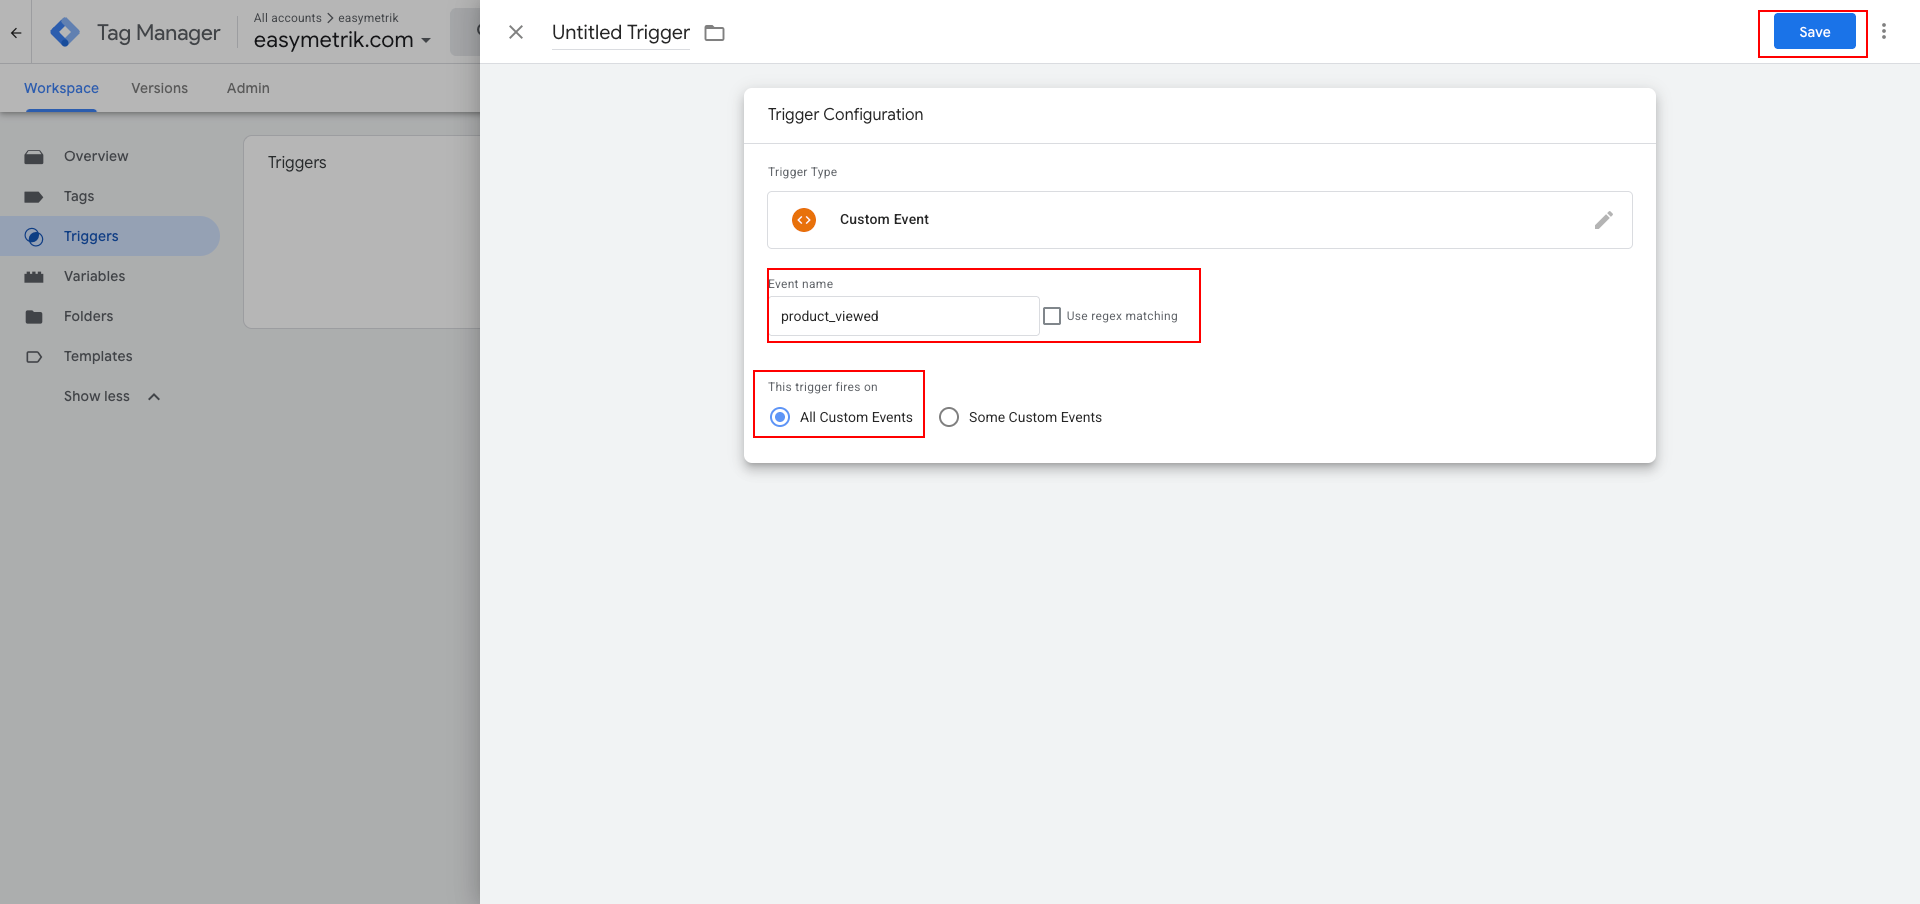
Shopify’s GTM documentation explains that the GTM trigger’s event name must match the event key pushed into the custom-pixel dataLayer.
17. Create the GA4 view_item Event Tag
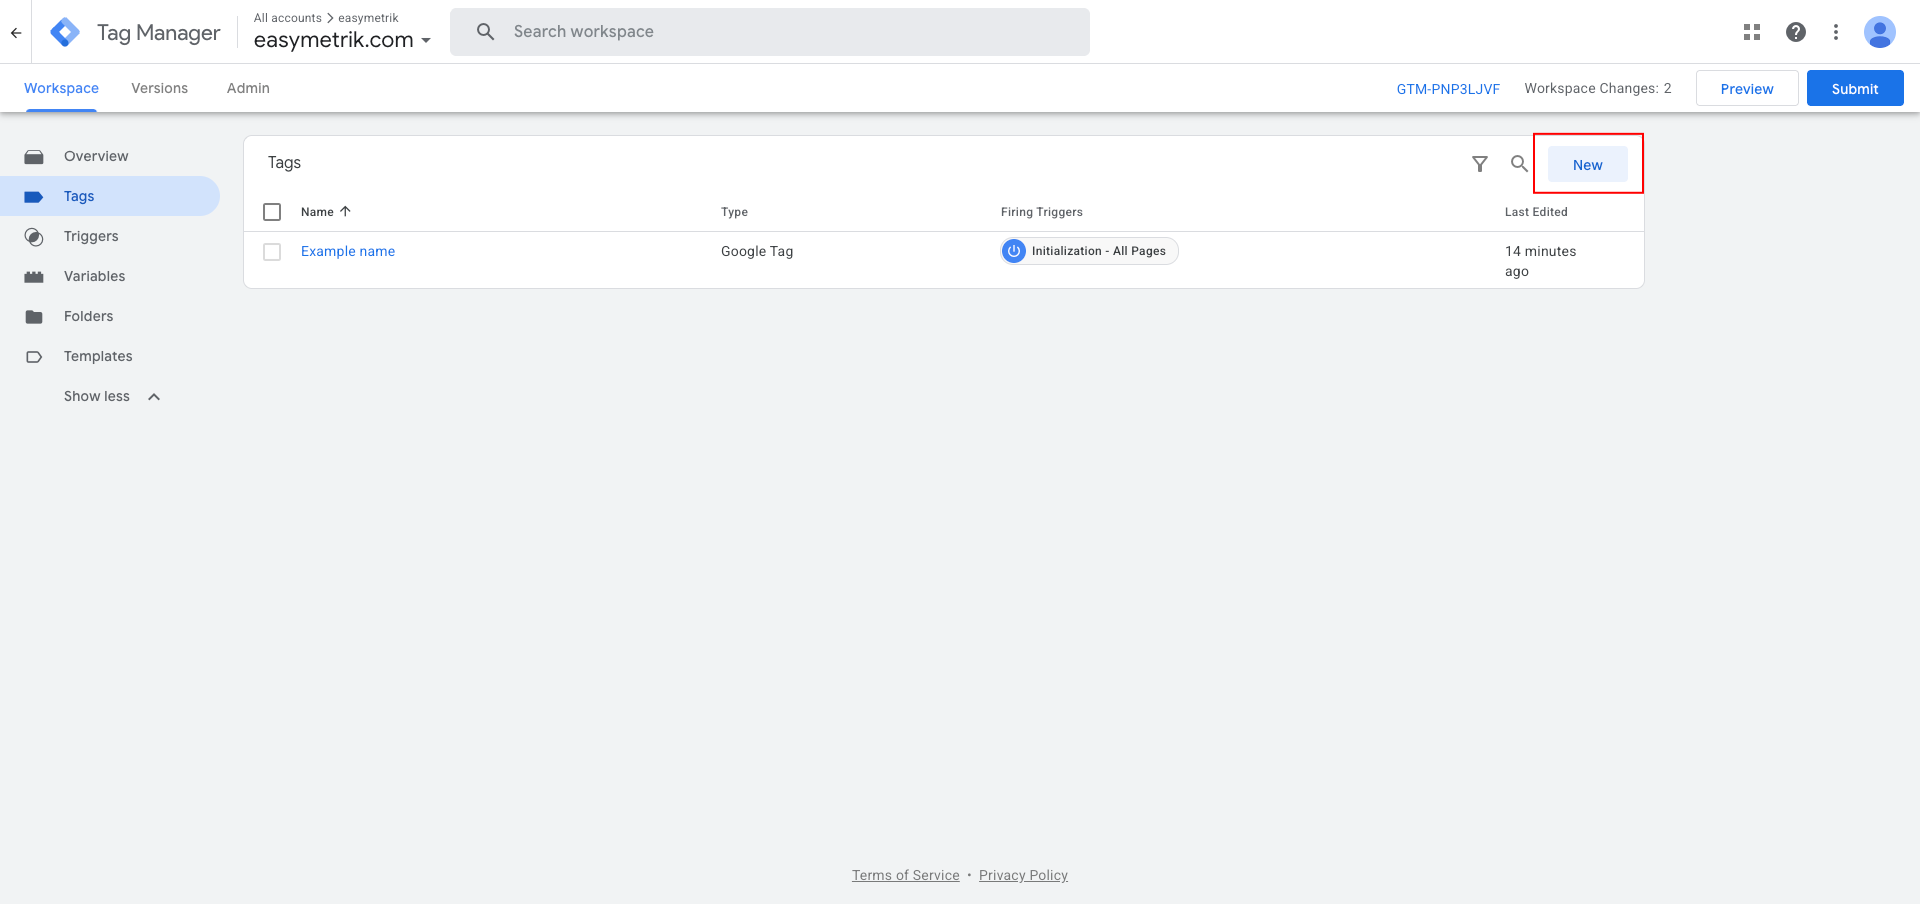
Go to:
Tags → New
Select:
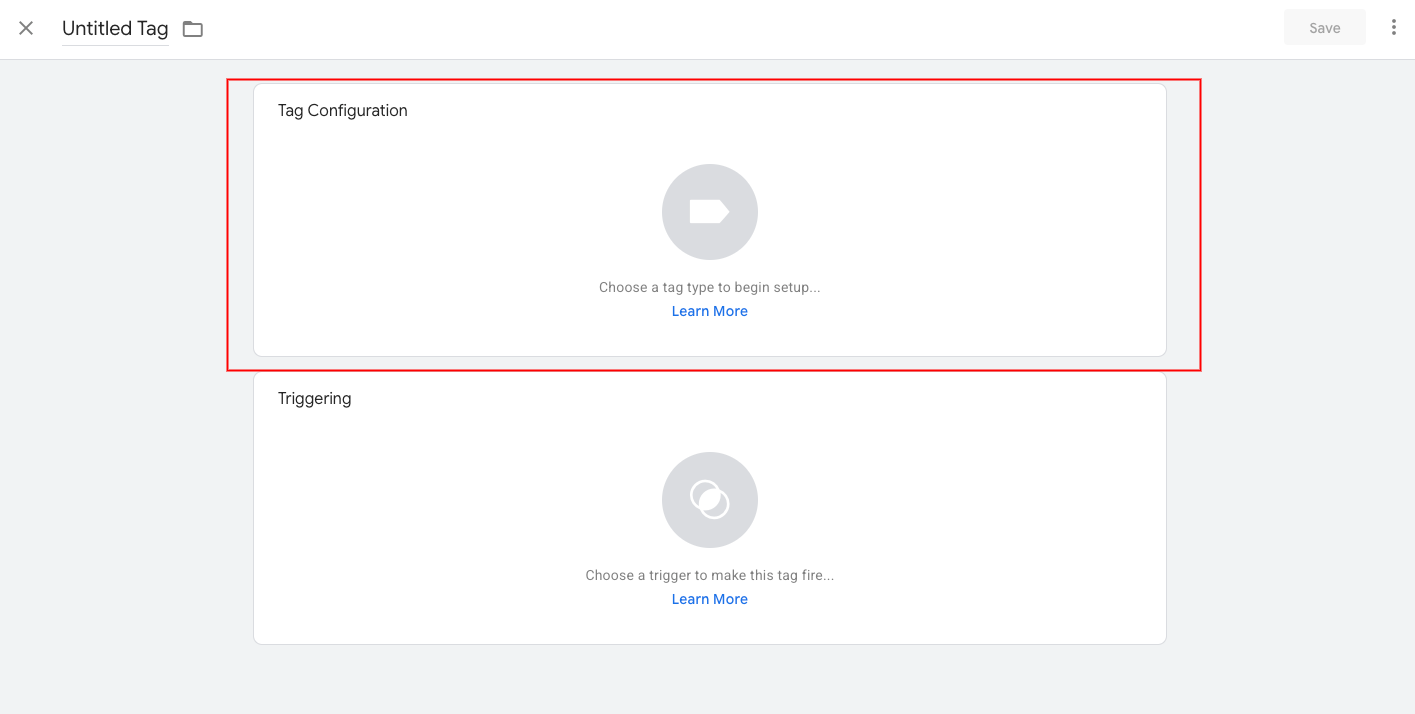
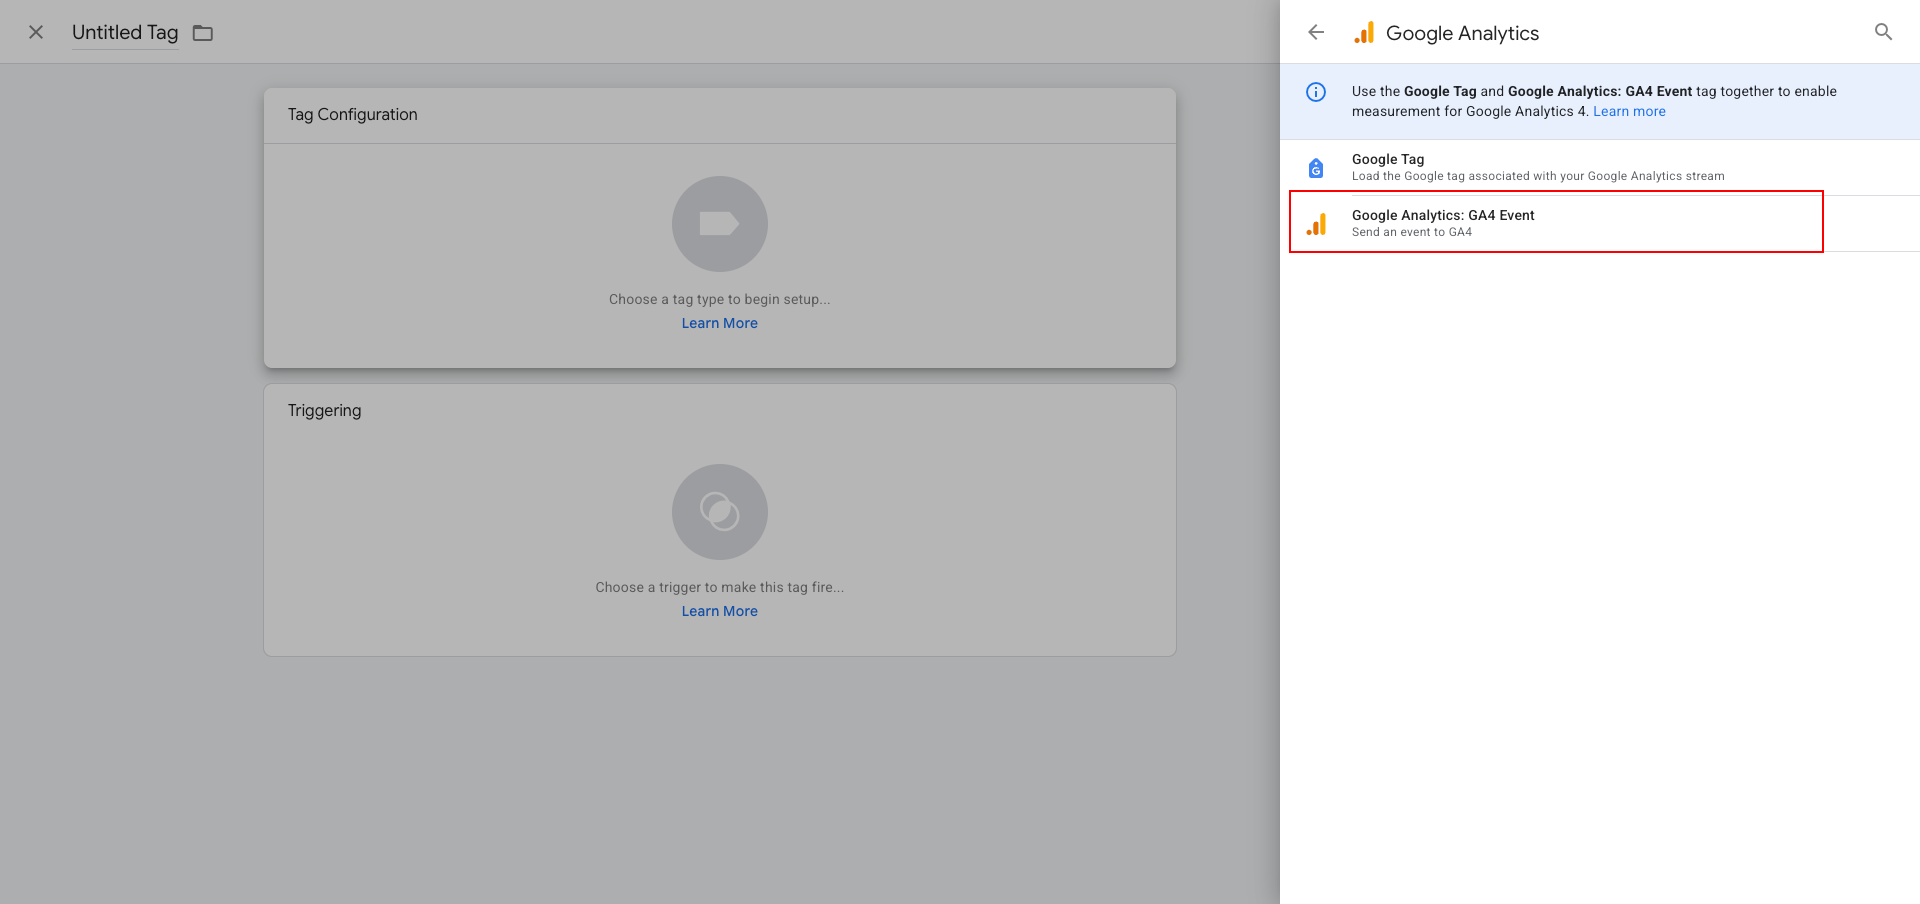
Google Analytics
Then select:
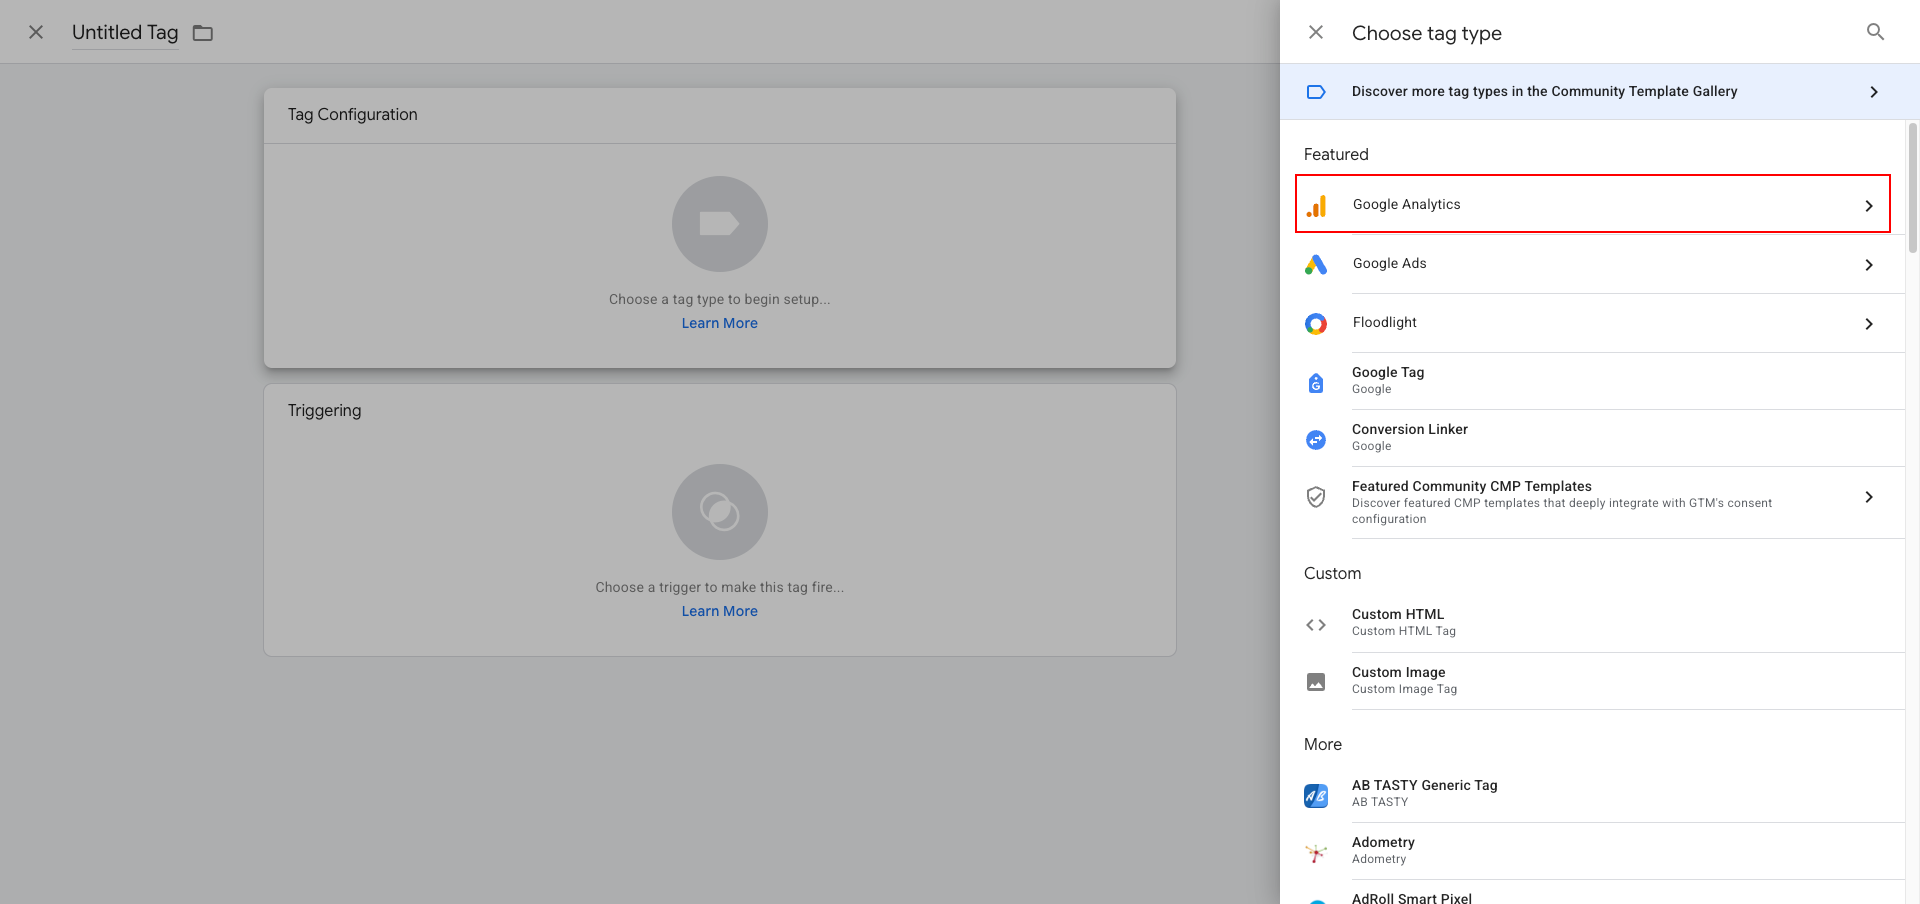
Google Analytics: GA4 Event
or the current Google Analytics event-tag option available in your GTM interface.
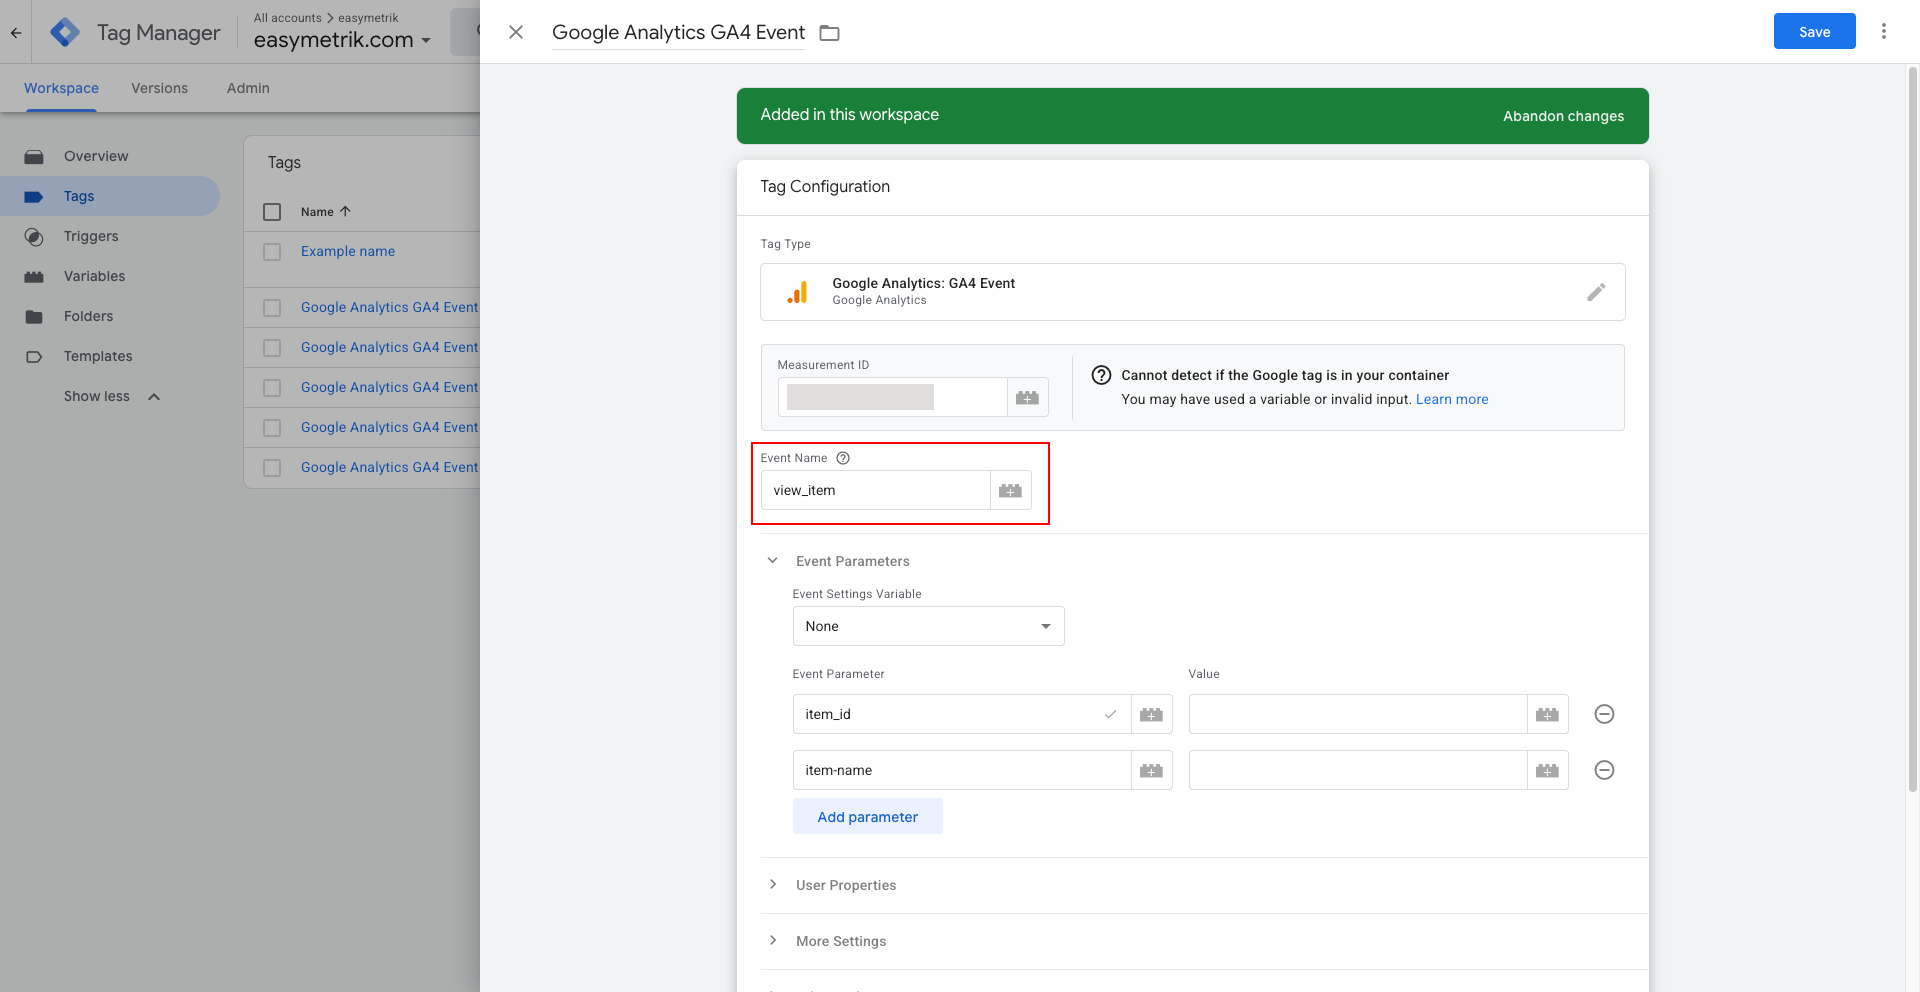
Set:
Event Name:
view_item
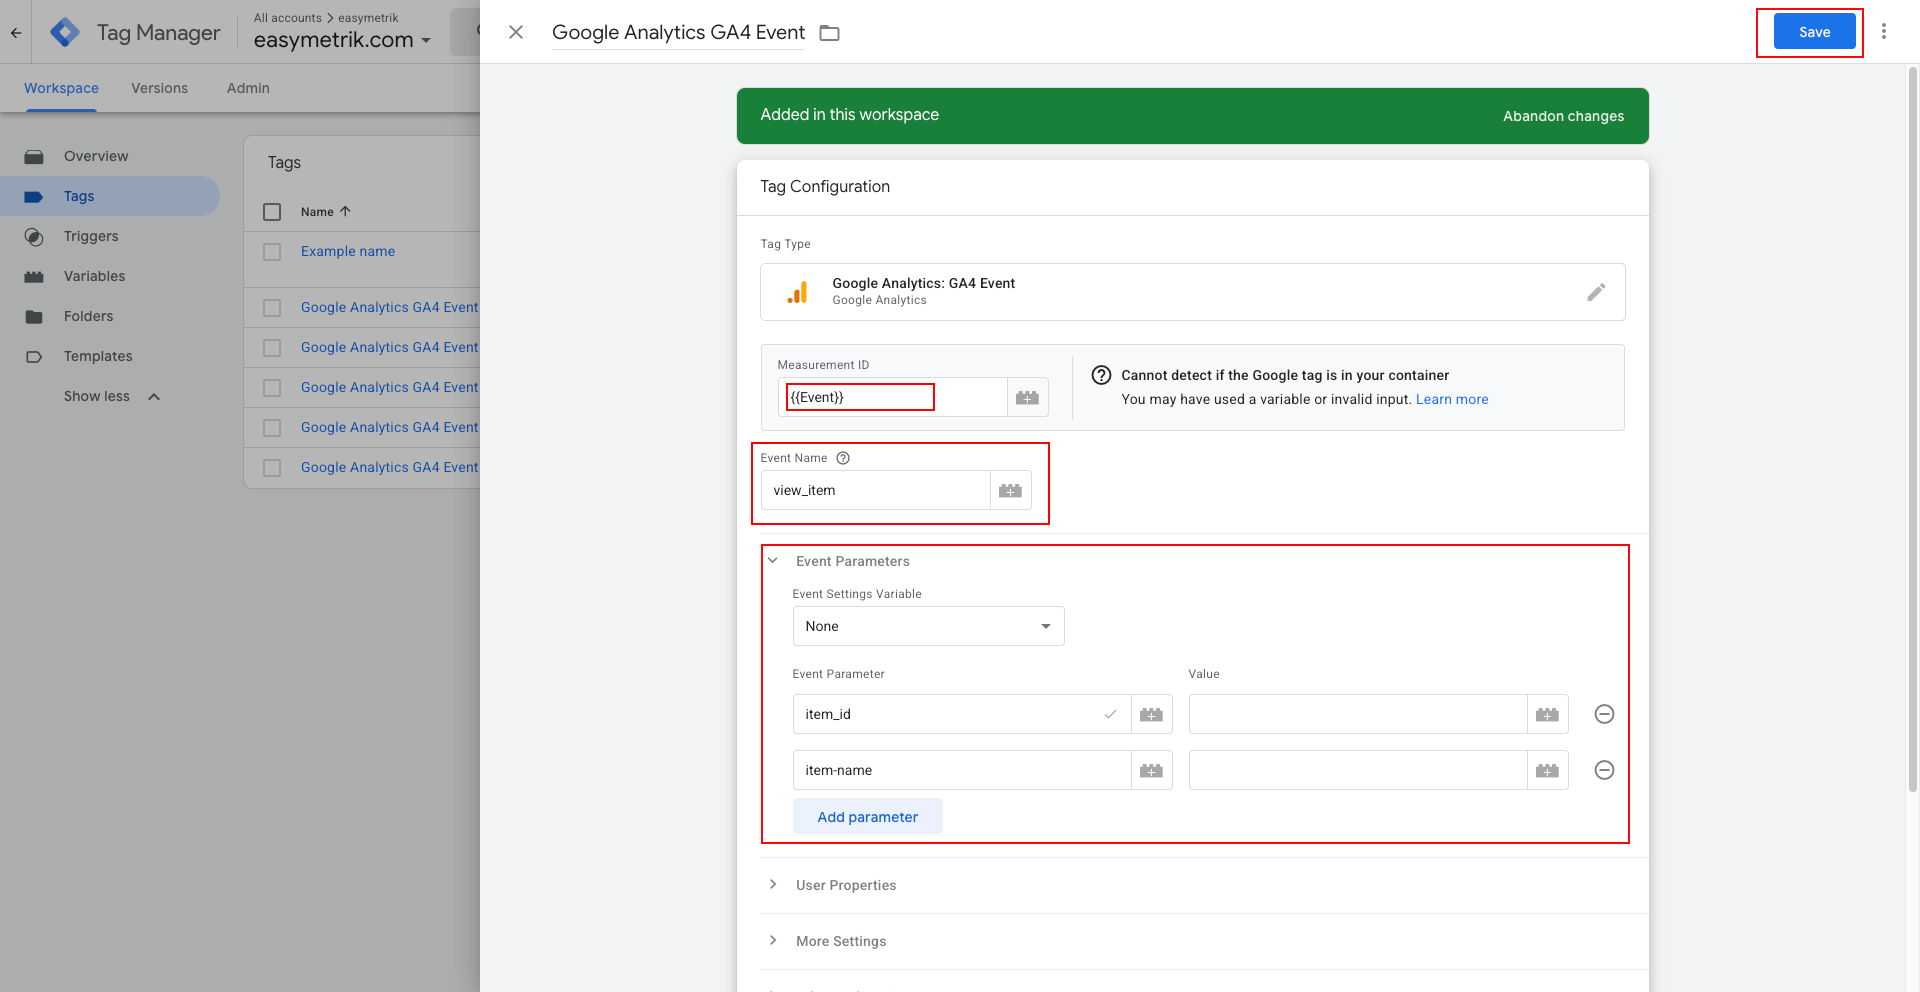
Select the Google tag created earlier.
Add the required event parameters.
For example:
| GA4 Parameter | GTM Variable |
|---|---|
item_id |
Product ID variable |
item_name |
Product Title variable |
Then attach the:
product_viewed
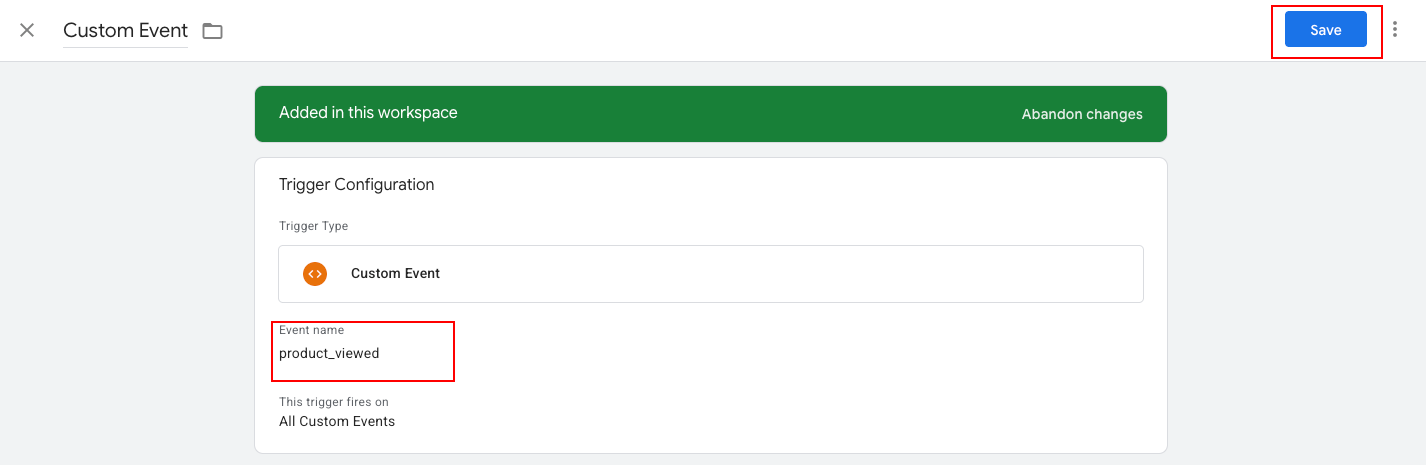
trigger.
Save the tag.
Google’s GA4 GTM documentation follows this same basic pattern: create an event tag, enter the event name, add event parameters, and attach a trigger.
18. Create the Add-to-Cart GA4 Event
Create another tag.
Set:
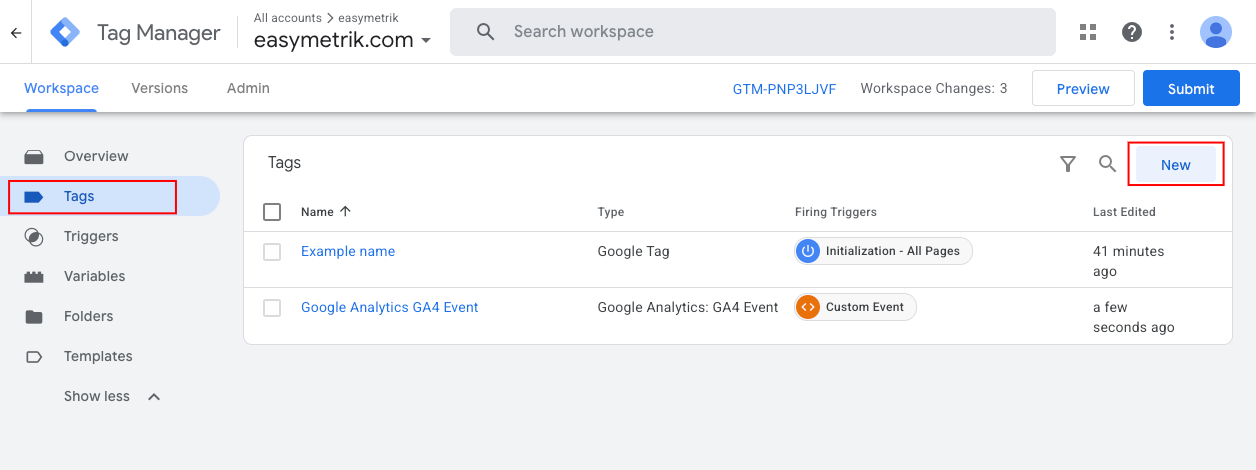
Event Name:
add_to_cart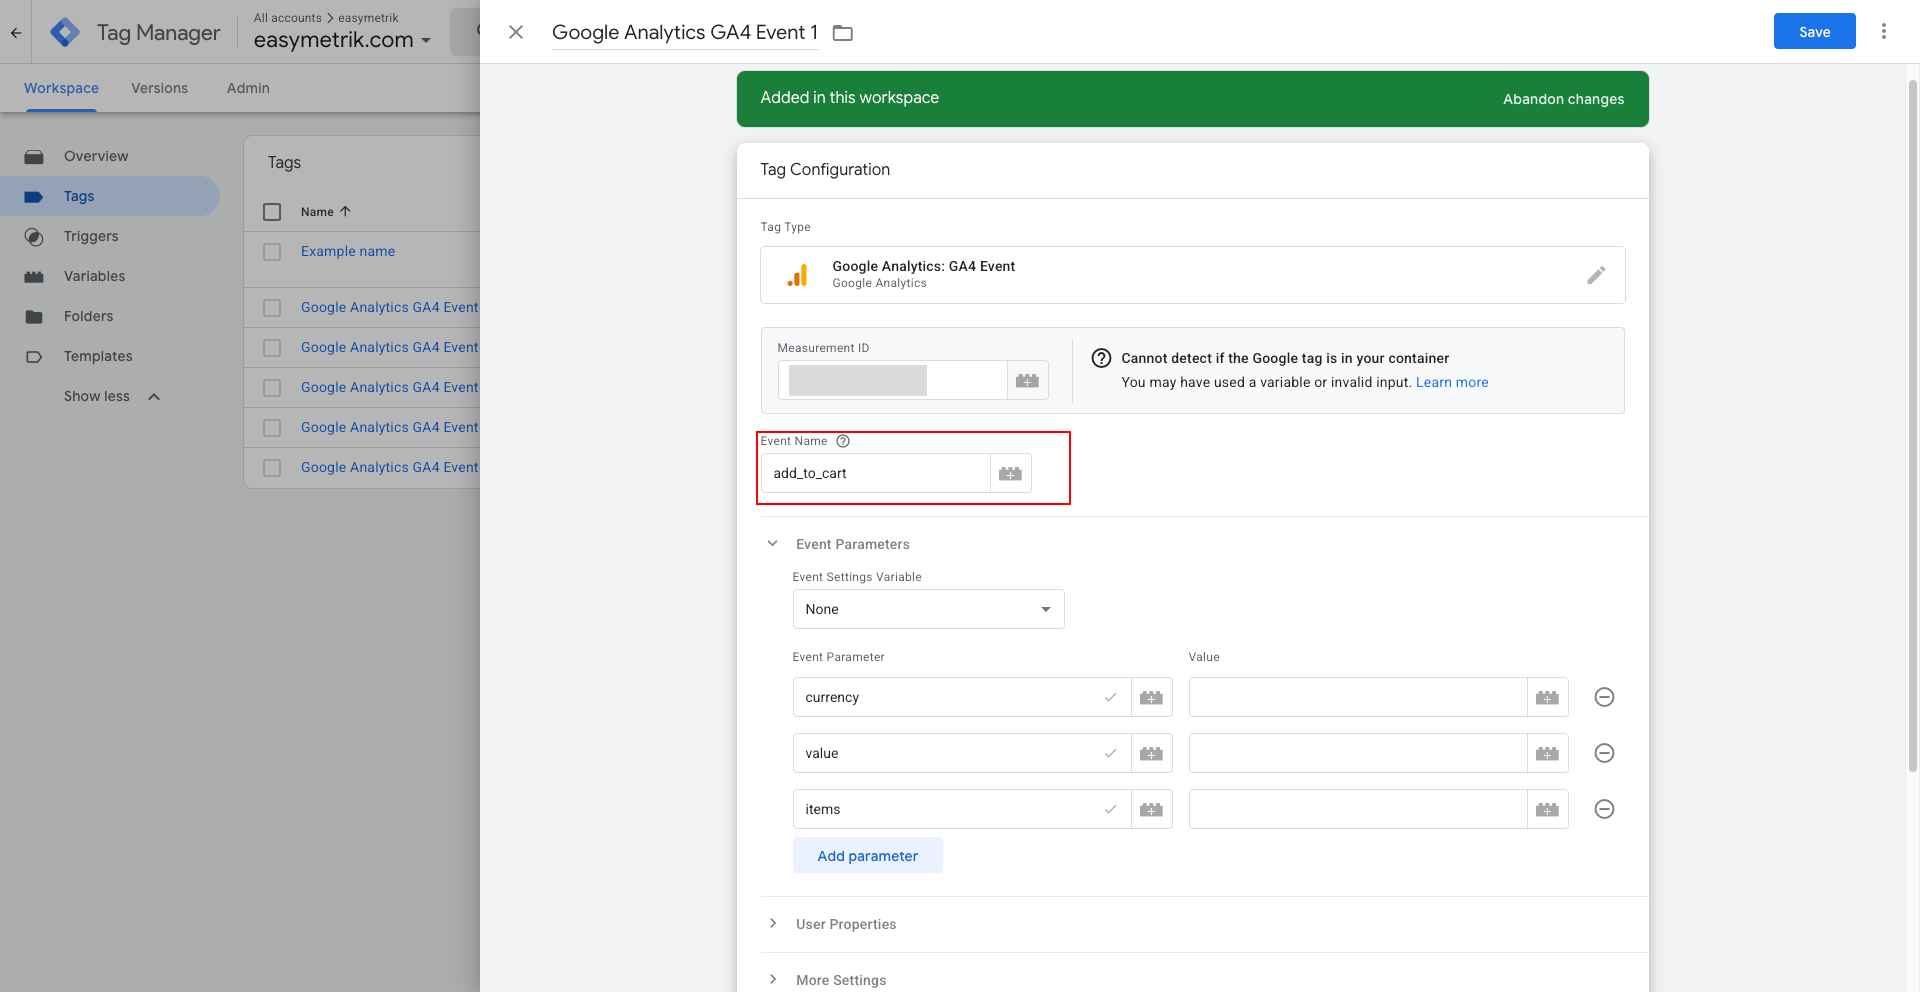
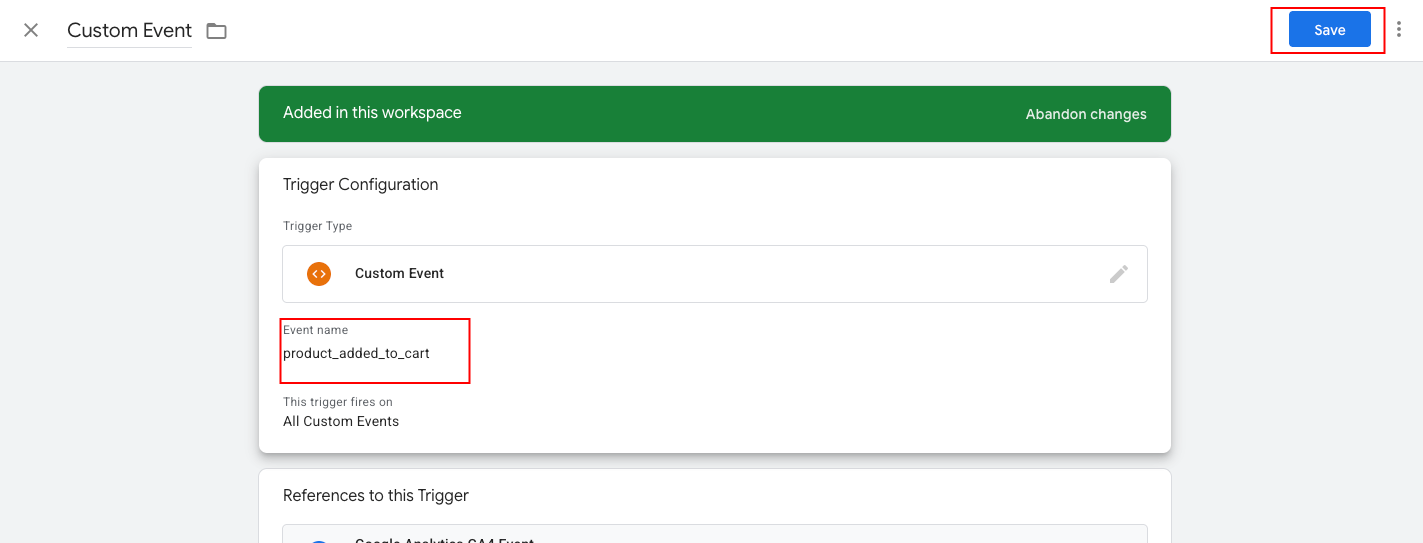
Create a Custom Event trigger:
product_added_to_cart
Add ecommerce parameters such as:
currency
value
items
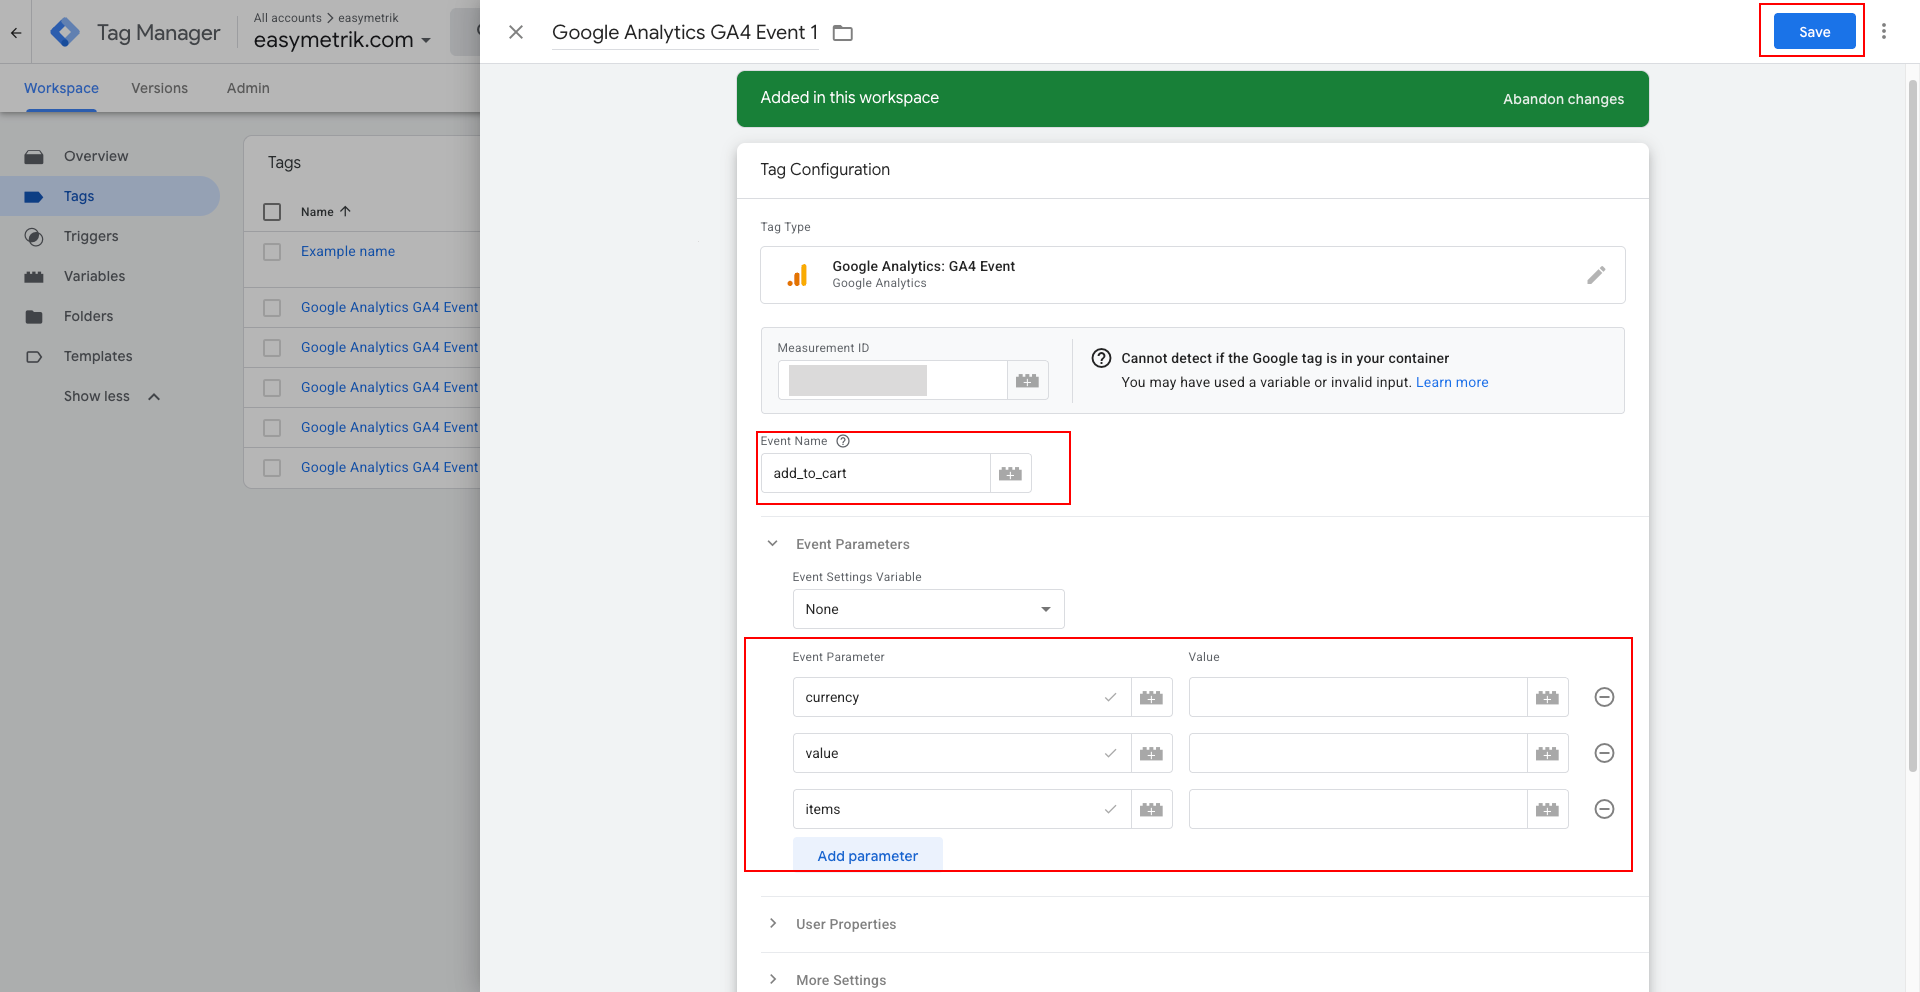
where your implementation provides those values.
Save the tag.
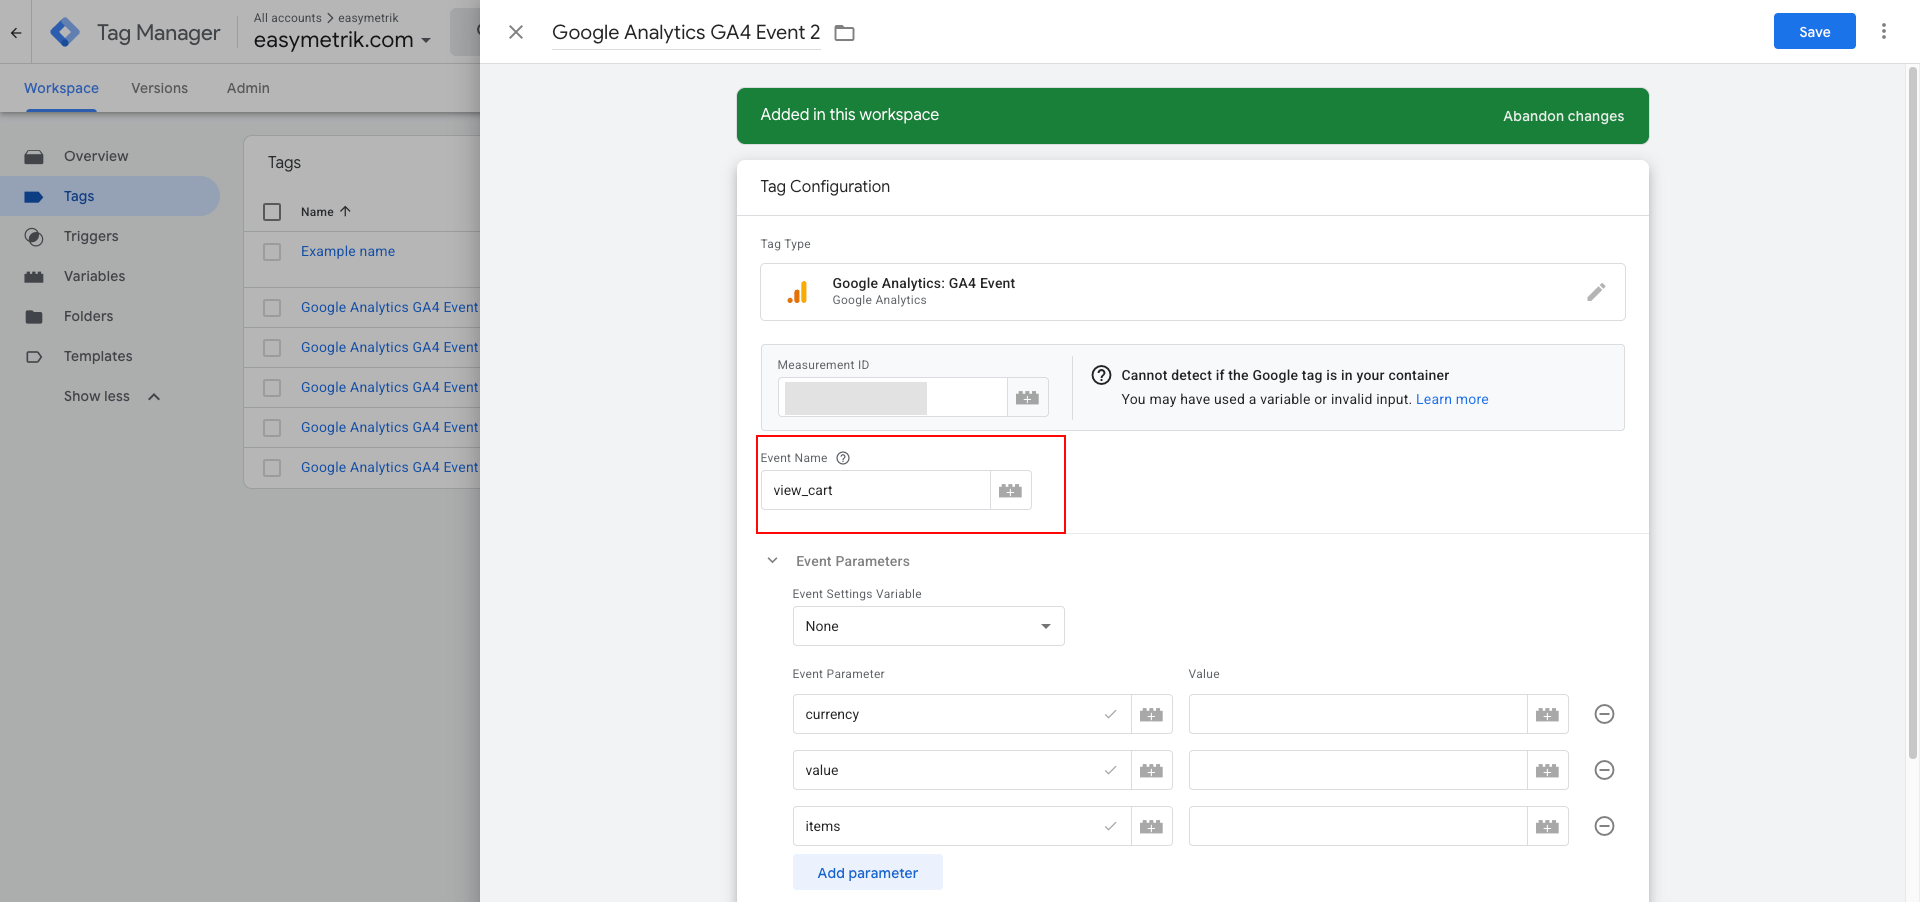
19. Create the View Cart GA4 Event
Create a new GA4 Event tag.
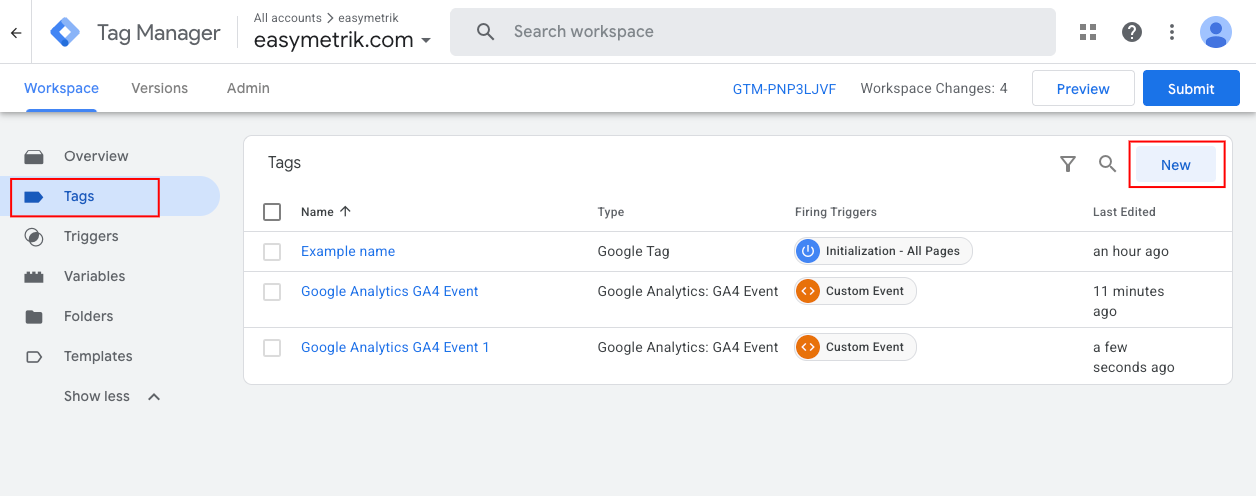
Set:
Event Name: view_cart
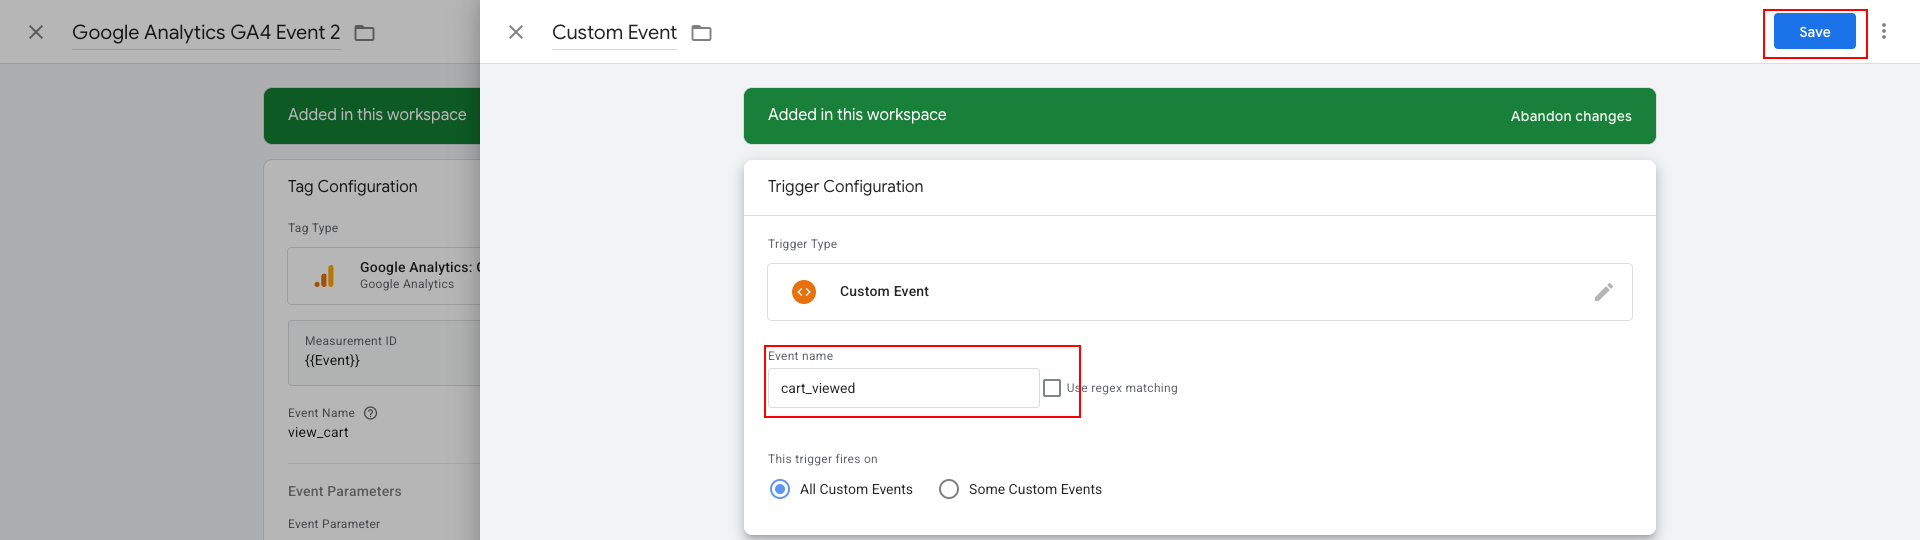
Create a Custom Event trigger:
cart_viewed
Add the appropriate:
currency
value
items
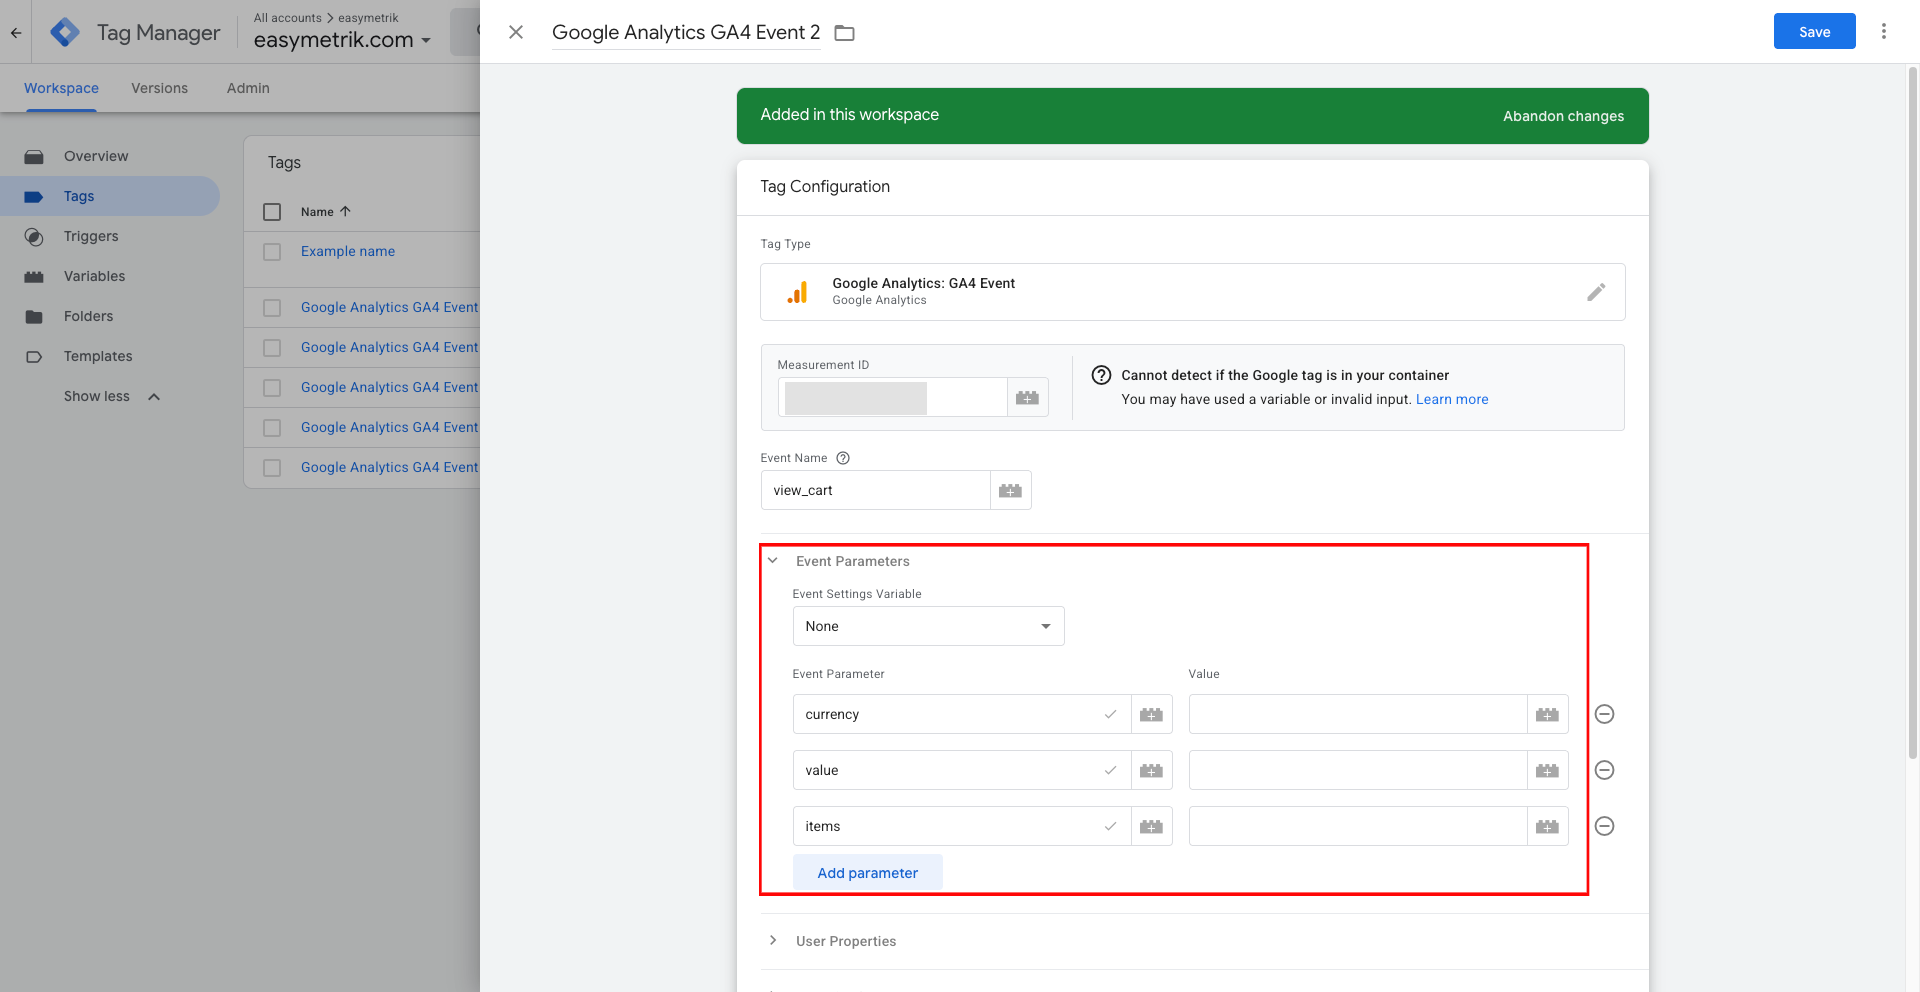
parameters when available.
Save the tag.
20. Create the Begin Checkout GA4 Event
Create another GA4 Event tag.
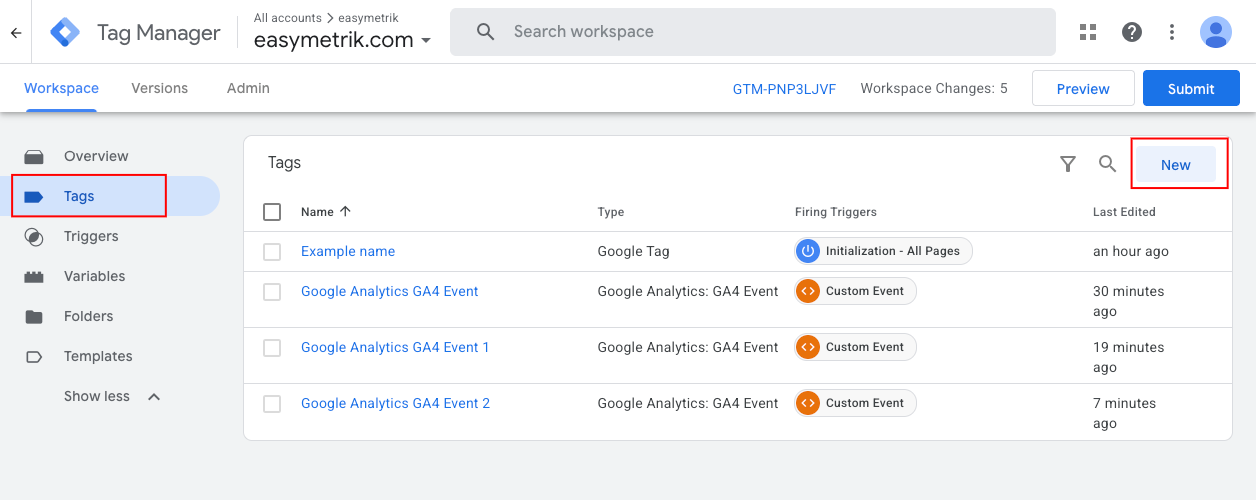
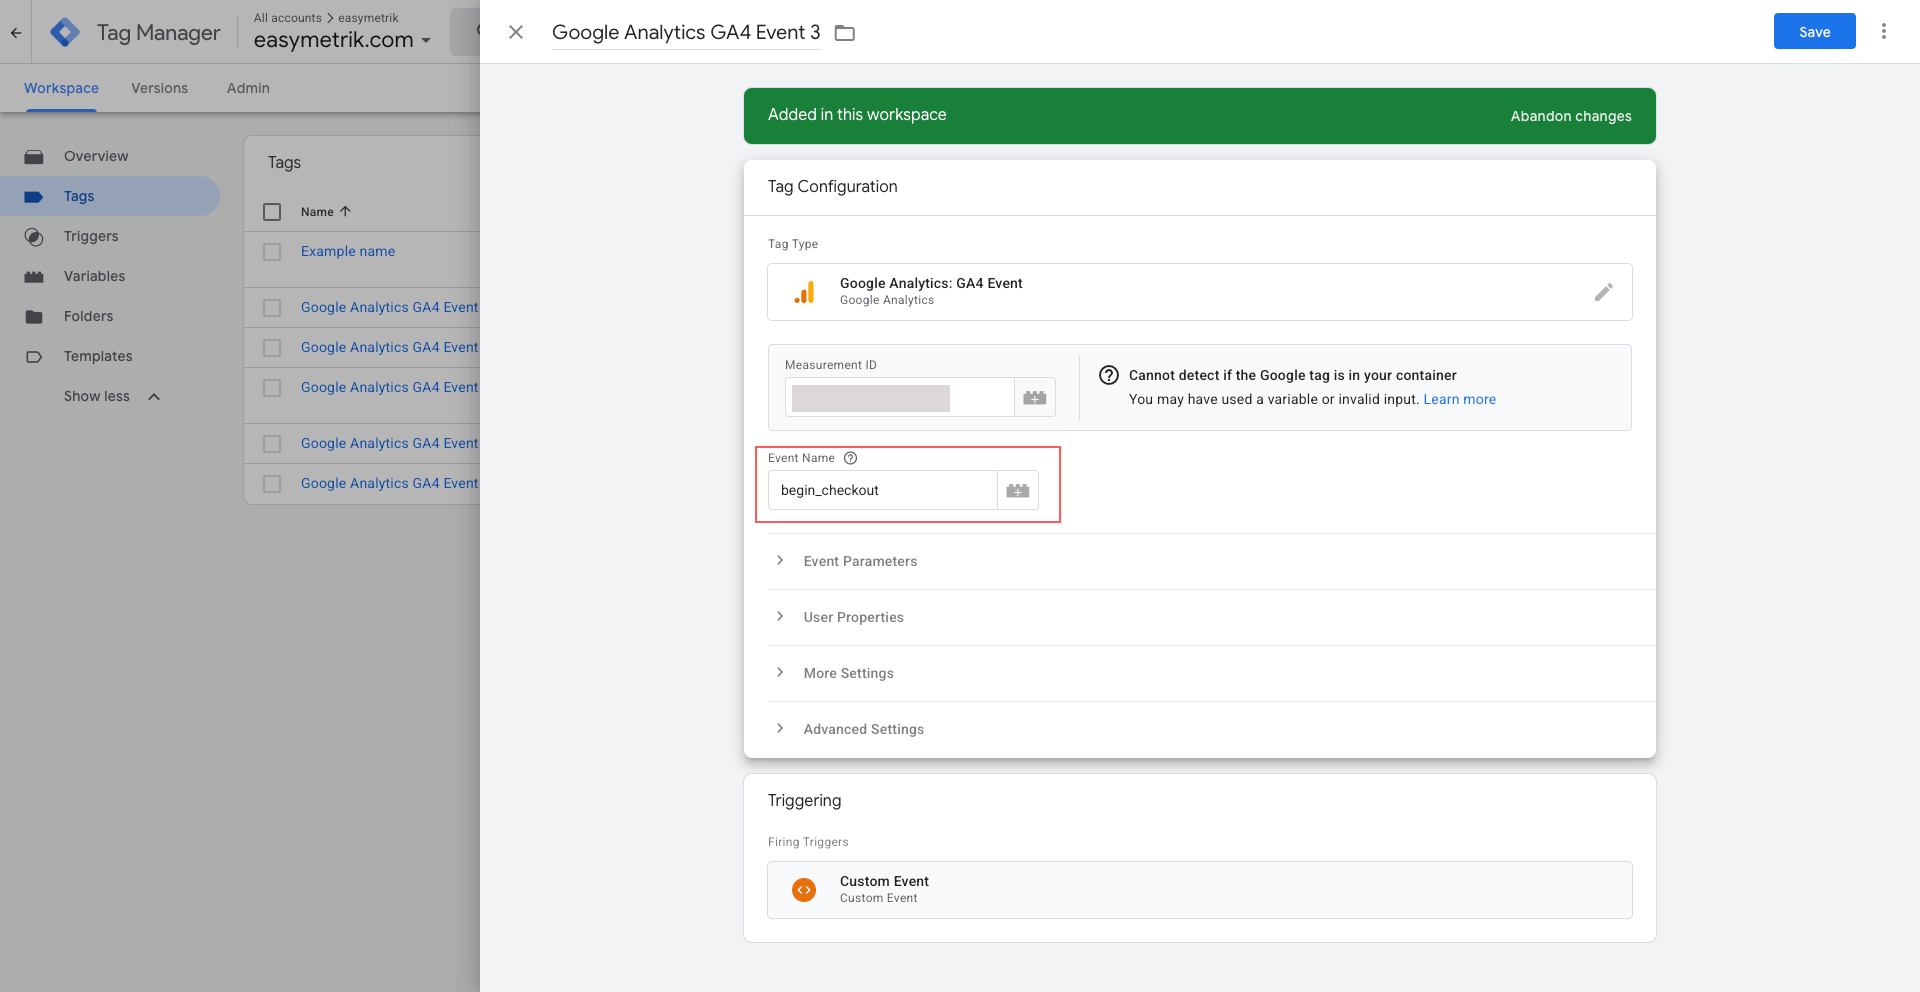
Set:
Event Name: begin_checkout
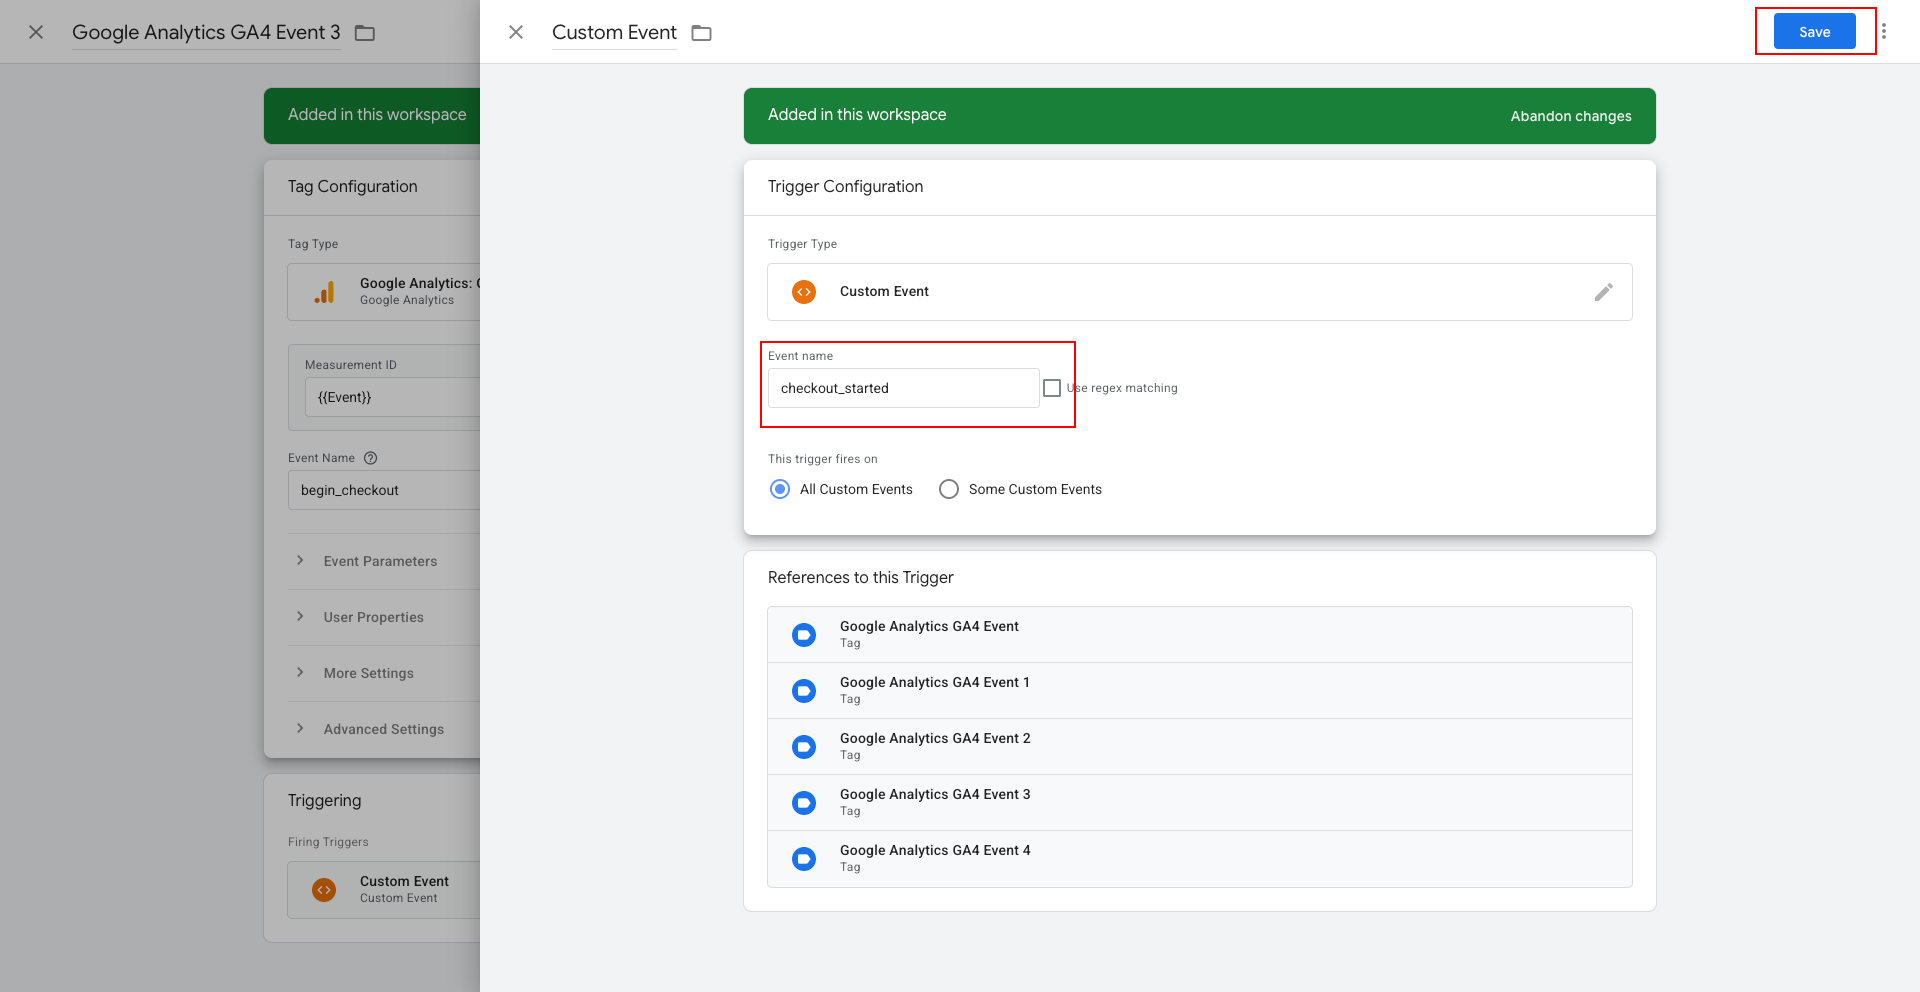
Create a Custom Event trigger:
checkout_started
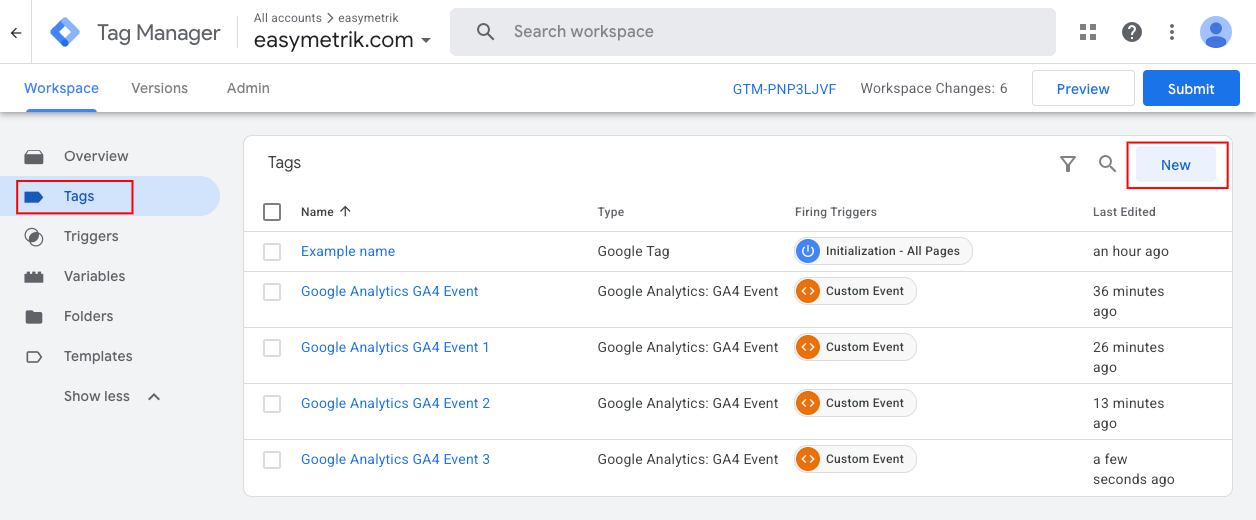
Add the appropriate ecommerce parameters.
Save the tag.
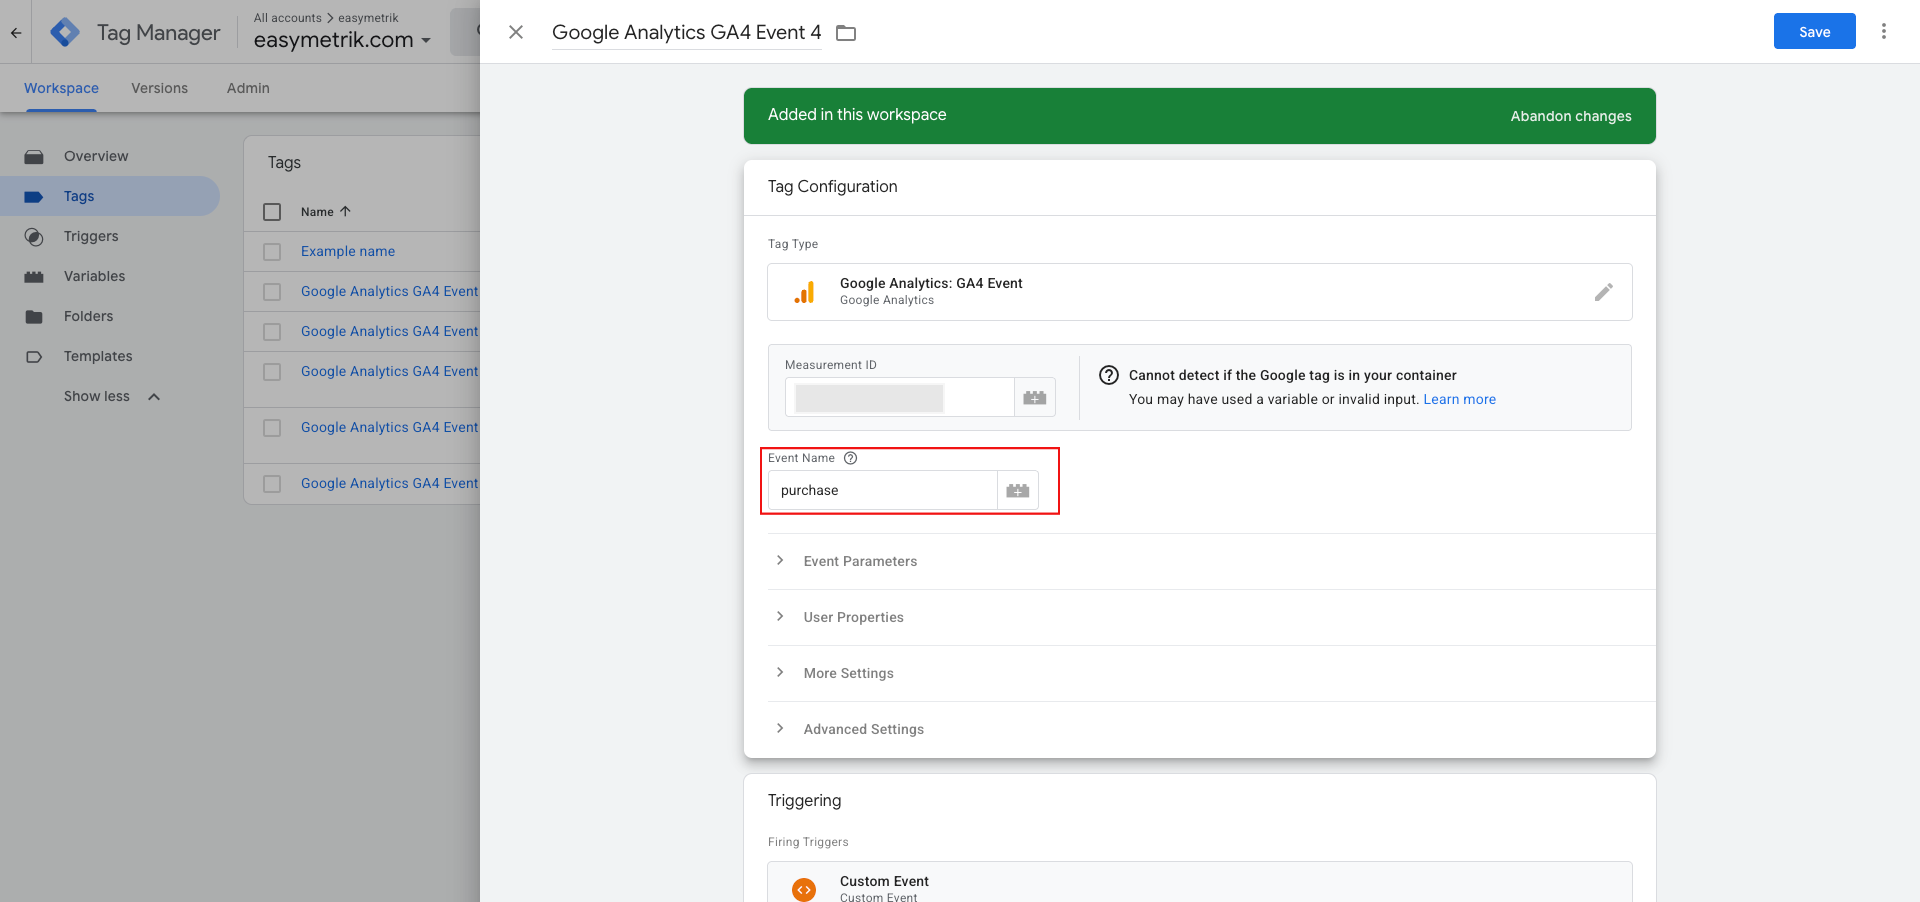
21. Create the GA4 Purchase Event
Now create the purchase tag.
Go to:
Tags → New → Google Analytics Event
Set:
Event Name:
purchase
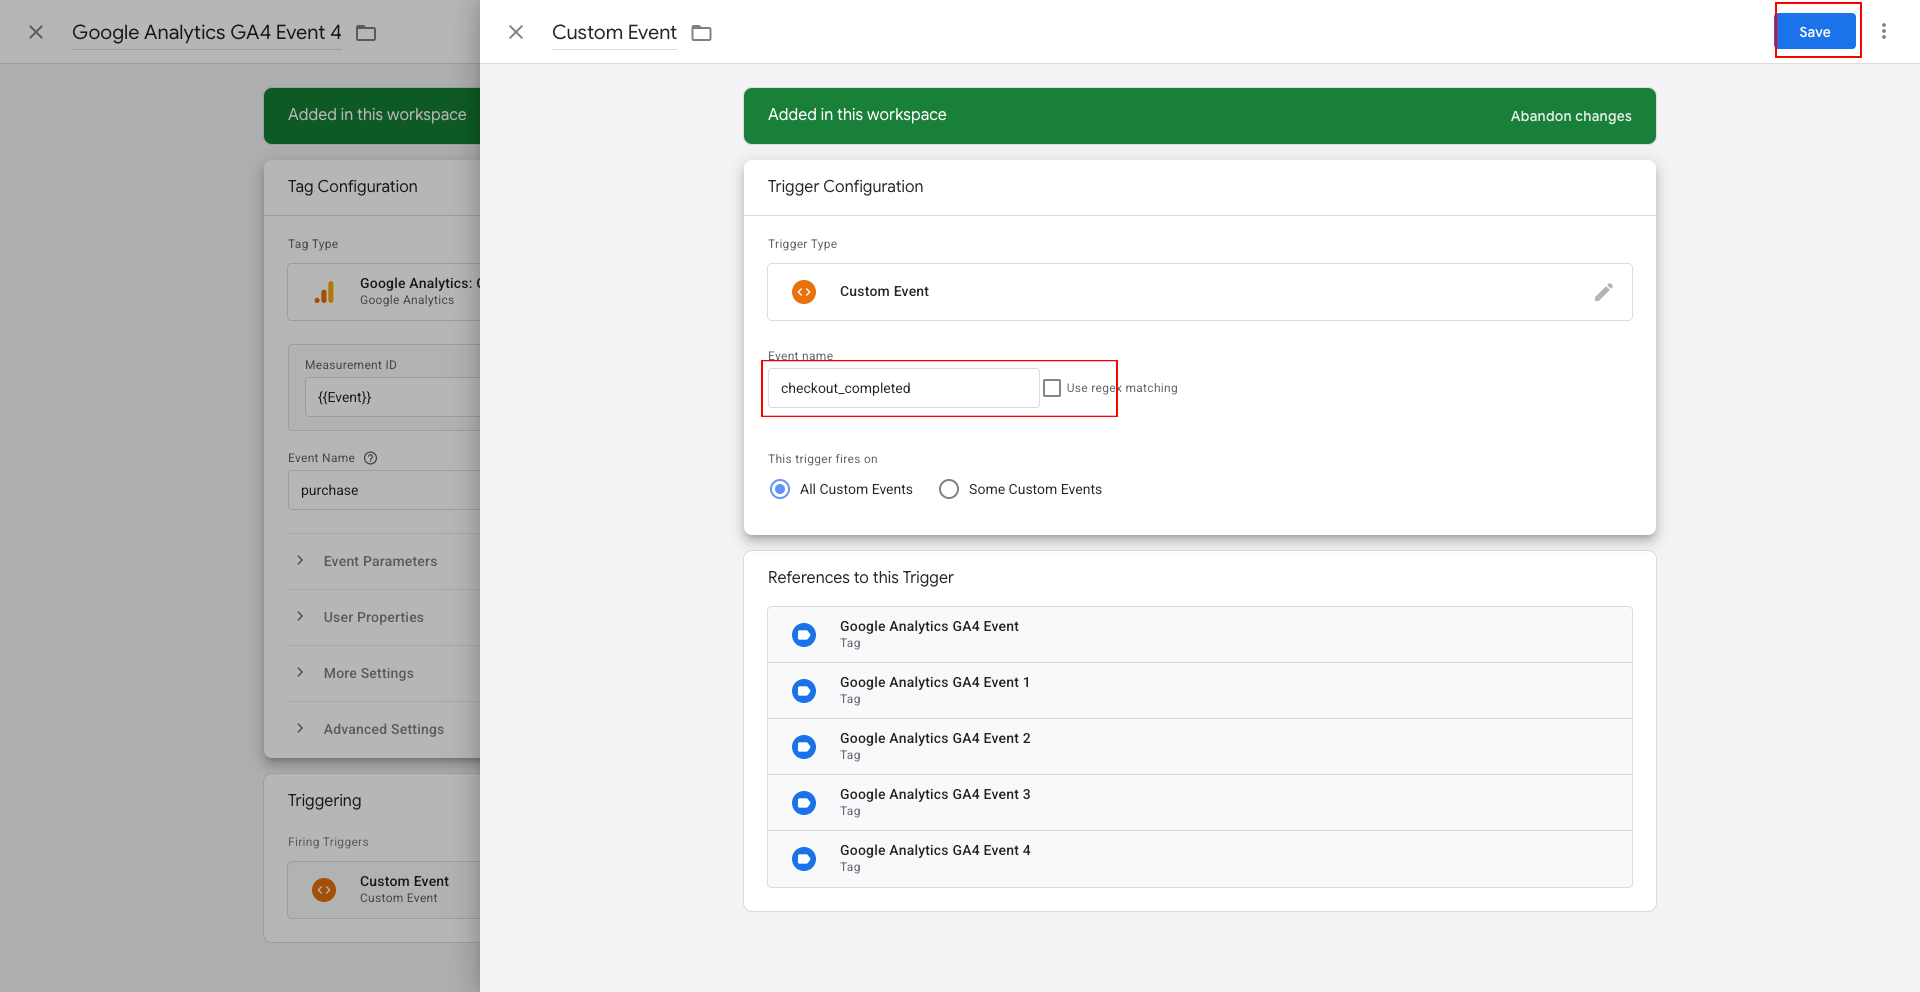
Create a Custom Event trigger:
Then create GTM Data Layer Variables for:
order_id
currency
value
tax
shipping
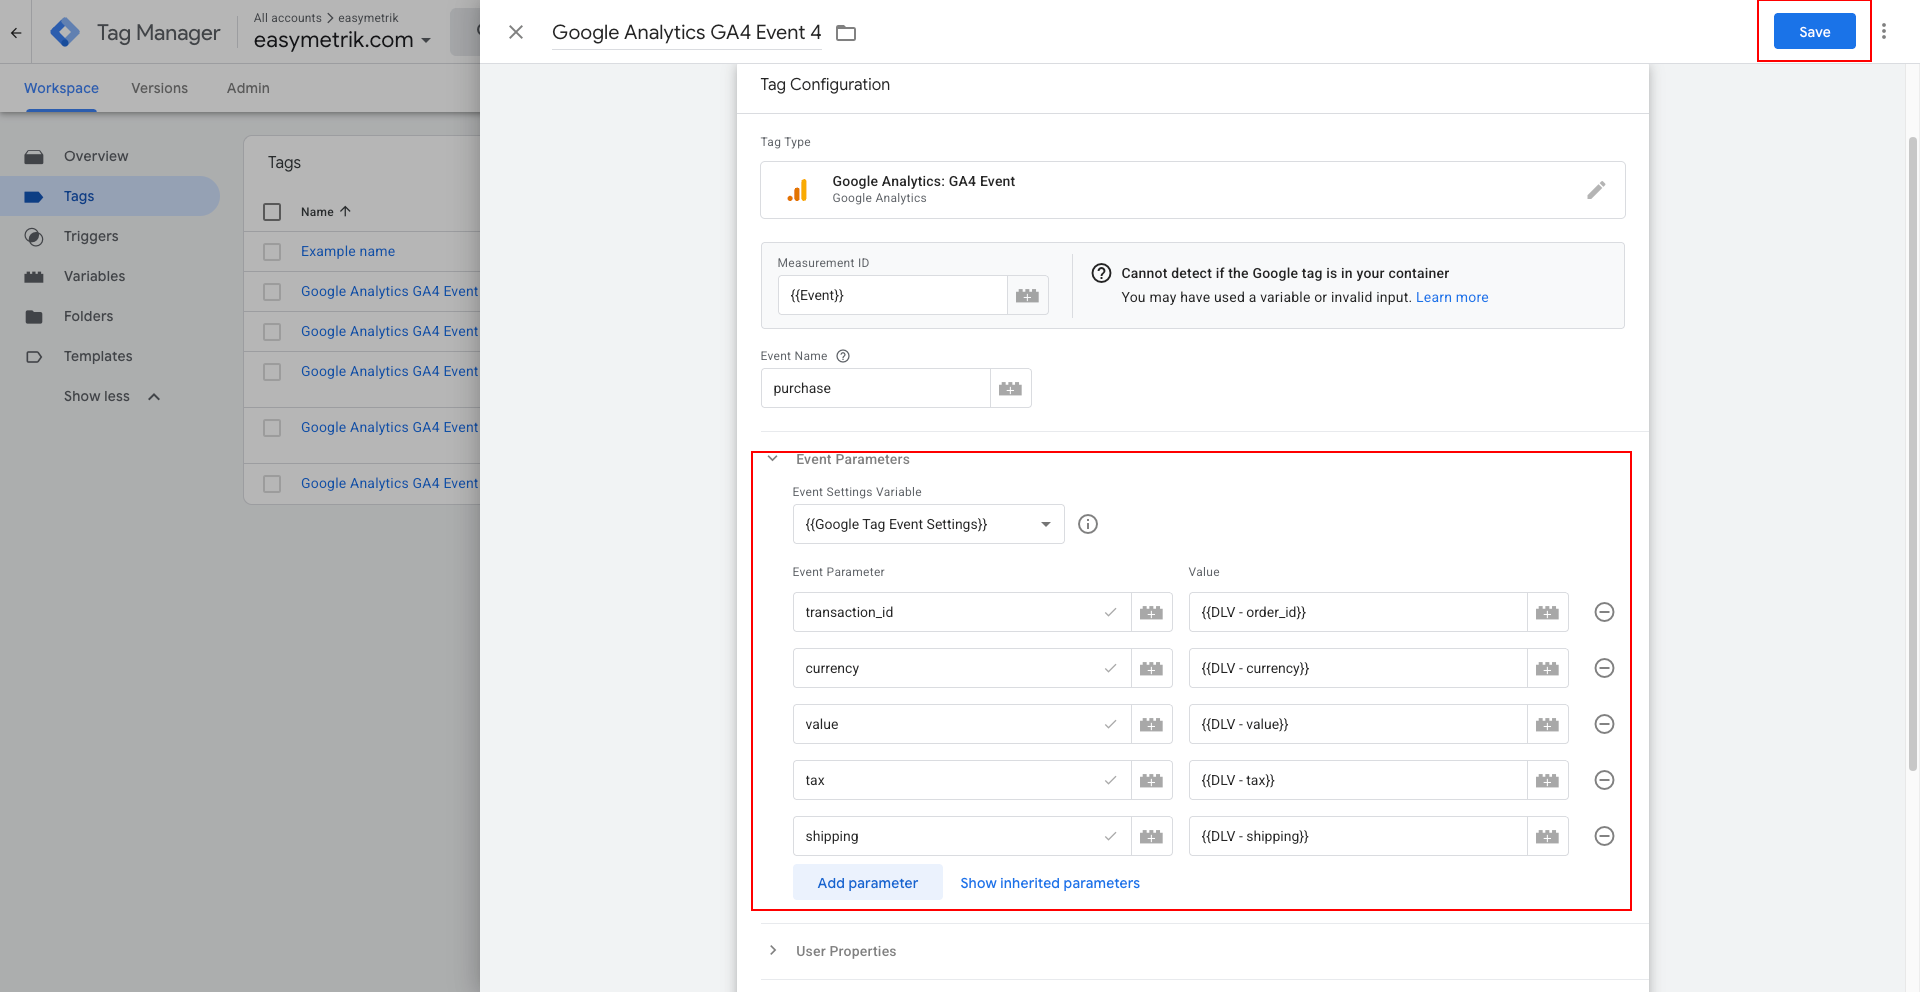
Map them to GA4 parameters:
| GA4 Parameter | Data Layer Variable |
|---|---|
transaction_id |
order_id |
currency |
currency |
value |
value |
tax |
tax |
shipping |
shipping |
Shopify’s documentation specifically shows the mapping of checkout data such as order ID, currency, total price, shipping, and tax into GA4 parameter names.
22. Configure the GA4 items Parameter
For complete ecommerce measurement, the items array is important.
GA4 ecommerce events use the items parameter to describe the products involved in an interaction.
For example:
{
  "items": [
    {
      "item_id": "SKU-1001",
      "item_name": "Example Product",
      "price": 49.99,
      "quantity": 2
    }
  ]
}
Your Shopify custom pixel implementation should provide the necessary product/line-item information.
Do not invent product values inside GTM.
The data should come from the actual Shopify event.
Google recommends sending ecommerce item information using the GA4 ecommerce event structure.
23. Test Browser-Side Tracking
Before moving to server-side tracking, test the web container.
In GTM:
Preview → Connect
Enter your Shopify store URL.
Open the store.
Then perform actions:
- Open a product.
- Add the product to cart.
- Open the cart.
- Start checkout.
- Complete a test purchase if available.
In GTM Preview mode, verify that events appear:
Then verify that the corresponding GA4 events fire:
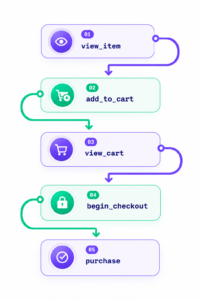
24. Test the Shopify Custom Pixel
Open the Shopify Pixel Helper.
Check whether the customer events are being added to the custom-pixel sandbox without errors.
Shopify specifically recommends Pixel Helper for testing GTM custom pixels.
You can also use Google Tag Assistant to inspect Google tags, although Google notes that Tag Assistant’s troubleshooting feature does not detect Google tags loaded inside a Shopify custom pixel.
25. Create a GTM Server Container
Now we’ll add server-side tracking.
Open Google Tag Manager.
Create a new container.
When selecting the target platform, choose:
Server
Give it a name such as:
Shopify GA4 Server Container
Google’s server-side tagging architecture uses both a web container and a server container.
26. Set Up the Server-Side GTM Hosting
A server container needs a cloud environment to receive requests.
Google’s server-side tagging documentation provides guidance for deploying a tagging server, including Google Cloud-based hosting options.
Follow the setup process provided by Google Tag Manager for your selected hosting method.
After deployment, you will receive a server container URL similar to:
https://gtm.example.com
Use your actual server container URL.
Do not use the example URL above.
27. Connect the Web Container to the Server Container
Now return to the GTM Web Container.
Open your Google tag.
Go to:
Configuration Settings
Add a new parameter:
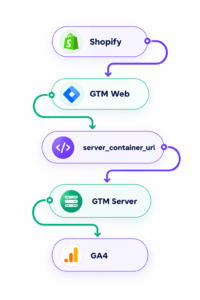
server_container_url
Set the value to your server container URL.
For example:
https://gtm.example.com
Google specifically documents server_container_url as the parameter used to route Google tag requests to a GTM server container.
The flow now becomes:
28. Configure the GA4 Client in the Server Container
Open the Server Container.
Go to:
Clients
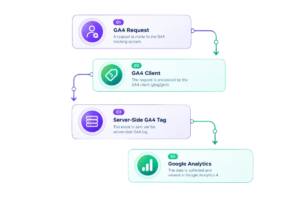
A GA4 Client is responsible for receiving and interpreting incoming GA4 requests.
Make sure the GA4 Client is configured and available to handle the incoming requests from your web container.
The server container receives HTTP requests from the web container and can process those requests before forwarding data to GA4.
29. Create a GA4 Server-Side Tag
Inside the Server Container:
Go to:
Tags → New
Select the GA4 tag/template available in your server container.
Configure the tag to send the incoming event data to your GA4 destination.
Set the measurement destination using your GA4 Measurement ID.
The basic flow is:
30. Configure the Server-Side Trigger
Create a trigger that allows the GA4 server-side tag to fire for the events you want to send.
For example, you may configure the server container to process incoming GA4 events and send them to the corresponding GA4 property.
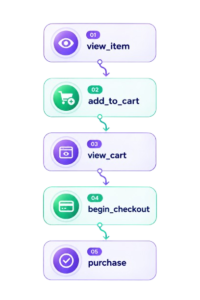
Start with the key ecommerce events:
Do not blindly forward every incoming request.
The server container can be used to validate and control which data is forwarded to destinations.
31. Configure Server-Side Purchase Tracking
The purchase event deserves special attention.
Your browser-side flow is:
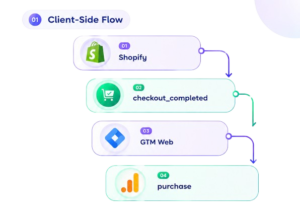
The server-side flow is:
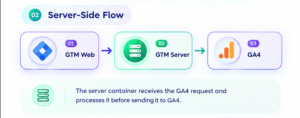
The server container receives the GA4 request and processes it before sending it to GA4.
Make sure the purchase request contains the correct:
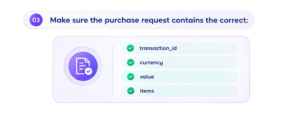
Do not change the transaction ID between the web and server layers.
32. Avoid Duplicate Purchase Tracking
This is one of the most important parts of the implementation.
A common mistake is to send:
Browser → GA4 → purchase
and then separately send:
Server → GA4 → purchase
for the exact same transaction without a clear deduplication strategy.
That can result in inaccurate ecommerce reporting.
For purchase measurement, use a consistent unique transaction ID.
For example:
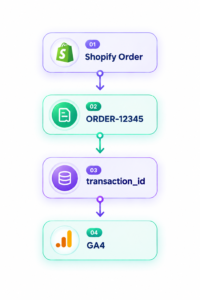
Google recommends using transaction IDs to minimize duplicate ecommerce key events.
33. Do Not Send Customer PII to GA4
Be careful with customer information.
Do not send unnecessary:
- Email addresses
- Phone numbers
- Full addresses
- Names
- Other personally identifiable information
through GA4 event parameters.
Shopify’s own GTM custom-pixel example contains customer fields for demonstration purposes, but that does not mean those fields should be passed directly into GA4. Review Google’s policies and your consent/privacy requirements before sending any customer data.
One benefit of server-side GTM is that the server container can be used to screen or modify incoming data before sending it to a destination.
34. Test Server-Side Tracking
Now test the server container.
Open:
GTM Server Container → Preview
Then visit your Shopify store.
Perform an ecommerce action.
For example:
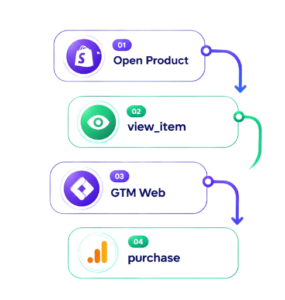
Check the server container preview to confirm that the request reaches the server container.
Then verify that the GA4 server-side tag fires.
35. Verify the Events in GA4
Open:
Google Analytics → Reports → Realtime
Perform an action on the Shopify store.
Check whether the event appears.
You can also use:
Admin/Configure → DebugView
when testing with an appropriate debug setup.
Check for:
Google recommends testing ecommerce event implementations and verifying that the expected event data reaches Analytics.
36. Troubleshooting: Events Are Not Appearing in GTM
If the event doesn’t appear in GTM Preview:
Check 1
Open Shopify’s Pixel Helper.
Check 2
Verify that the custom pixel is connected.
Check 3
Check the spelling of the Shopify event:
product_viewed
must exactly match the GTM Custom Event trigger.
Check 4
Check that the dataLayer.push() code is executing.
Check 5
Check for JavaScript errors.
37. Troubleshooting: GA4 Browser Events Are Missing
Check:
- Google tag exists
- Correct Measurement ID
- Correct event trigger
- Correct event name
- Correct Data Layer Variables
- GTM container is published
- Custom pixel is connected
Google’s GTM documentation states that event tags require the appropriate event trigger and parameters.
38. Troubleshooting: Server Container Is Not Receiving Requests
Check:
server_container_url- Server container deployment
- Server container URL
- DNS configuration
- Server container preview
- GA4 Client configuration
- Web container Google tag configuration
The Google tag must be configured to send requests to the server container using the server_container_url parameter.
39. Troubleshooting: Purchase Is Being Counted Twice
Check whether:
- Shopify’s native GA4 integration is also active
- Another GTM container is sending GA4 events
- A second GA4 tag exists
- Browser and server implementations both send the same purchase
- Multiple custom pixels are installed
- Old tracking code remains on the store
Shopify specifically warns that adding GA4 through GTM alongside its built-in GA4 integration can result in duplicate tracking.
Choose one deliberate architecture and document which system owns each event.
40. Publish the GTM Containers
Once testing is complete:
Web Container
Go to:
Submit → Publish
Add a version name such as:
GA4 Shopify Browser Tracking
Server Container
Publish the server container with a descriptive version name such as:
GA4 Server-Side Ecommerce Tracking
Do not publish untested tracking changes directly to production.
41. Final Testing Checklist
Before considering the implementation complete, test the complete customer journey.
Browser-Side GTM
- GTM Web Container installed
- Shopify custom pixel connected
-
dataLayerworking -
product_viewedfiring -
product_added_to_cartfiring -
cart_viewedfiring -
checkout_startedfiring -
checkout_completedfiring
GA4 Browser Events
-
view_item -
add_to_cart -
view_cart -
begin_checkout -
purchase
Server-Side GTM
- Server container created
- Server container deployed
- Server URL configured
-
server_container_urladded - GA4 Client configured
- Server-side GA4 tag configured
- Server-side trigger configured
Ecommerce Data
-
transaction_id -
currency -
value -
items -
tax -
shipping
Testing
- Shopify Pixel Helper checked
- GTM Web Preview checked
- GTM Server Preview checked
- GA4 Realtime checked
- GA4 DebugView checked
- Duplicate purchase events checked
42. Browser-Side vs Server-Side GTM: Final Architecture
After completing the setup, your tracking architecture should look like this:
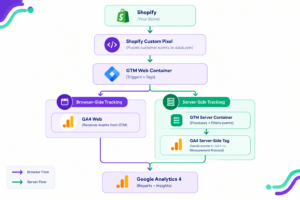
The exact implementation can vary depending on your Shopify setup and server-side infrastructure, but the key concept remains the same: the web container captures and dispatches the event, while the server container provides an additional processing layer before data is sent to GA4.
Conclusion
Setting up GA4 browser events and server-side ecommerce events using GTM on Shopify requires more than simply installing Google Tag Manager.
The implementation has several connected layers:
- Create GA4.
- Create the GTM Web Container.
- Add GTM to Shopify using a custom pixel.
- Subscribe to Shopify customer events.
- Push those events into the GTM dataLayer.
- Create GA4 event tags in the Web Container.
- Map Shopify events to GA4 ecommerce events.
- Test browser-side tracking.
- Create and deploy a GTM Server Container.
- Configure the Web Container to send requests to the server container.
- Configure the GA4 Client and server-side GA4 tag.
- Test server-side ecommerce events.
- Check transaction IDs and prevent duplicate purchases.
- Publish the containers after successful testing.
The most important part is consistency. Your Shopify events, GTM triggers, GA4 event names, ecommerce parameters, and server-side implementation must all work together.
A correctly structured implementation gives you a clear measurement path from the Shopify storefront through GTM and into GA4 while giving you greater control over how data is processed before it reaches the analytics platform.